
guitars my wife and kids.
Understanding the plight of cash-strapped networking guys the world over, Arista has released a virtual-machine-ready version of their fabulous switch operating system, EOS. Currently this is only available to existing Arista customers, so see your Arista sales rep to get a copy. Please don’t ask me for a copy, since I will not send you a copy no matter how much you beg. Arista has hinted that they may release this into the general population, in which case I may build a Virtual Box appliance to share. Until then, you’ll need to read on and build it yourself.
Equipment Used
I’ve built this lab using my Macbook Pro that has an Intel i7 processor with 16GB of RAM. The OS in use is Mountain Lion (OSX v10.7.5). I’m using VirtualBox for Mac v4.2.1 (r80871), and vEOS v 4.10.2. I’ve configured each VM to have one CPU, and 1GB of RAM. Real Arista switches ship with at least 4GB of RAM, but this is a lab after all, so 1GB should be fine. You can further tune them down to 512MB each, and they’ll run, but they’ll have little (if any) free memory. If you’ve got the RAM, I’d stick to 1GB for each VM.
Virtual machines are possible using a variety of tools, so why did I choose VirtualBox? Mainly because it’s free, and this way anyone with access to the vEOS files would be able to follow along. Also because it’s available on many host operating systems. Did I mention that it’s free? I love free things, especially when they’re useful!
Using the lab as shown requires that you have a clue about linux, because I will not go into detail about installing it. You can build it without the Linux server if you’d like, and the switches will still work. The Linux server adds useful functionality for things like uploading code, learning ZTP, and so-on.
The Network We’ll Build
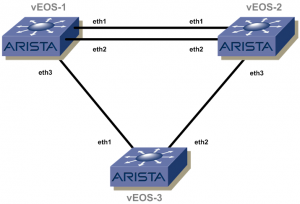
The virtual Arista switches have 1Gbps Management interfaces, while all the other interfaces are 10Gbps. Whether or not they can actually deliver that speed is unimportant to me – I just wanted to make sure that all of the interfaces used for inter-switch links were the same. Additionally, I had another driver for keeping the management interfaces separate.
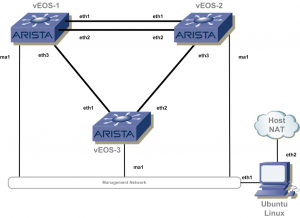
I’ve structured the lab in such a way that the links between each switch act like physical cables (Separate internal Networks in VirtualBox), but the network connecting the management interfaces to the Ubuntu Linux server are on a common shared (host-only) network . Lastly, I’ve configured the Linux box to have access to the outside world by having one of its network interfaces configured as a NAT interface in virtual box. Given this design, code, extensions, and anything else you’d like can be downloaded from the Internet to the Linux box, then the virtual switches can retrieve it from there. The virtual switches cannot get outside of the virtual lab, so you should be able to abuse them in any way imaginable without fear of corrupting the networks outside of your computer.
Enough Blather, Let’s get to It!
The first thing you’ll need to do is download and install Oracle’s Virtual box. You can get it for your OS here: https://www.virtualbox.org. You’ll also need the Arista vEOS files, which you can get from Arista if you’re an existing customer.
There are actually two Arista files that are needed: the virtual hard drive, which is in the .vmdk cross-platform format (works with any VM software that supports it), and the Aboot ISO file, which is specific to each VM platform. The source I got from Arista included files for VirtualBox, VMWare, HyperV, and QEMU. The files I’ll be using are as follows. Of course the file names may change depending on the EOS and Aboot releases:
Aboot-veos-virtualbox-2.0.6.iso EOS-4.10.2-veos.vmdkFind the location where VirtualBox will place the VMs, create a folder there, and put both of these files in that folder. On my Mac, I’ve placed them into Users/GAD/VirtualBox VMs/AristaFiles/. The reason for this will make sense in a minute.
Build a Base VM
Because of the way VirtualBox seems to work, and because of my obsessive nature, we’ll build a base VM, then clone it three times. This will create three VMs, each with its own folder, and each having its own virtual disk. This will be of use should we ever decide to upgrade the image in the future, as it will allow each switch to run separate versions.
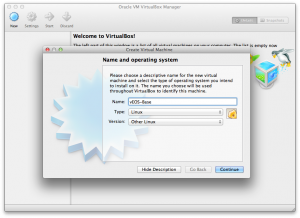
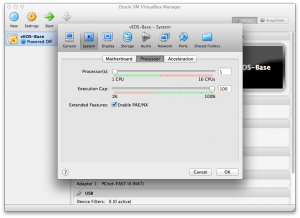
You should now choose how much memory to allocate for the VM. I’ve used 1024MB on all VMs. I’ve successfully created them with as little as 512MB, but they had little to no free memory, so I’d recommend 1024MB or more. Remember that whatever you choose will be replicated three times, so in my case with a 1024MB VM, I will end up consuming 3GB of RAM with the Arista vEOS VMs alone. Once you’ve specified the memory size, click continue, which should bring you to the hard drive screen.
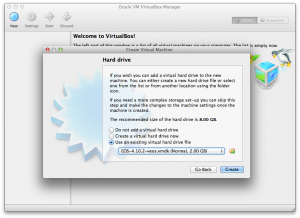
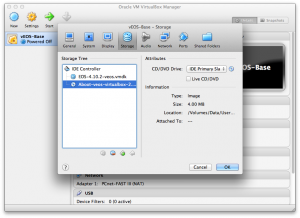
vEOS is very particular about how its storage is configured. The virtual hard drive we already added should be where it belongs, but we need to add the Aboot image for the VM to boot. Aboot is the (very cool) boot loader used on Arista switches, and it needs to be installed as a CD, but it must be configured on the IDE Primary Slave on the first (usually only) IDE controller. If a SCSI controller gets created, it must be deleted or vEOS will not load.
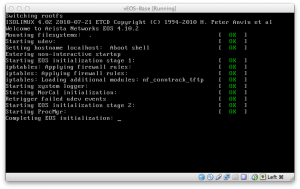
Once the VM boots, you can log in using the admin username. This switch will have only one interface – Management1, which you can configure if you really want to, but for now let’s keep it simple since this isn’t really our end-state anyway. Feel free to power it off and we’ll move on to the cloning process.
Cloning the VMs.
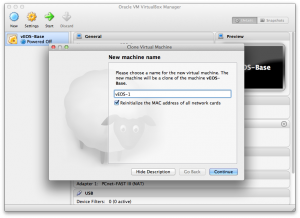
Do this step three times, naming the new VMs vEOS-1, vEOS-2 and vEOS-3. At this point, you should have four VMs, including the original vEOS-Base VM. The difference is that each of the clones has its own .vmdk file, while the original points to the .vmdk file in the Arista Files folder. The Aboot image points to the Arista Files folder in each VM, but this is a read-only ISO, so that’s OK. If you’d like to change this, copy the Aboot image to each of the VM folders and then change where the image links in the Settings/Storage page for each VM.
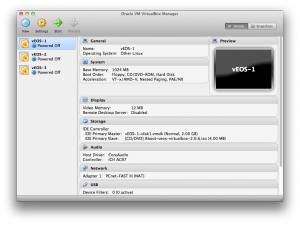
At this point, go ahead and create the Ubuntu Linux VM. You can use any Linux you want, actually, and I won’t go into the details of installing that because it should be pretty straightforward. I recommend that you download and install the server version (https://www.ubuntu.com/download/server) since it’s smaller than the desktop version. After that’s done, it’s time to build the networks.
Building the Virtual Networks
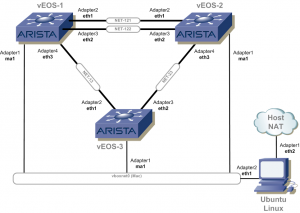
The management network is shared, so each switch can see every other switch, as well as the Ubuntu Linux VM on this network. This is done because the Management interfaces are routed, and so that each switch can get to the Ubuntu Linux server in the same way.
Lastly, the Ubuntu Linux server also has a NAT interface, which allows it to connect to the Internet through the host operating system (in my case, Mac OSX). Let’s go ahead and build those networks now.
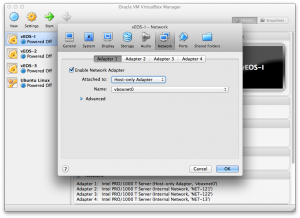
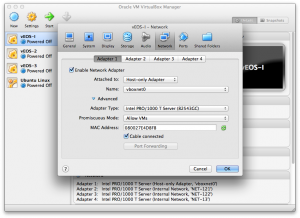
The next option is Promiscuous Mode, and this must be set to Allow VMs or Allow All. I have all of mine set to Allow VMs. Lastly, The checkbox for Cable Connected should be checked.
Next, configure Adapter2 on the Ubuntu Linux VM to be attached to NAT. There are no other options. When this is done, the VM configuration for the Ubuntu Linux VM is complete (though we’ll still need to configure the OS with IP addresses later on).
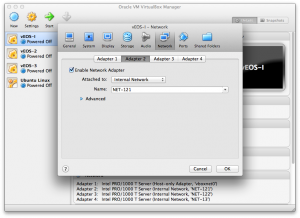
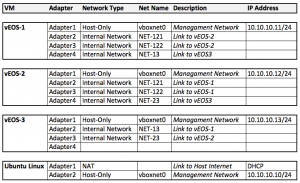
Look at the network drawing at the beginning of this section. This drawing shows where each adapter is, what network it’s configured for, and how the VMs are interconnected. Looking at vEOS-1, we can see that Adapter2 translates to Eth1, which connects to vEOS-2 on Eth1, and the physical cable is represented as NET-121. To configure this, go into Settings, Network for vEOS-1, and choose Adapter2. Make sure the interface is enabled, choose Internal Network from the Attached to pulldown, then enter NET-121 in the Name field. Remember to click the advanced section and set the adapter type to PCnet-FAST III, Promiscuous Mode to Allow VMs and check checkbox for Cable Connected.
vEOS-1#sho lldp nei
Last table change time   : 0:01:41 ago
Number of table inserts  : 5
Number of table deletes  : 0
Number of table drops    : 0
Number of table age-outs : 0

Port      Neighbor Device ID             Neighbor Port ID           TTL
Et1       vEOS-2                         Ethernet1                  120
Et2       vEOS-2                         Ethernet2                  120
Et3       vEOS-3                         Ethernet1                  120
Ma1       vEOS-2                         Management1                120
Ma1       vEOS-3                         Management1                120
Here’s the output from the show spanning-tree command on vEOS-1:
vEOS-1#sho spanning-tree
MST0
  Spanning tree enabled protocol mstp
  Root ID    Priority    32768
             Address     0800.27e4.d8fb
             This bridge is the root

  Bridge ID  Priority    32768  (priority 32768 sys-id-ext 0)
             Address     0800.27e4.d8fb
             Hello Time  2.000 sec  Max Age 20 sec  Forward Delay 15 sec

Interface        Role       State      Cost      Prio.Nbr Type
---------------- ---------- ---------- --------- -------- --------------------
Et1              designated forwarding 2000      128.1    P2p
Et2              designated forwarding 2000      128.2    P2p
Et3              designated forwarding 2000      128.3    P2p
The Final Touches
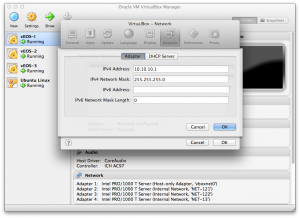
The last thing to do to make this lab really useful is to assign IP addresses to the management interfaces (see the spreadsheet in the previous section for how I have mine configured), and the Ubuntu Linux server. To set the Ubuntu Linux server, edit the /etc/network/interfaces file with the sudo vi /etc/network/interfaces command (You can use vi right?) and make sure the following is included in the file:
auto eth0
iface eth0 inet dhcp

auto eth1
iface eth1 inet static
address 10.10.10.10
netmask 255.255.255.0
network 10.10.10.0
broadcast 10.10.10.255
Save the file and issue the sudo /etc/init.d/networking restart command. At this point, you should be able to ping every VM from every other VM using the management network.
arista@Ubuntu:/etc/network$ ping -c 5 10.10.10.11
PING 10.10.10.11 (10.10.10.11) 56(84) bytes of data.
64 bytes from 10.10.10.11: icmp_req=1 ttl=64 time=0.287 ms
64 bytes from 10.10.10.11: icmp_req=2 ttl=64 time=3.15 ms
64 bytes from 10.10.10.11: icmp_req=3 ttl=64 time=0.624 ms
64 bytes from 10.10.10.11: icmp_req=4 ttl=64 time=0.524 ms
64 bytes from 10.10.10.11: icmp_req=5 ttl=64 time=0.416 ms

--- 10.10.10.11 ping statistics ---
5 packets transmitted, 5 received, 0% packet loss, time 4013ms
rtt min/avg/max/mdev = 0.287/1.001/3.155/1.082 ms
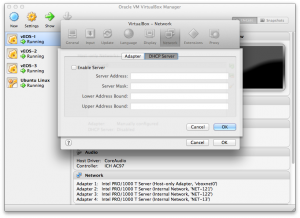
Here’s one more cool benefit of the way we’ve built this lab. Add the user arista with the password arista to every device. On the vEOS machines, use the following exec mode command:
vEOS-1#conf t
vEOS-1(config)#username arista privilege 15 secret arista
vEOS-1(config)#wri
On the Ubuntu Linux machine, use this command:
sudo useradd -b /home/arista -m -p arista arista
Once the usernames have been added to each device, you can use your favorite SSH client to connect to each VM, including the Ubuntu Linux machine. This is cool because though you can do everything from the console of each VM, using the console sucks compared to the power of a full-featured SSH client like Secure-CRT. At this point, the Lab is complete, and you can abuse it to your heart’s content. Congratulations!
Troubleshooting
Sometimes, no matter how careful we are, things just don’t work right. Here are some common errors and problems I’ve seen while building and endlessly rebuilding this lab.
FATAL: No bootable medium found! System Halted
This error means that the VM cannot find the Aboot ISO file, or the file is corrupted.
VM hangs at Starting new kernel forever
This is indicative of the VM being unable to find the virtual hard disk (.vmdk) file. Check your storage settings and make sure the .vmdk for that VM exists.
VM is slooooow
If it’s working, but it’s really slow, try giving the VM more memory. If you’ve only got 4GB of RAM in your machine, this lab will probably not run very well, so you might just have to live with it. Ideally, this lab needs a minimum of 4 CPUs and 4GB of RAM.
Conclusion
I hope this helps people who need an Arista lab. I know it’s helped me quite a bit. I might even be inclined to write up some lessons using this lab, so stay tuned and enjoy my other ramblings while you wait.
Donate: PayPal Crypto:
ETH: 0x0AC57f8e0A49dc06Ed4f7926d169342ec4FCd461
Doge: DFWpLqMr6QF67t4wRzvTtNd8UDwjGTQBGs

I just noticed you wrote this up a week before I did something similar on EOS central https://eos.aristanetworks.com/2012/11/veos-and-virtualbox/
I like the detail you’ve provided – looks like we ran into some of the same things – and adding the Ubuntu VM is a good idea. Thanks for posting this!
Ed
Hi GAD – there is no longer a -virtualbox iso image for Aboot, and also no vEOS README that I could see. I’ve tried this procedure with the Aboot iso that doesn’t have a hypervisor name, and the bootloader complains that “No SWI specified in /mnt/flash/config” which is probably true, since /mnt/flash doesn’t exist… any clues on where to go next?
Obviously as soon as I posted, I spotted it – Virtualbox defaults to creating a SATA hard disk. Moving the vmdk to the IDE controller as IDE Master and deleting the SATA controller got me going (the SCSI comment tipped me off).
How did you get a copy of the EOS image?
I tried arista website, but no go. I need to be a customer.
Until Arista re-licenses the vEOS image, you must be a customer to get a copy.
FYI – Virtualbox allows more than four NICs, but beyond four you have to start using the CLI tools to enable them. I have Juniper Olives going with 8+ interfaces in Virtualbox right now.
As an example, here is the config I use for my Olives:
https://pastie.org/pastes/8175961/text
Thanks for the great article – trying out vEOS right now!
Figured I’d post an update. My vEOS lab is working flawlessly. A couple things of interest:
1) The Aboot .iso no longer contains the word “virtualbox”. Arista has made it so that one boot loader works for all platforms. Eg. my boot loader file is Aboot-veos-2.0.8.iso
2) I have made a custom NIC “script”. Available here: https://pastie.org/pastes/8176245/text (I like customizing MAC addresses on interfaces to be meaningful – really helps when it comes to troubleshooting lab environments).
3) You can start/stop your VMs without loading up Virtualbox or filling up your dock with icons. Use these:
VBoxManage startvm “vEOS-1” –type headless
VBoxManage controlvm “vEOS-1” poweroff
Thanks for the awesome write-up!
Excellent write-up! I ran into one problem that was driving me crazy. After first creating vEOS-Base, my VM was hanging at ‘Starting new kernel’. I thought I had followed your tutorial perfectly. It turns out that my PC’s BIOS has its virtualization features disabled by default. I believe that feature is needed to support a 64-bit VM, which includes the vEOS VM. Once I enabled virtualization in the BIOS, things worked perfectly.
My PC is an HP 8470p with 8 GB RAM, Ubuntu 12.04 Desktop as the host OS, VirtualBox downloaded straight from Ubuntu Software Center, Aboot 2.0.8, and the vEOS 4.2.12.4 vmdk.
Thanks for the expert tutorial.
Nice documentation. Thank you for making my first steps with vEOS a little bit easier. I stumbled upon the storage configuration.