 If you’ve read any of my posts or even books, then it should come as no surprise to find that I am an immense nerd. As a nerd, I find anything having to do with technology or engineering to be quite fascinating, and to that end I got myself a 3D printer. As a guitar-playing nerd, one of the first things I wanted to print was a guitar.
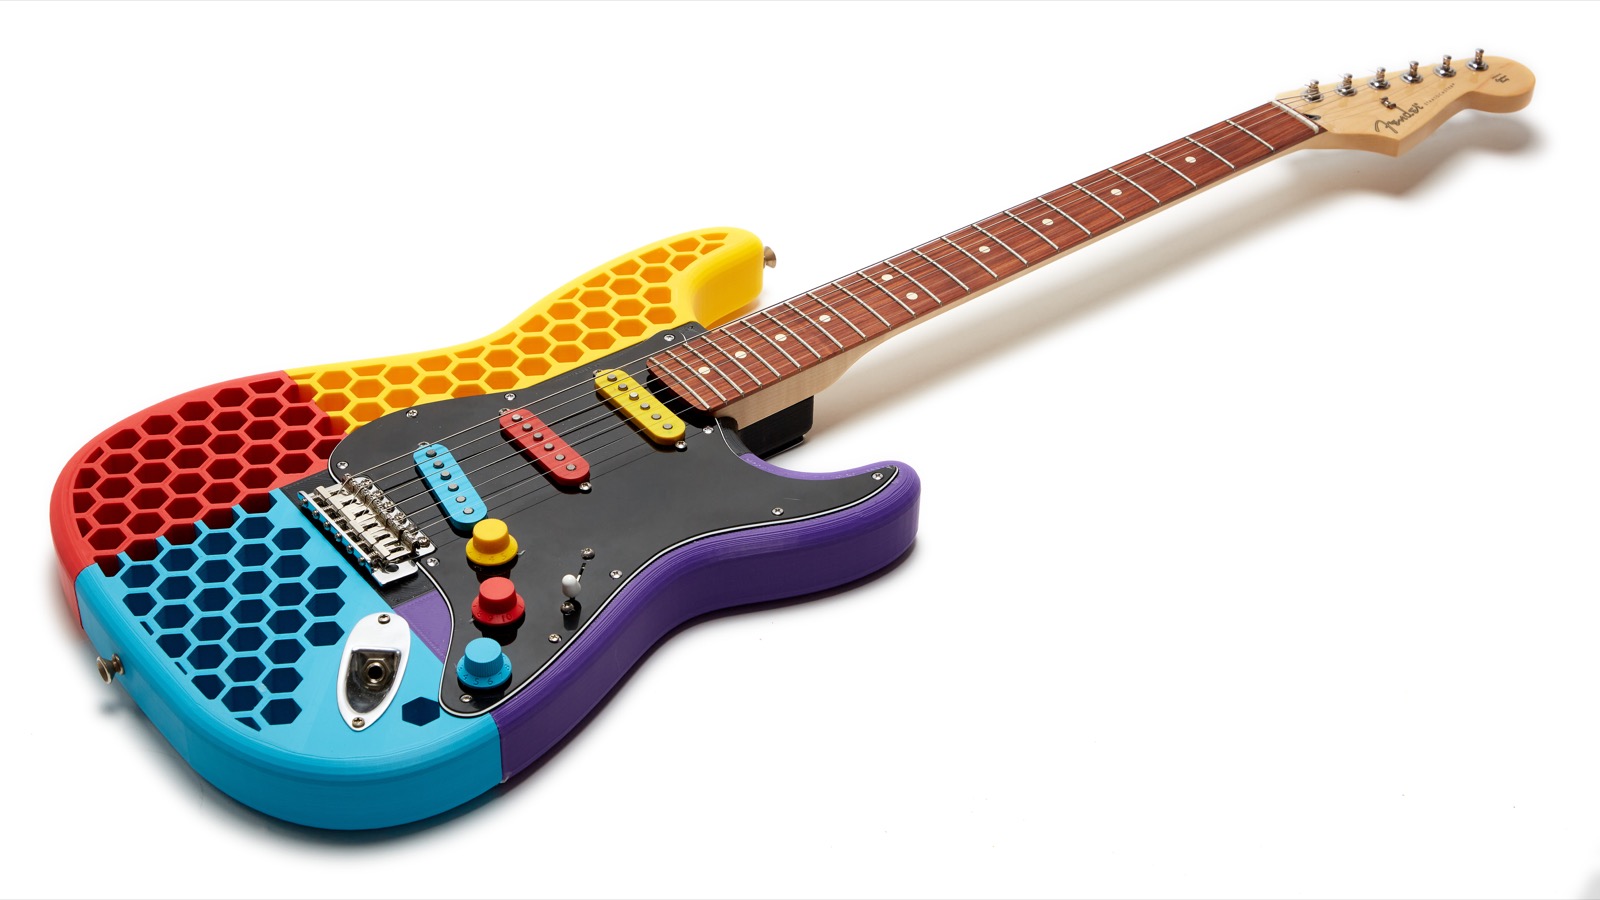
Clearly I did just that, but does it play well? And how’s it sound? Read on while I take you through all the details of how I 3D printed this colorful and very ’80s looking plastic Strat that — spoiler alert — plays and sounds just like a Strat!
Why Print a Guitar?
 Why not? Seriously, though, I love guitars and I love technology and I thought that this would be a fun challenge for me. I love to make things and thought that a 3D printed guitar would be a pretty cool conversation piece, and let me tell you: it absolutely is. Everyone who sees it is blown away by it, and the #1 question I get is, “does it work?” It sure does!
A lot of people buy 3D printers and end up printing nothing but useless trinkets only to discover that 3D printing is not quite the Star Trek replicator solution that they thought it was. While I’ve certainly printed some useless stuff, I had bigger things in mind.
Then SARS-CoV-2 happened.
A Quick Aside
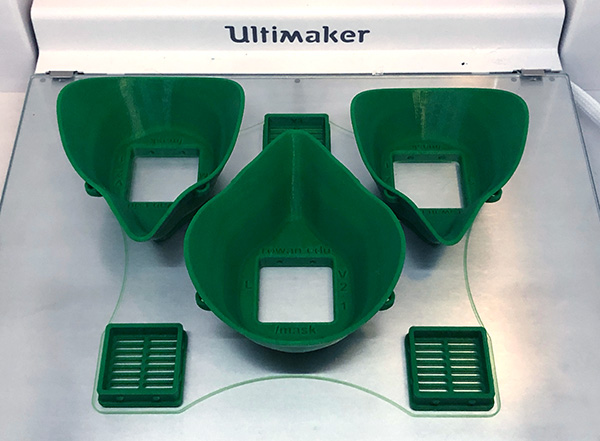
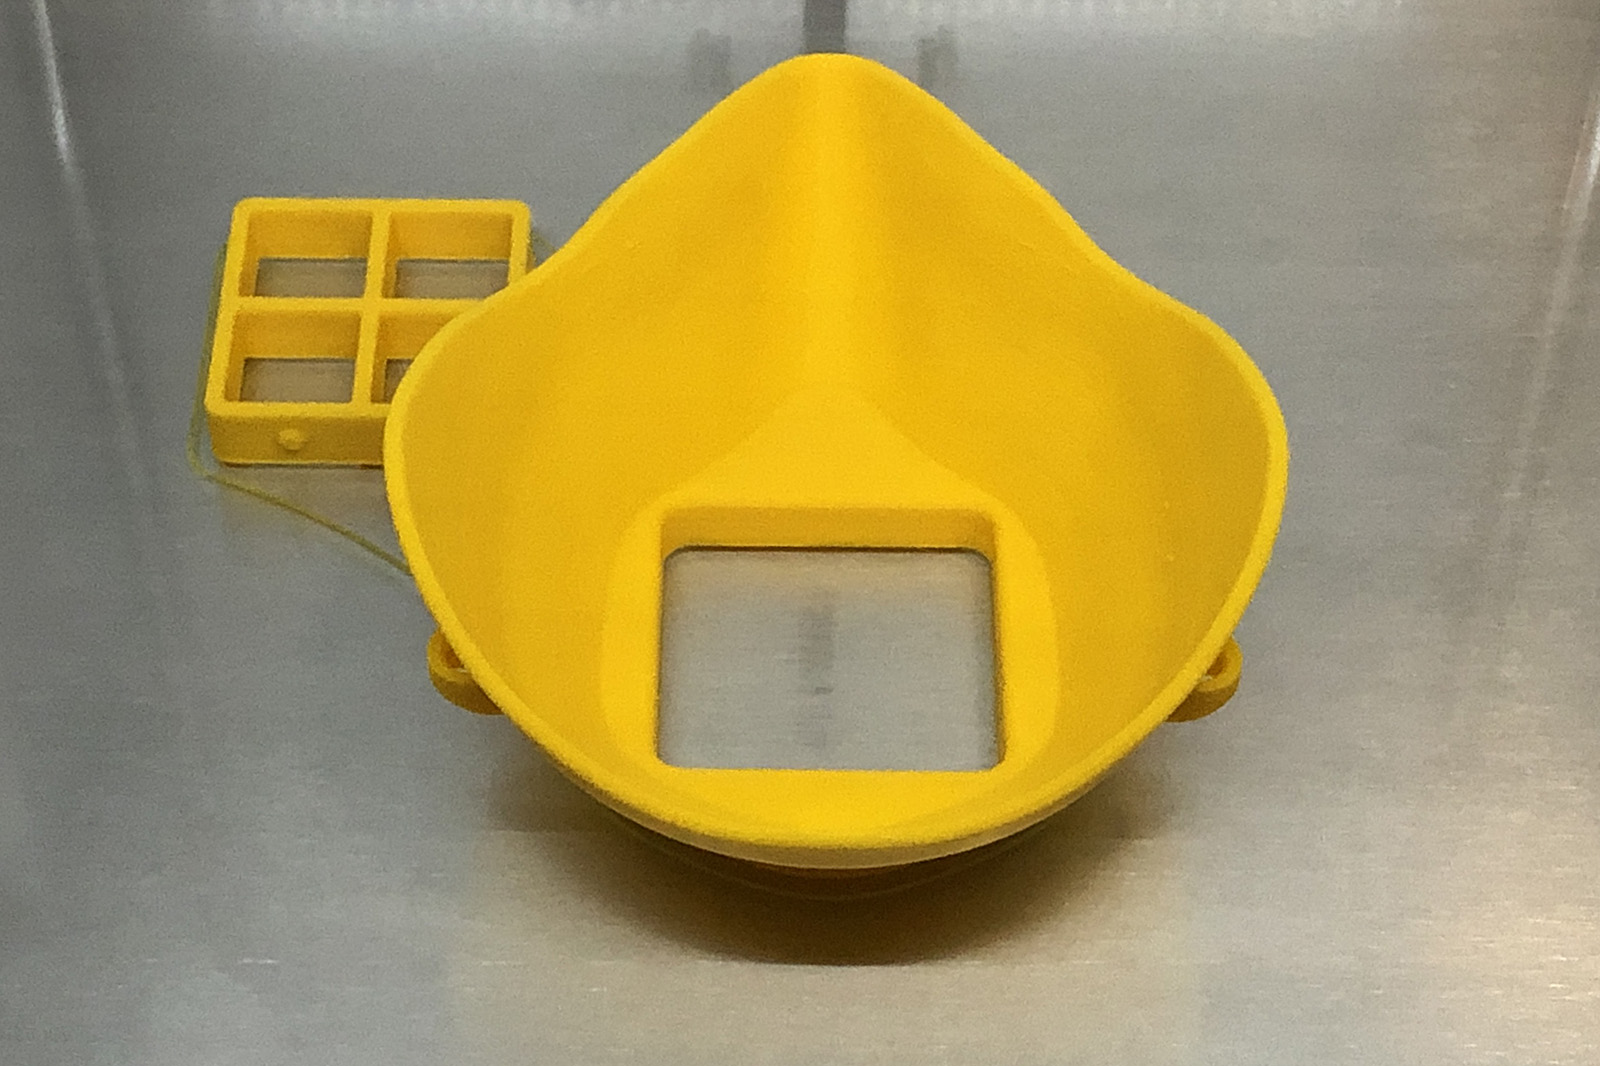 This guitar was finished almost two months ago before things got weird. As I put the finishing touches on this article, I find myself three weeks into the 2020 Coronavirus Covid-19 social isolation event where keeping busy means continued sanity. Between work and writing I manage to keep myself busy which really means avoiding everyone else in the house because they’re all crazy. I am now also using the 3D printer to print Personal Protective Equipment (PPE) for local doctors and hospitals in need. For example, this one (source) was printed for a local pediatrician where having a mask that makes someone looks kind of like a duck isn’t such a bad thing. Here are three more of the updated design that come in different sizes. If you have a 3D printer and you’d like to help, check out the MatterHackers Covid-19 Maker Response Hub. If you’re reading this in the future, thanks for reading and please send me stock quotes and sports scores, assuming that stocks, sports, and US Dollars still exist in your time.
The Goal
 Well, obviously the goal was to 3D print a guitar, but what kind? How much money should I spend? What color should it be?
I decided early on that the guitar would be an existing design because while I love technology, I’m not a 3D architect by any stretch, and the software I know how to use is limited to Cura (the slicer) and TinkerCad, a simple free online Computer Aided Design (CAD) tool.
I decided that if I wanted the guitar to be useful, then a Fender-type design was best because if there’s one thing Leo Fender did well, it was make killer guitars that could be bolted together from parts. Along those lines I also decided that I would be using a wooden neck and not 3D-printing that part of the guitar. The neck is the kind of the soul of the guitar, and buying one off the shelf just seemed like the way to go.
Anything metal would be purchased or used from my spare parts bin. Anything plastic, I would print. My goal was to keep this inexpensive, which is honestly something I’m not very good at, an observation that I once again confirmed by the end of the project.
The Printer
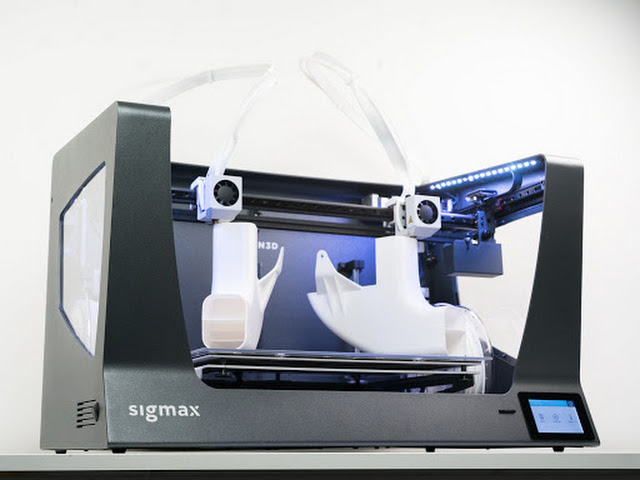
 I started this journey with a BCN3d Sigma printer. It was cool, but it had some limitations and I wanted something bigger in part because of this guitar printing project, so I returned it and traded up for the BCN3D Sigmax. That turned out to be a disaster for various reasons including what I consider to be some bad hardware design decisions by BCN3d. Thanks to MatterHackers where I bought the printer, I opened a support case with BCN3D and got the printer returned for a full refund after which I just sucked it up and bought an Ultimaker S5. At the start of the project I had more money than brains. Luckily the purchase of this printer has solved that problem.
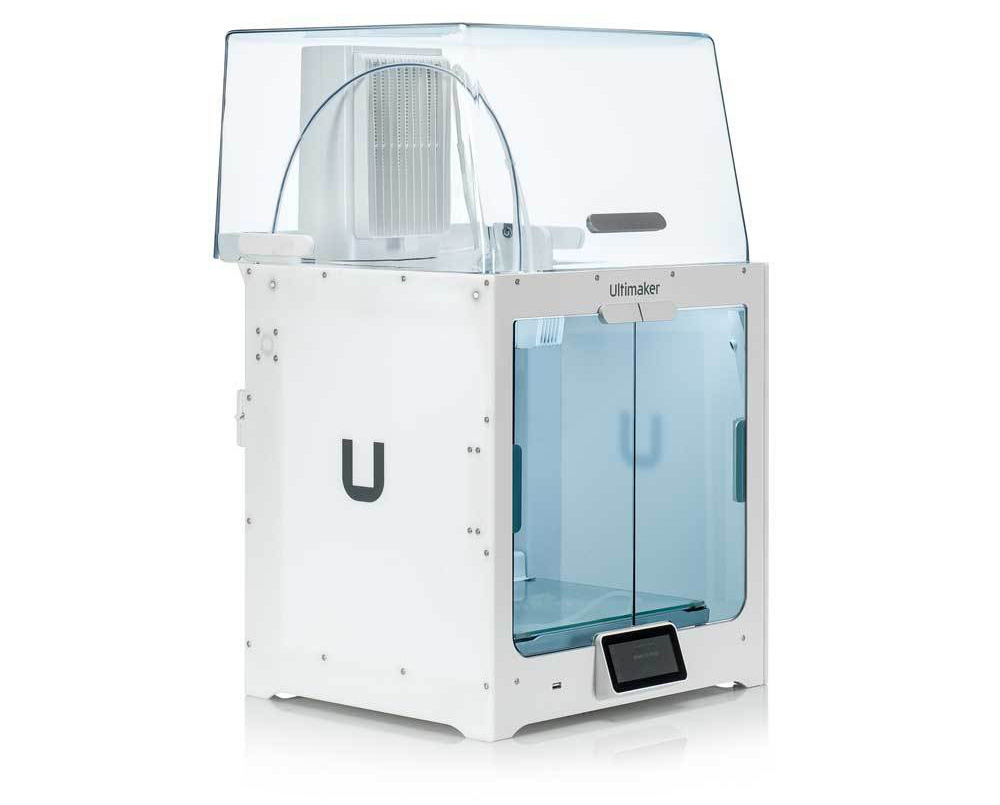 I needed a dual-extrusion printer so that I could easily print support material, and I wanted the larger build volume in order to print things like a guitar. The Sigmax would have been the perfect machine if it actually worked the way it should, but I have to say that the Ultimaker is an absolute beast and I’m very happy with it, which I should be given the price. I mean, damn. Oh, and after almost gassing myself out of my home office with it printing for 19 hours at a time, I went and got the HEPA-filtered fume hood as shown in the picture.
No, this is not your run of the mill home printer, but the only thing this printer is really giving me for this project is build volume which translates to the ability to printer larger parts. I didn’t even end up using the dual extrusion capability for this project, though I use it all the time for others.
The Filament
 The filament that most people use, is called PLA for short. If you ever seen a demonstration of 3D printing or someone handed you a 3D printed part, there’s a good chance that the part was printed using PLA. PLA is great for a lot of reasons, not the least of which is the wide variety of available colors, but if you want something to be rigid and not flex under stress, it may not be the best solution. Since a guitar is under constant stress imparted by the strings, I thought that PLA may not be the best solution.
I’m not going to bore you with my reasons for not using Acrylonitrile Butadiene Styrene (ABS), but I did use something called Tough PLA.
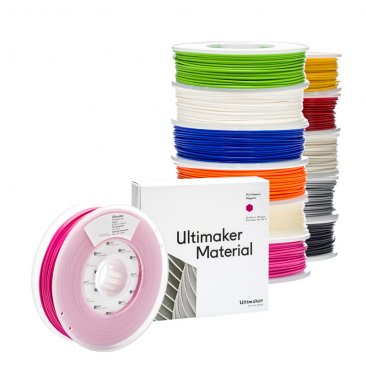
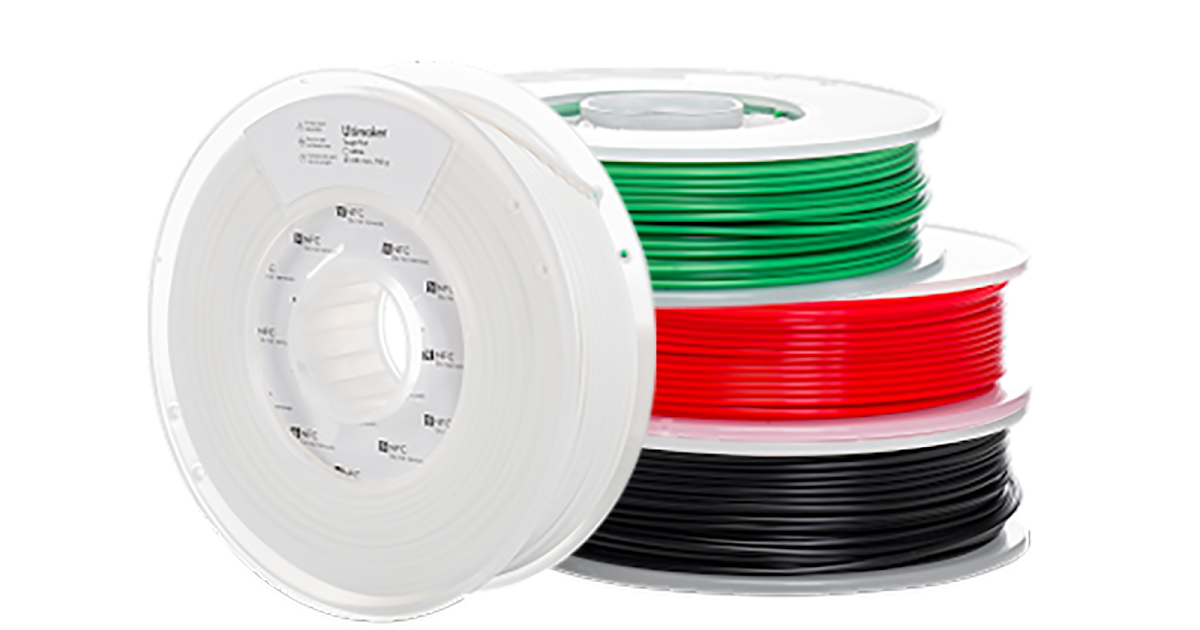 Ultimaker, the company that makes my 3D printer, also makes a special filament called Tough PLA which they advertise as, combining the easy printing of PLA with the impact resistance and stiffness of ABS. Tough PLA is a very cool development in the world of 3D printing but its limitation, at least here in early 2020, is that it’s only available is a small set of colors. From Ultimaker, those colors are white, green, red, and black. While companies like MatterHackers have a wider variety in their similar Pro PLA, I originally wanted to keep the filament to the Ultimaker brand in an effort to maximize the potential for success. In the end I used Ultimaker Tough PLA for the center piece and MatterHackers Pro PLA for the rest.
If I were to do this again I would entertain other polymers such at PETG but MatterHackers didn’t have it in yellow when I was looking. Honestly, though, after completing the project I am pretty happy with the results in regular old PLA.
The Guitar Model
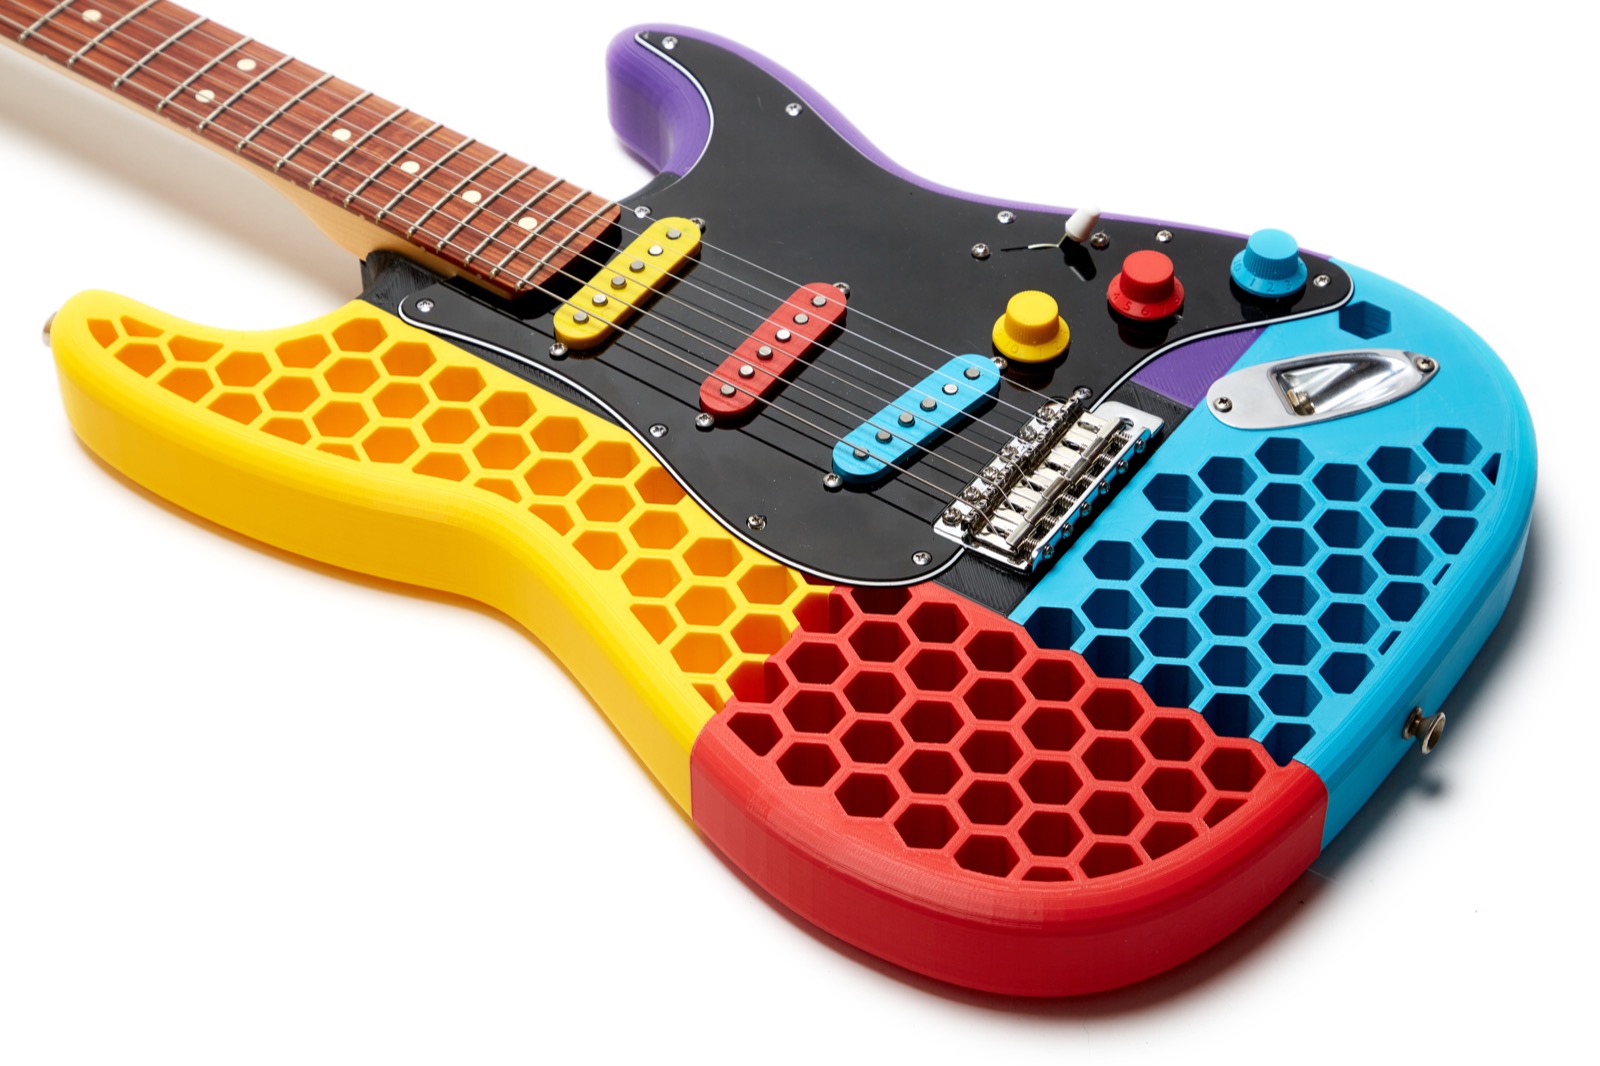
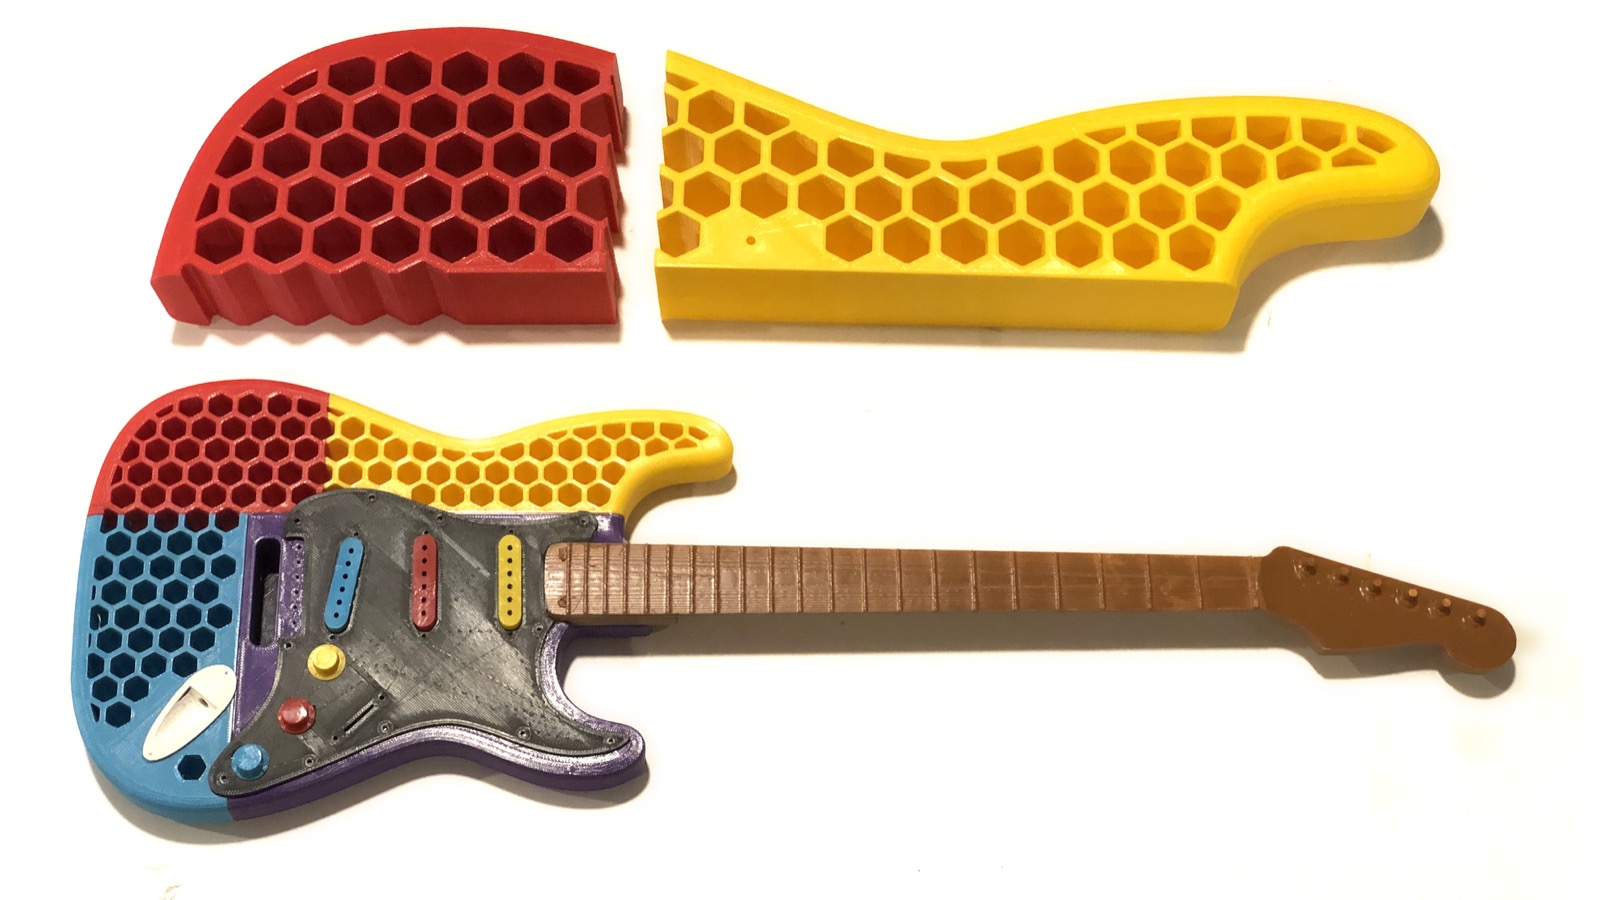
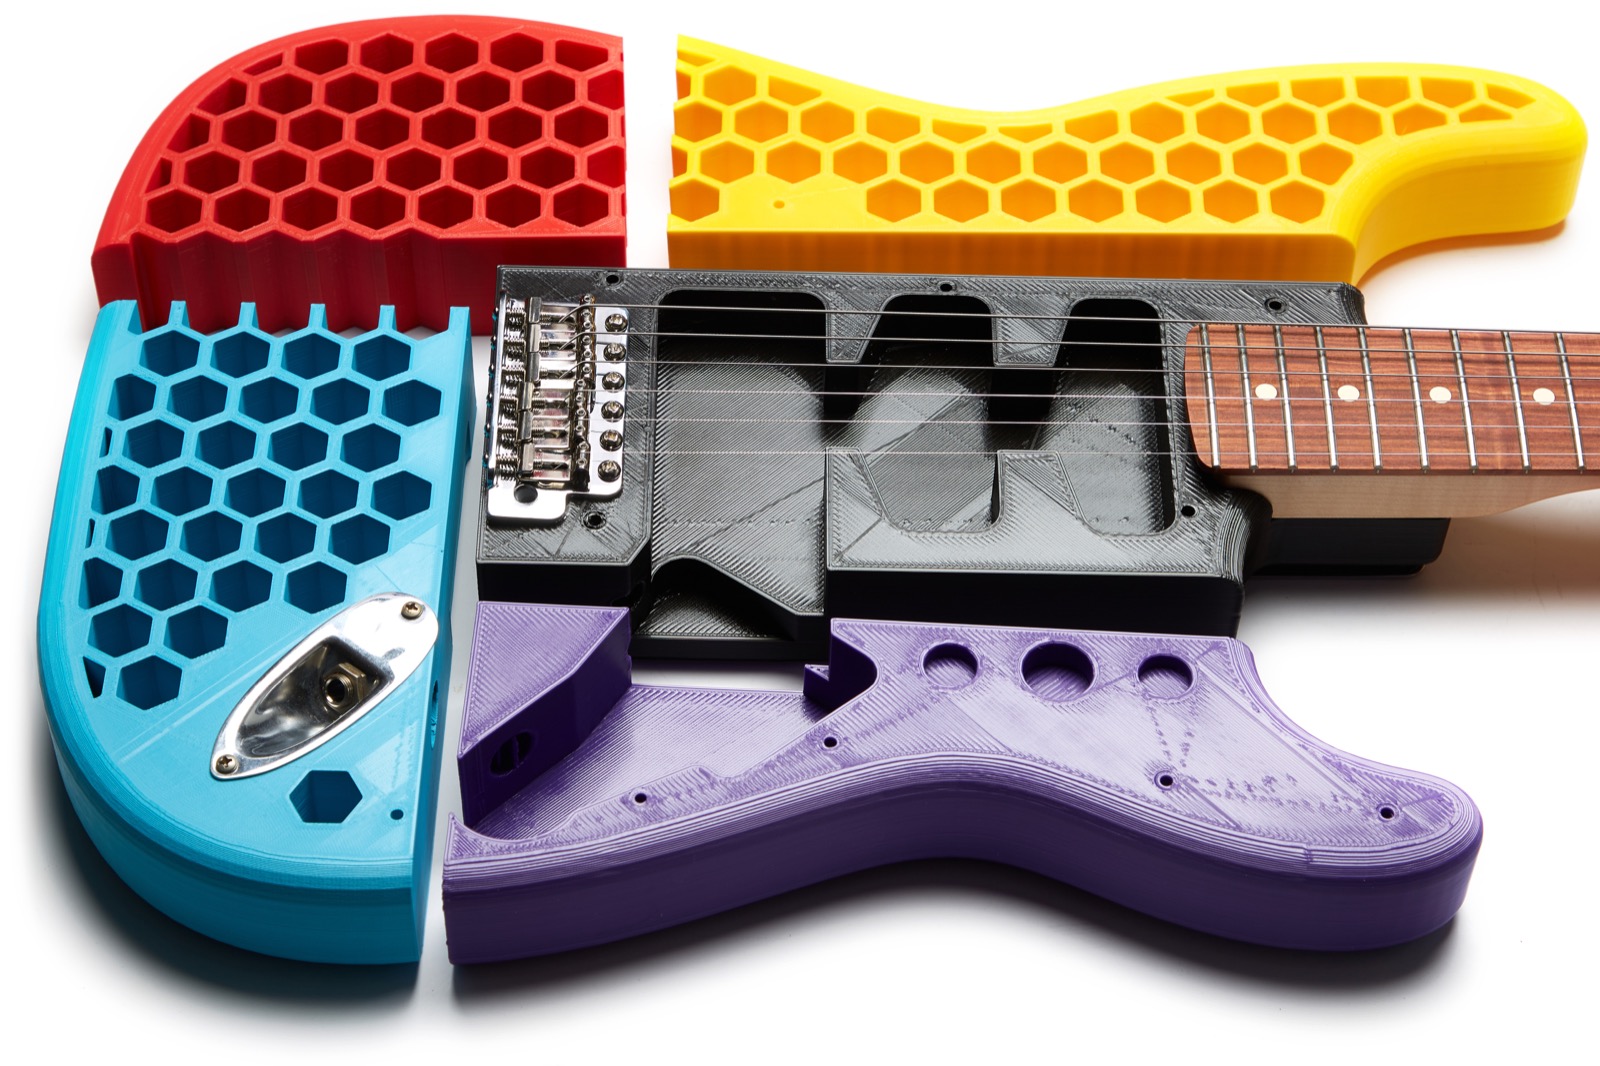
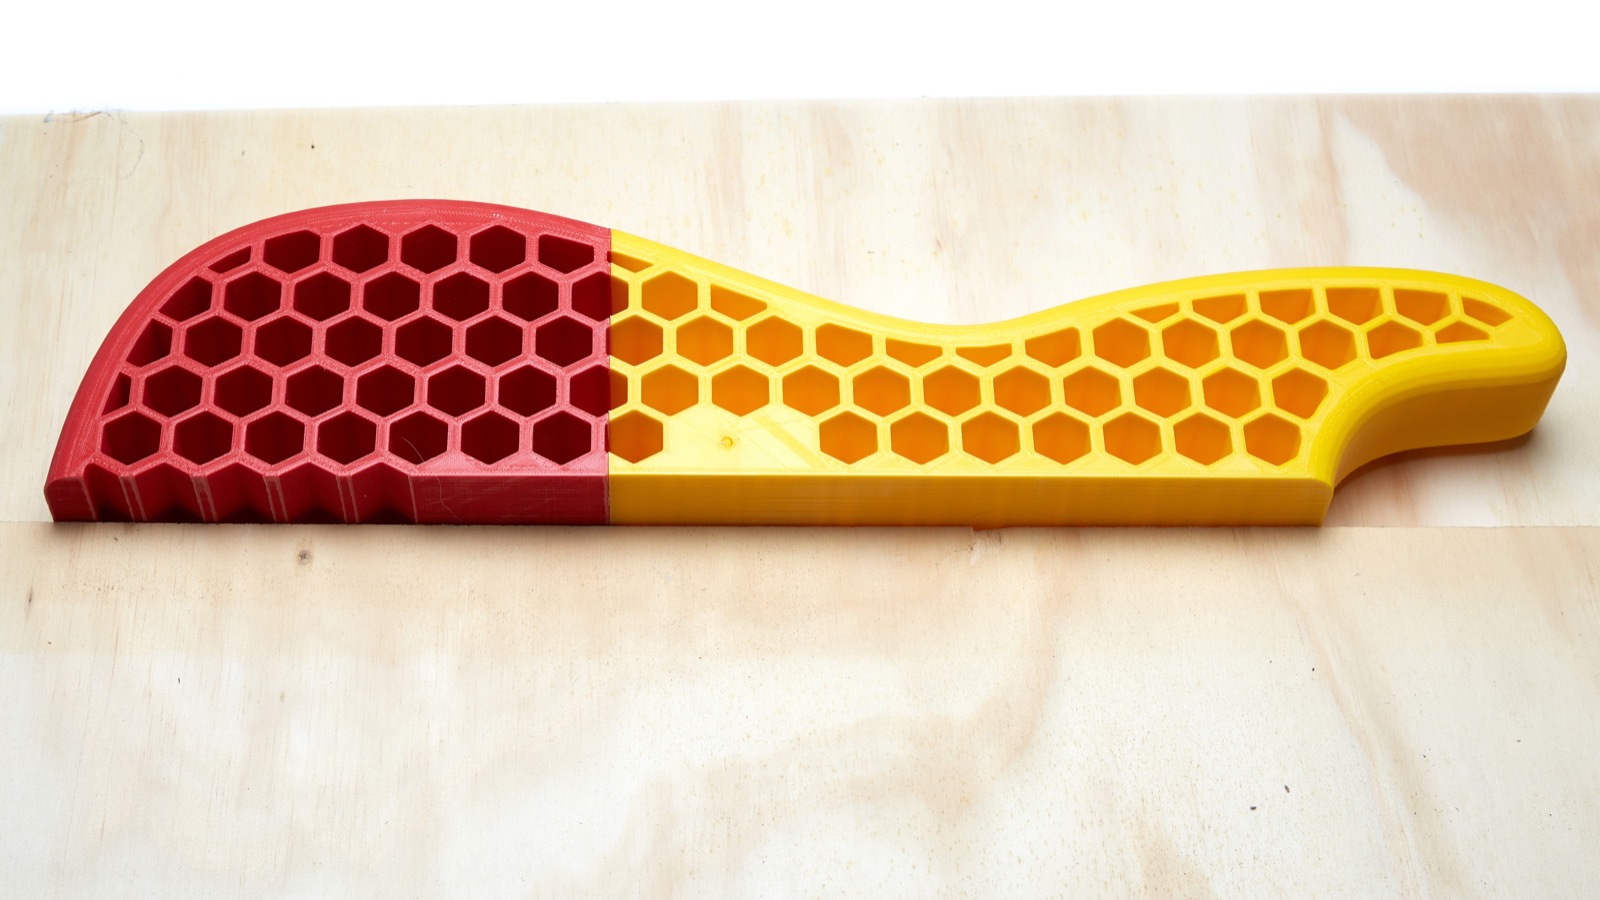
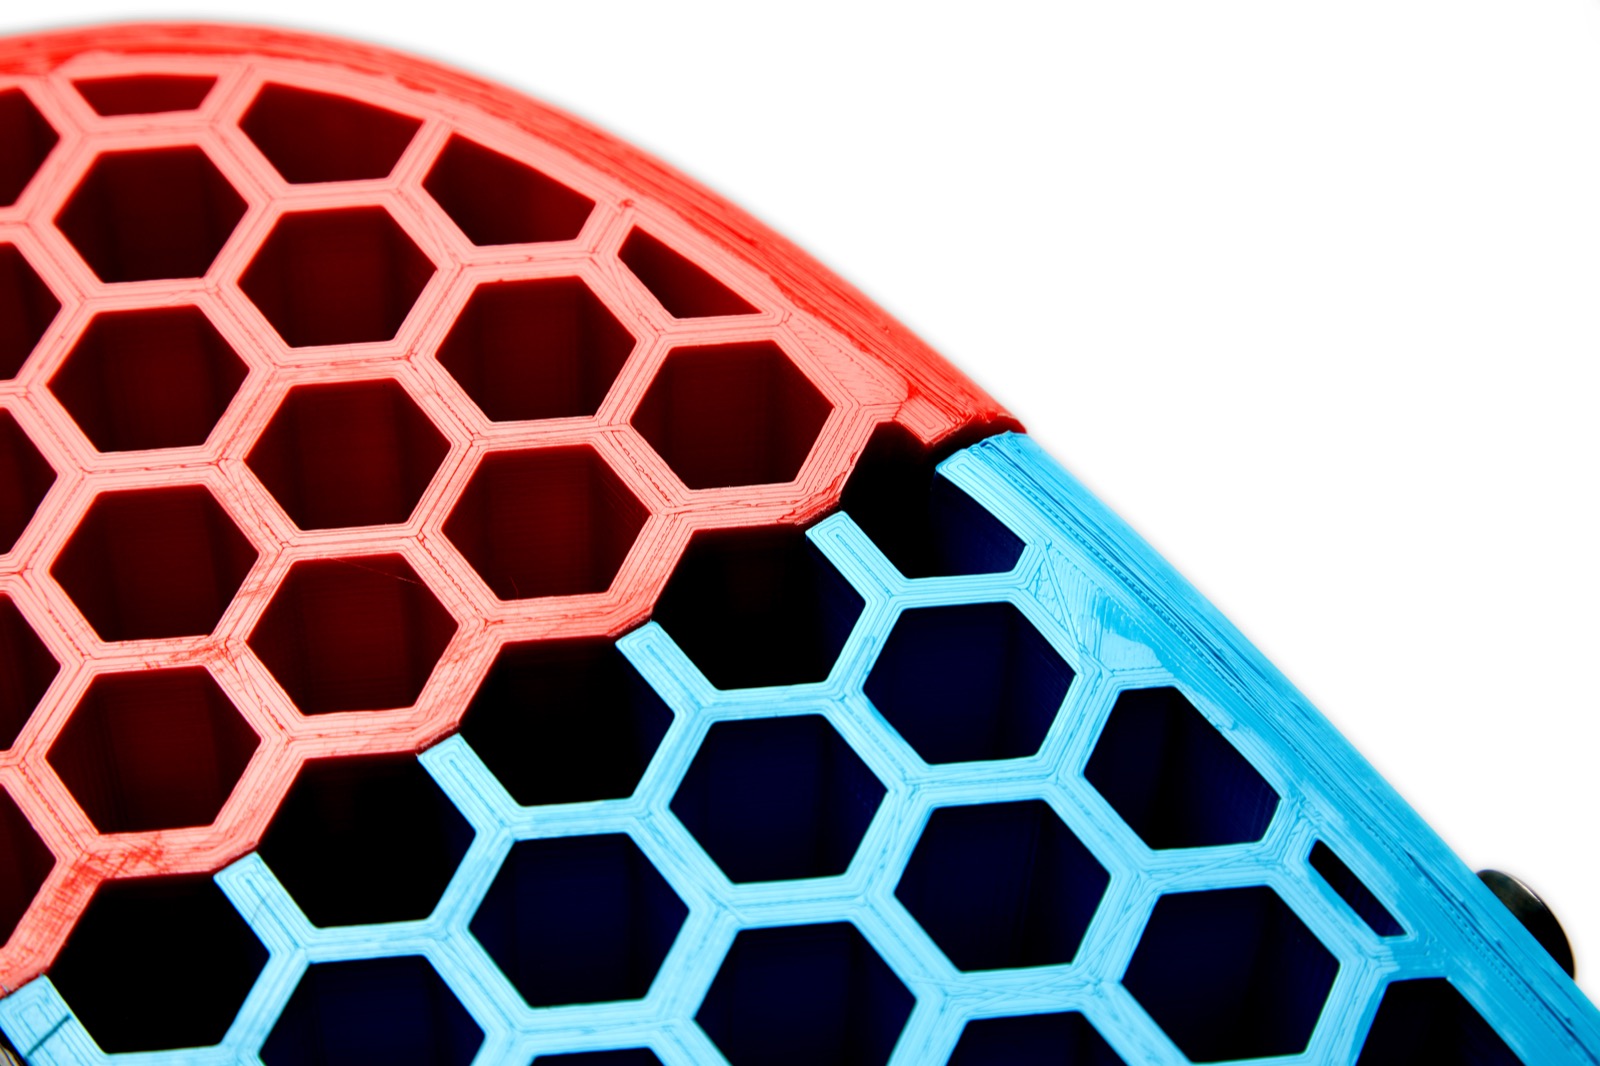
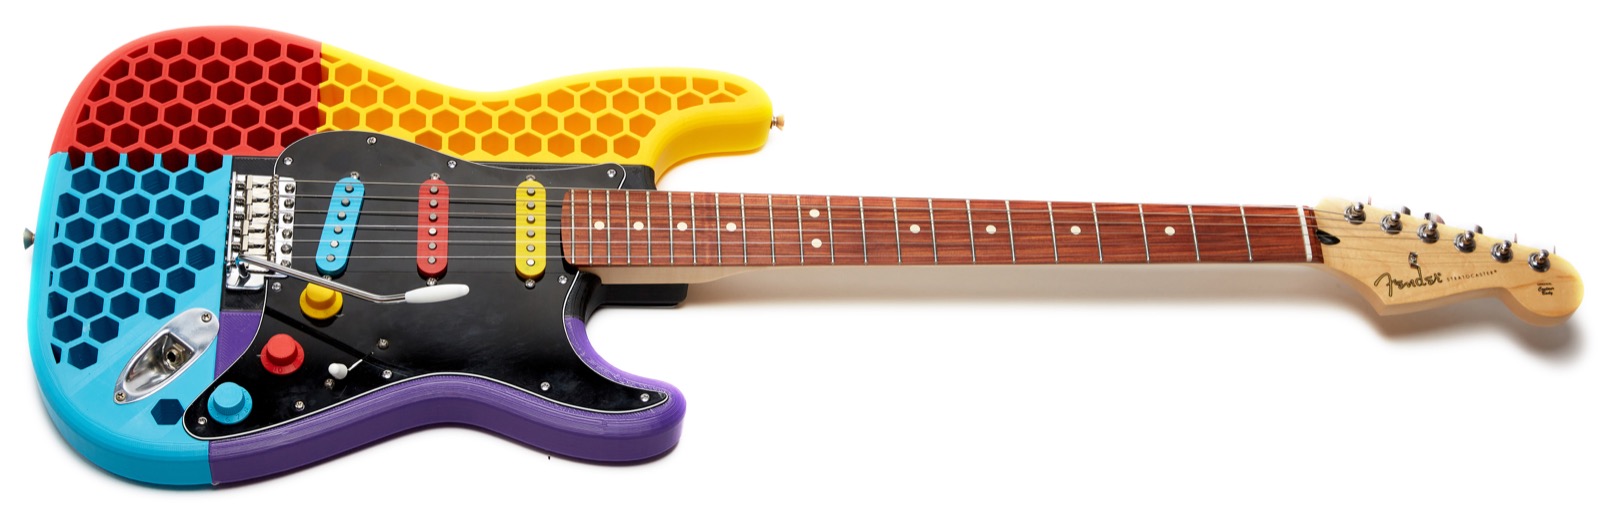
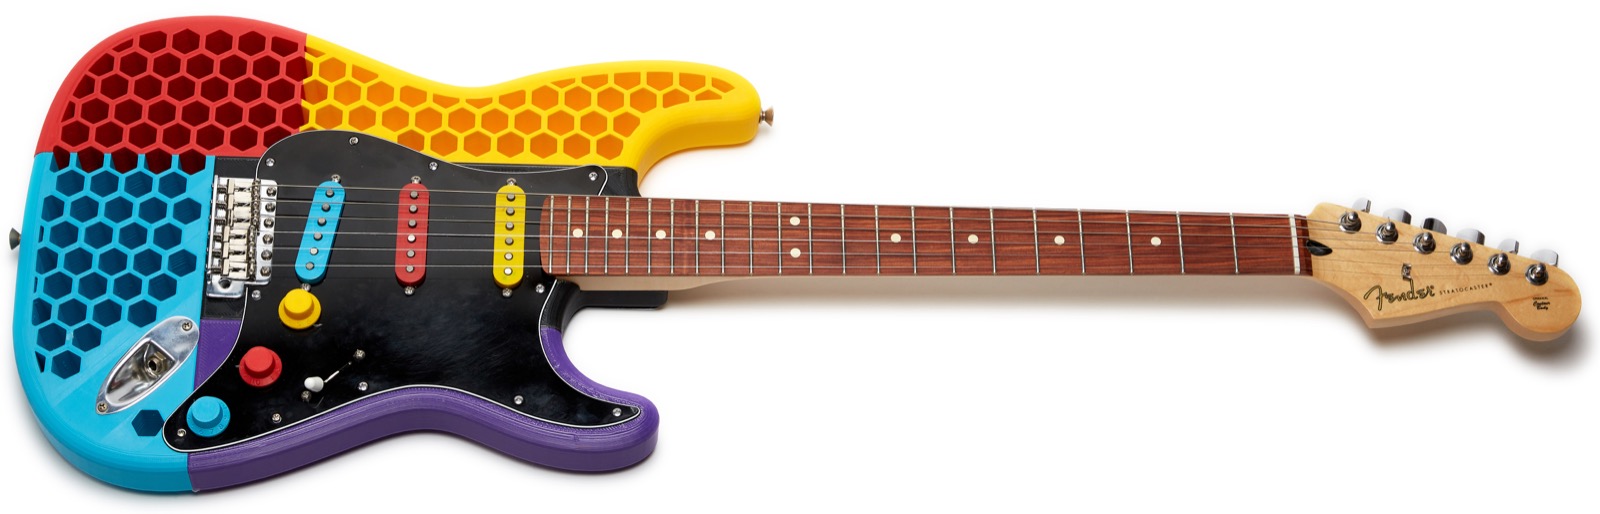
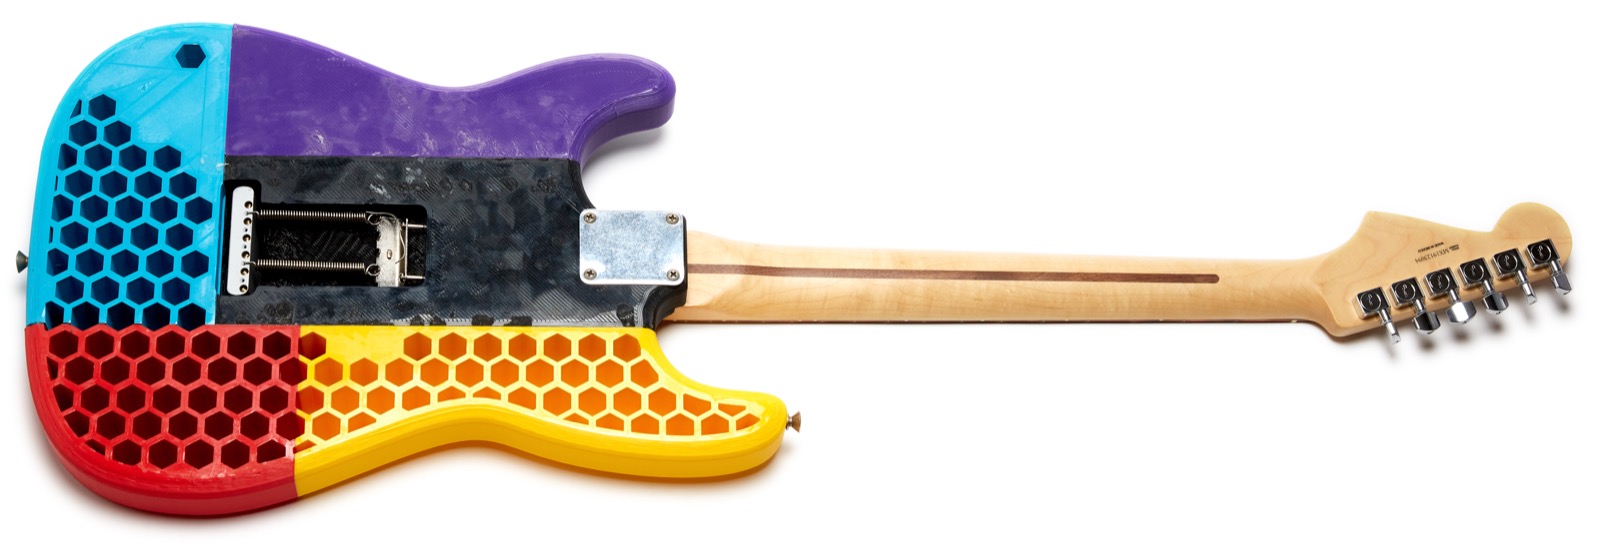
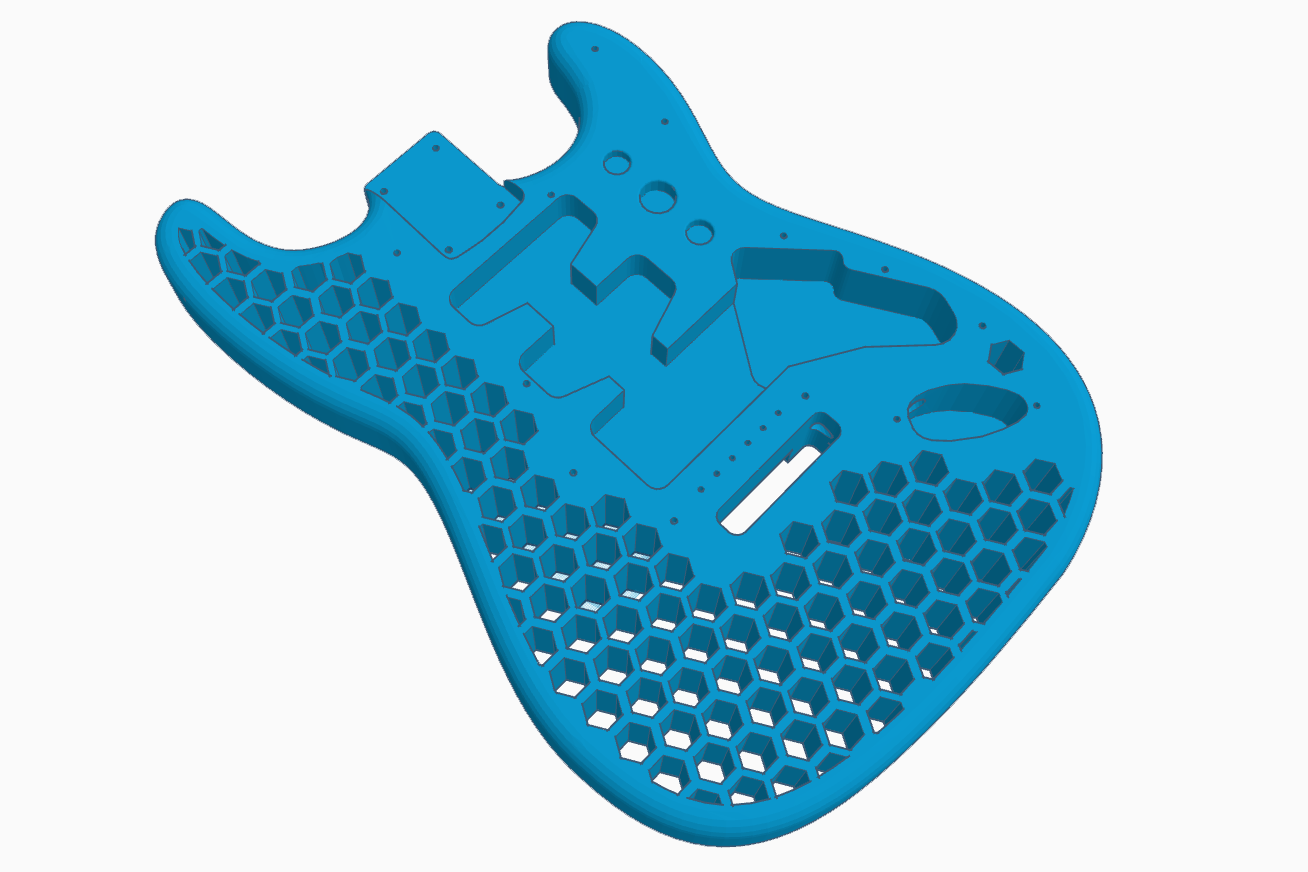 When figuring out what guitar to print, I had to make some fundamental decisions. For example, I needed to decide if I was going to design my own from the ground up, and I quickly decided not to. Why? Because I’m not a luthier and I wanted to try and limit any technical hurdles to the 3D printing process and not get bogged down in things like scale length, bridge position, and so-on. There are some very cool guitars designed from the ground up for 3D printing, but most of them cost money or were the intellectual property of people charging for their designs in the form of fully printed guitars. What I needed was a tried and true existing design. Digging around online, I found this cool looking honeycombed Strat body that I thought would work for me. I’ve since forgotten where I got it so if you made this model please let me know so I can give you credit!
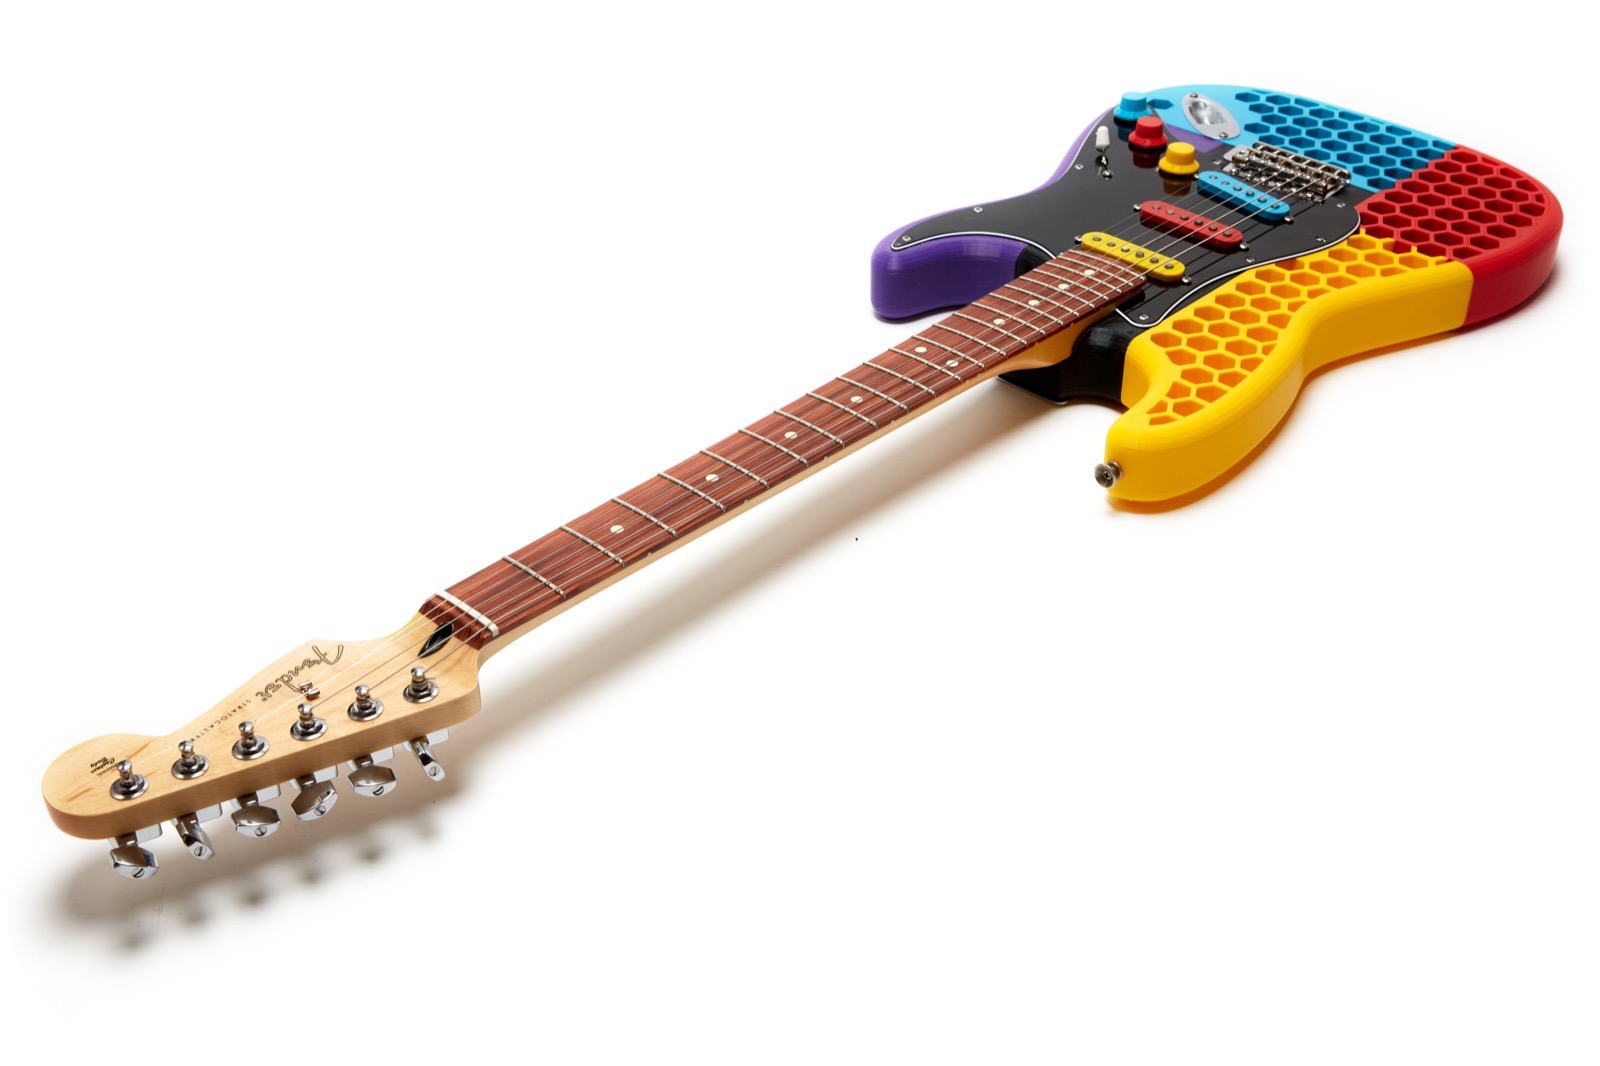
The Fender Stratocaster and Telecaster are both guitars designed by Leo Fender to be easy to manufacture and repair, and although they couldn’t have dreamt of 3D printing back in the ’50s, the concepts put into place by Leo have stood the test of time. Not only that, but the body shapes are in the public domain these days, much to the consternation of Fender. Since Telecasters and I don’t get along, I decided that the Stratocaster (Strat) shape would be my choice.
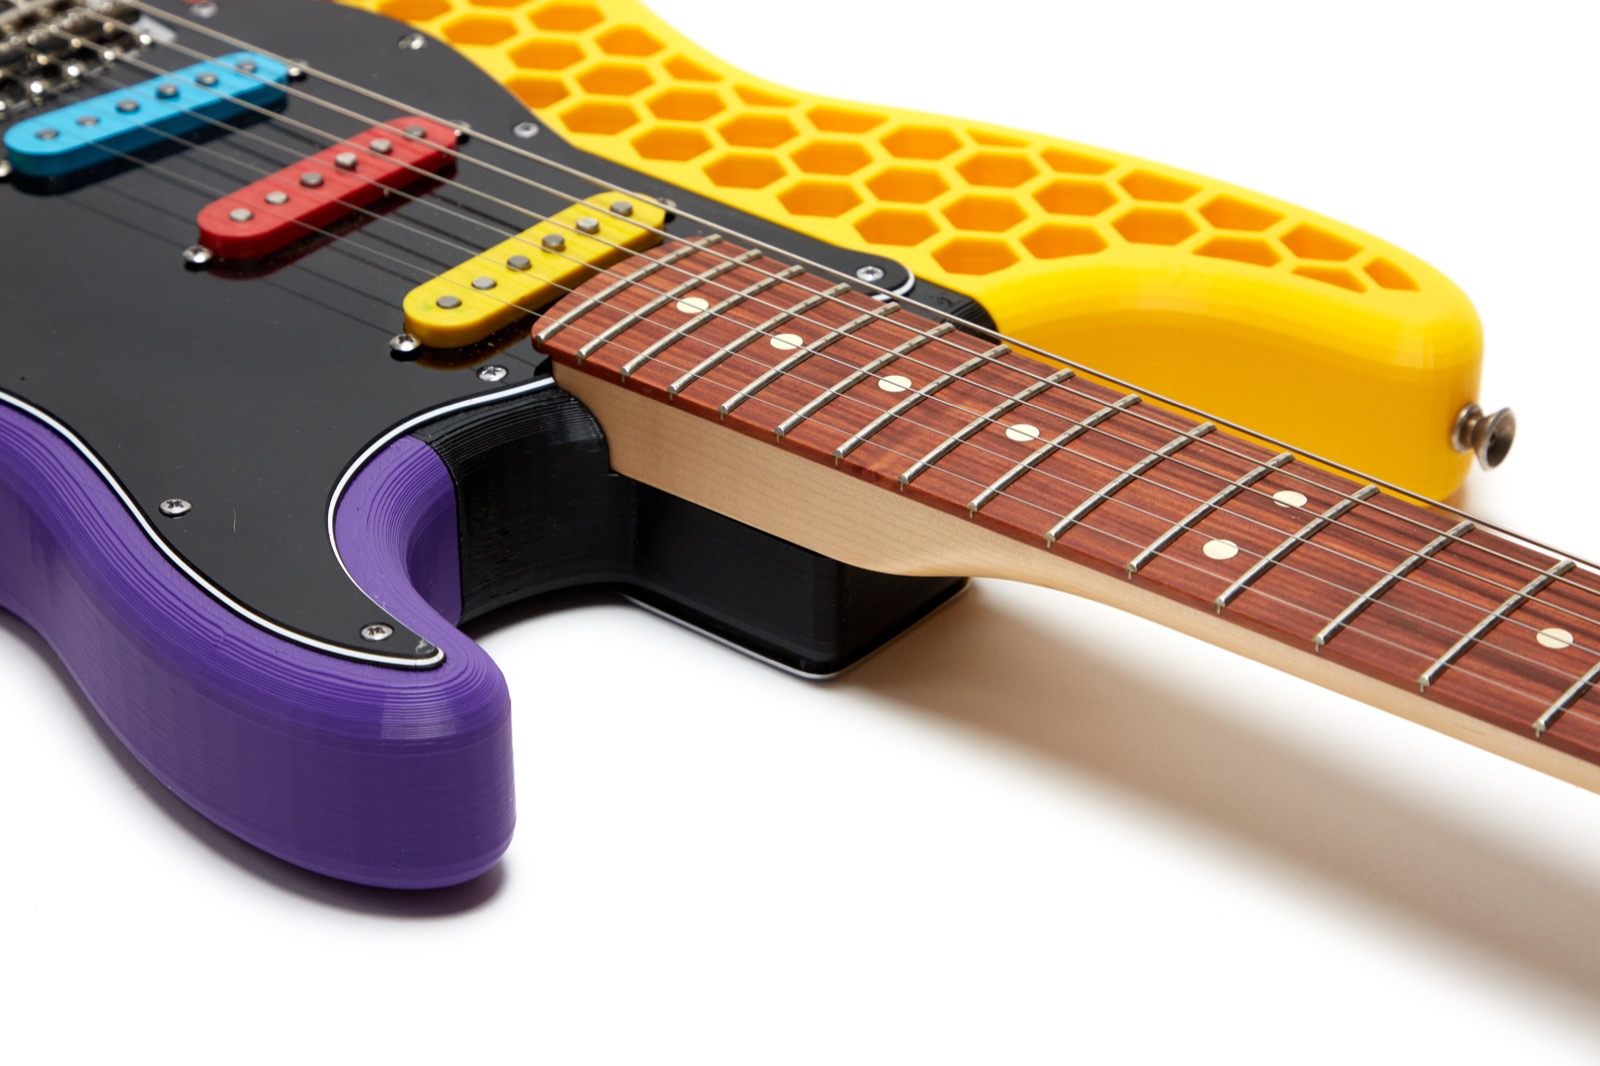
Using a Strat body makes the entire process much simpler than if I had chosen, say, a Les Paul because with the Strat Design, very little is actually screwed into the body. The vast majority of parts are attached to the pick guard on a Strat, and the pick guard is then attached to the body. Additionally, my 3D printed guitar could use an actual wooden neck which similarly bolts to the body of the guitar. A Strat was designed to be many pieces screwed together, and by limiting the parts that I needed to 3D print, I could make a guitar that might actually play and sound like a Strat. Plus, I have a lot of guitar parts laying around and as a result I would likely not need to buy any parts. I was wrong about that as you’ll see, but the idea seemed solid at the start of the project.
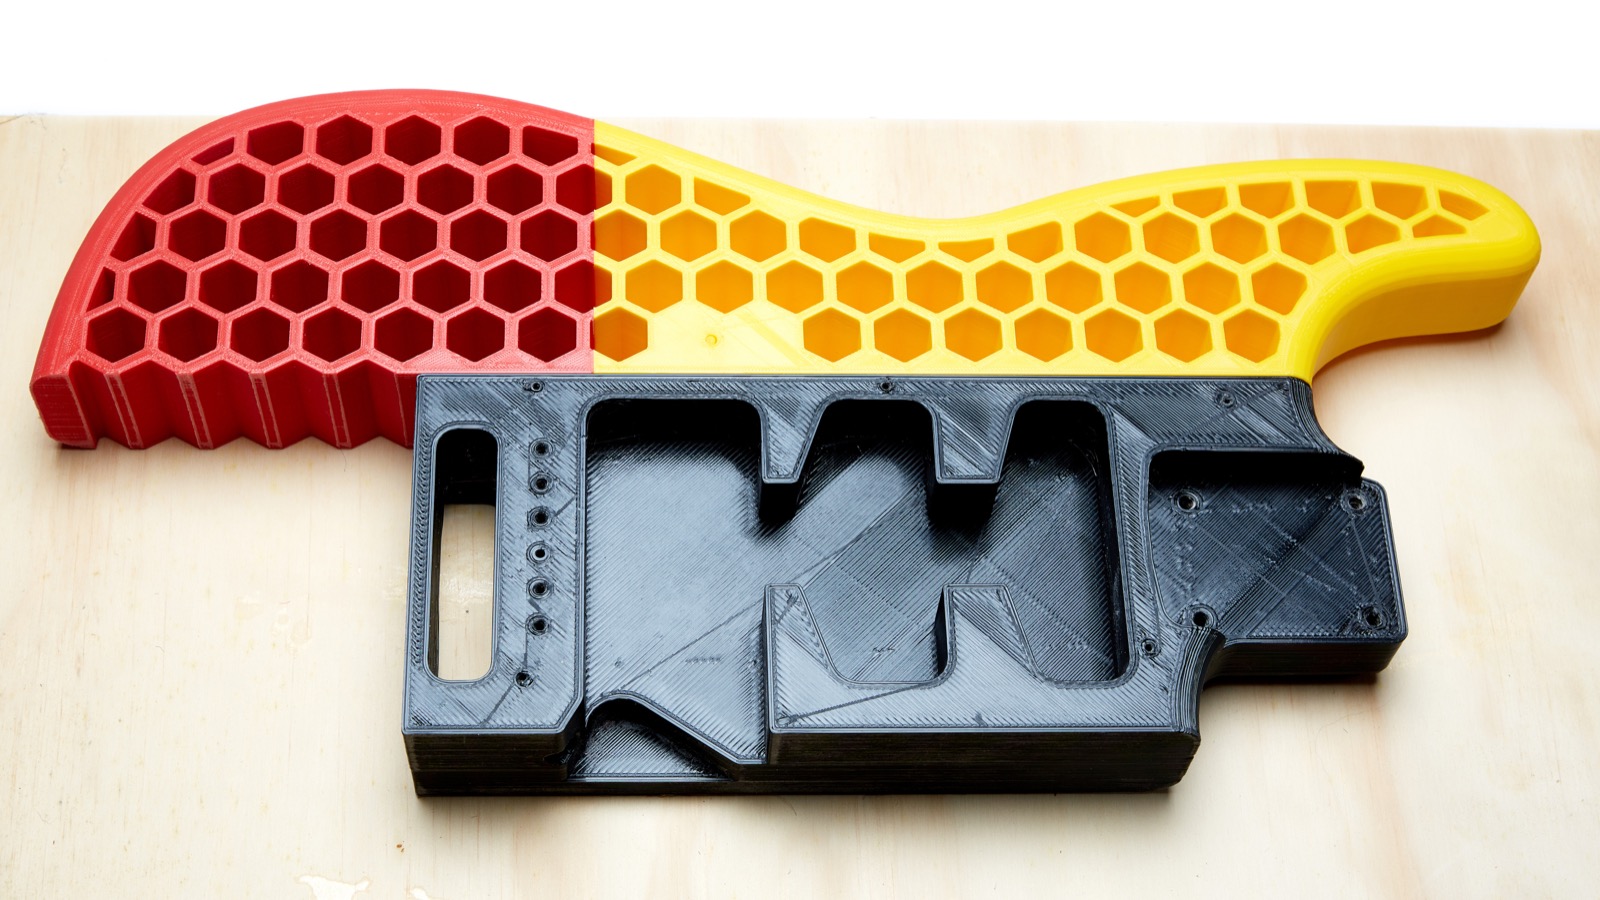
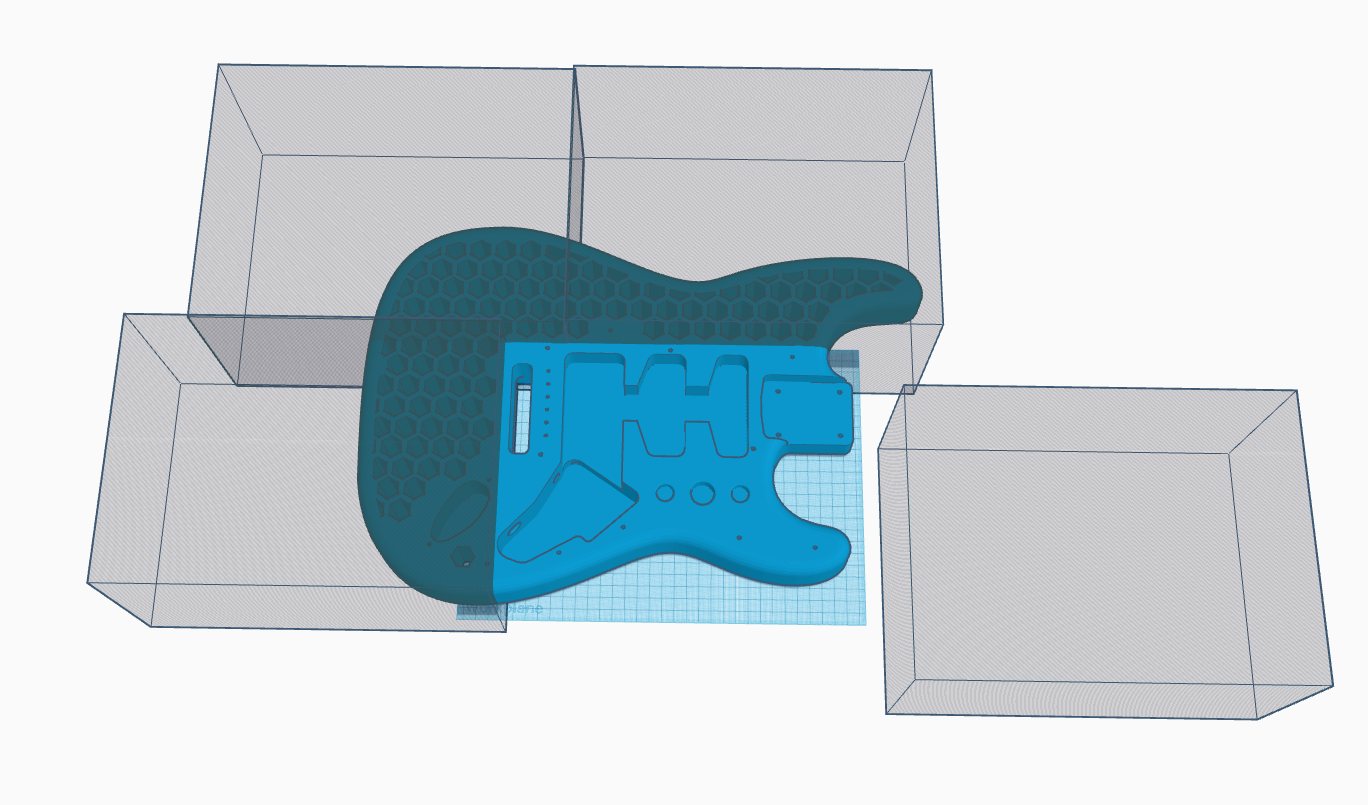 Using Tinkercad, I took the model, created a workspace the same size as my printer’s bed, then set out to figure out a way to cut the model into sections, each of which would fit on my printer. Since I had a larger printer, I could break the guitar up into only four parts. More importantly, all of the stress-sensitive parts of the guitar could be printed in a single piece which meant that I didn’t need to worry about glued seams pulling apart under the string tension. Using something like Meshlab or Fusion360 may have made this step simpler, but I didn’t have or know how to use those tools.
I’ve posted my final model files on Thingiverse so you can print your own. Remember, the parts are sized for an Ultimaker S5, so check to see if they’ll fit on your printer.
Phase I – The Test Prints
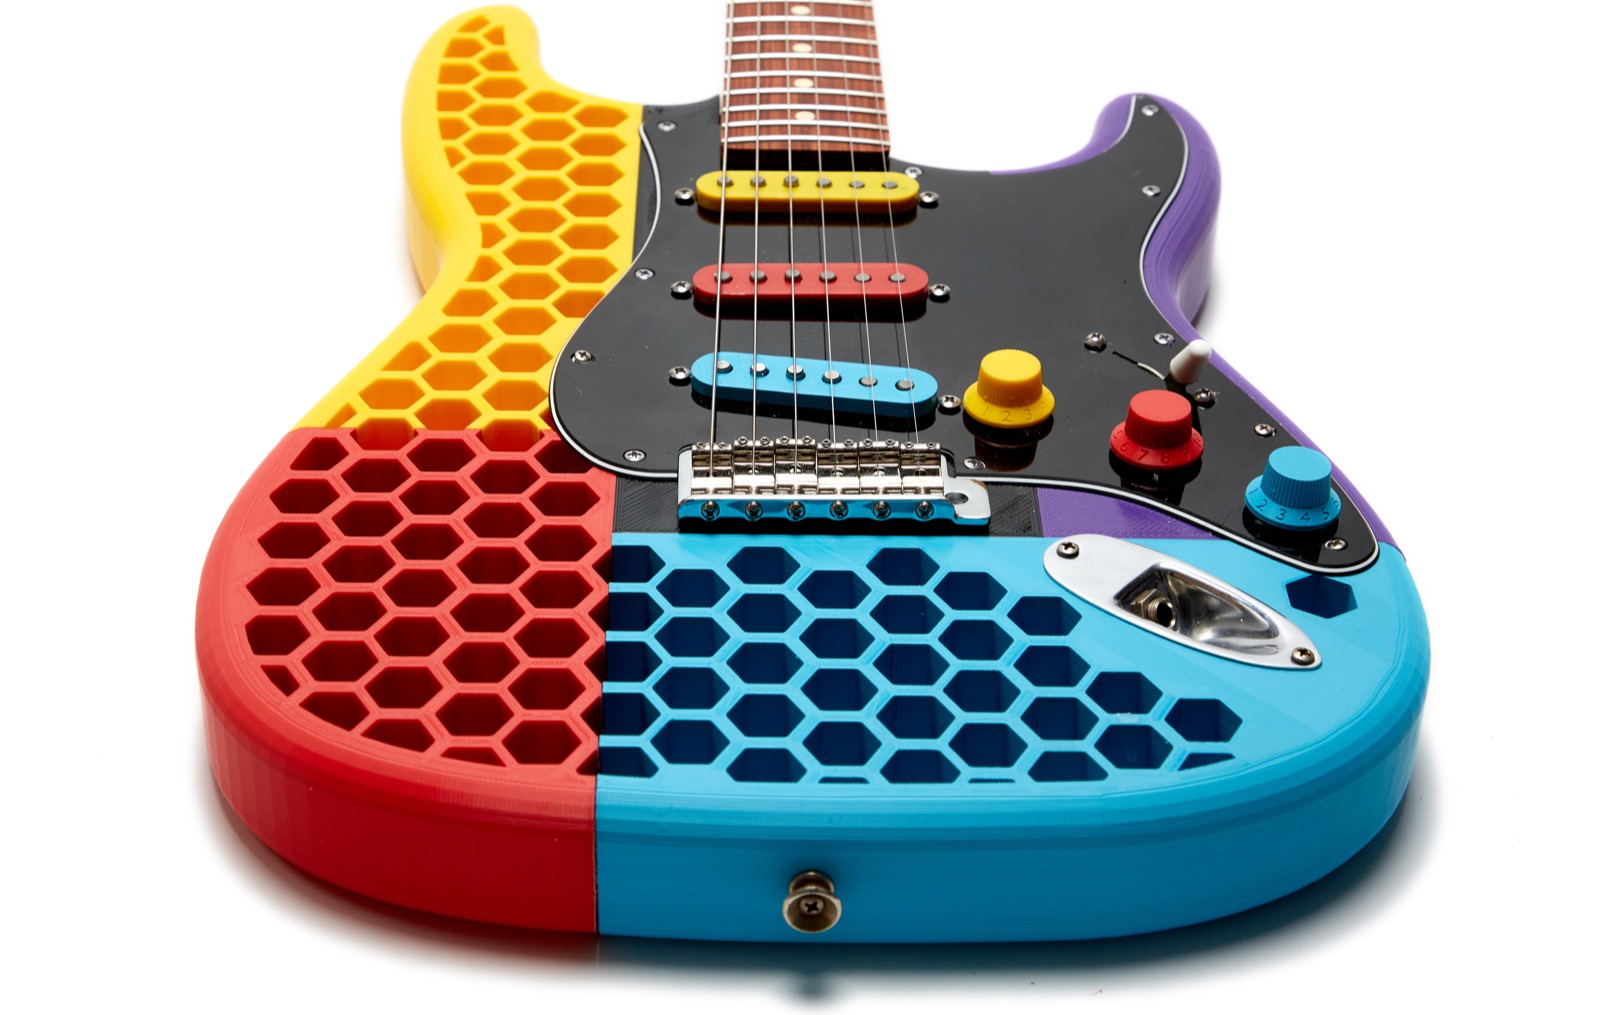
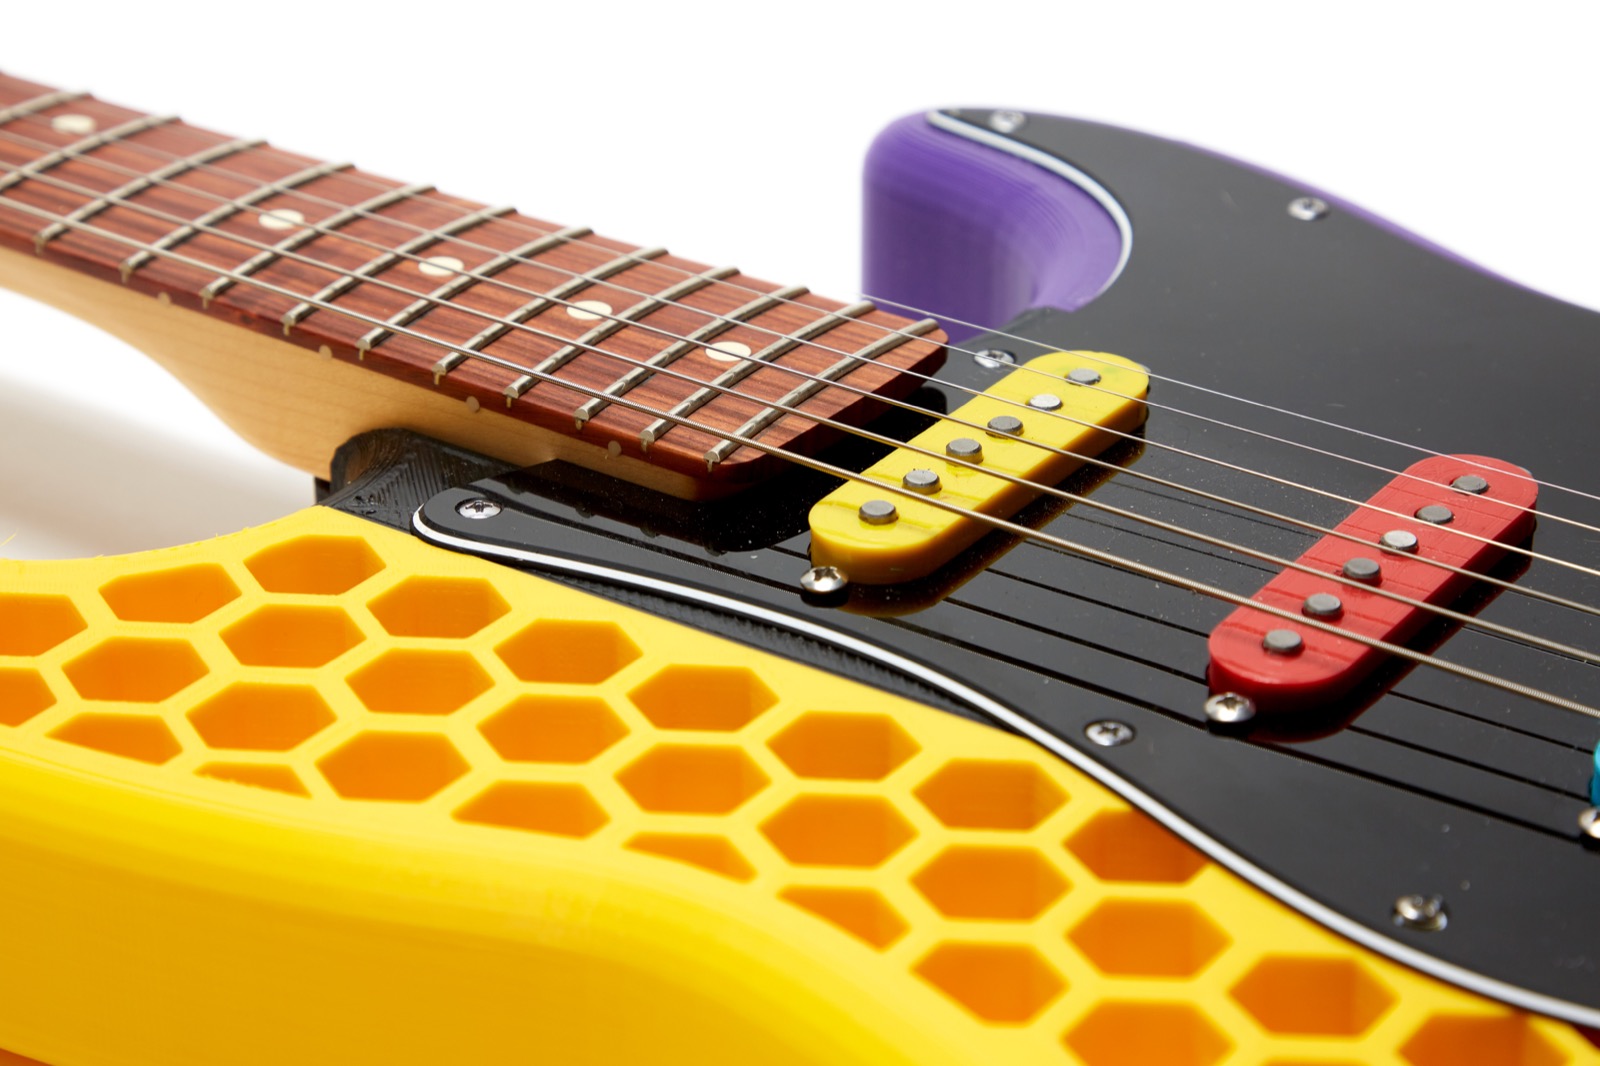
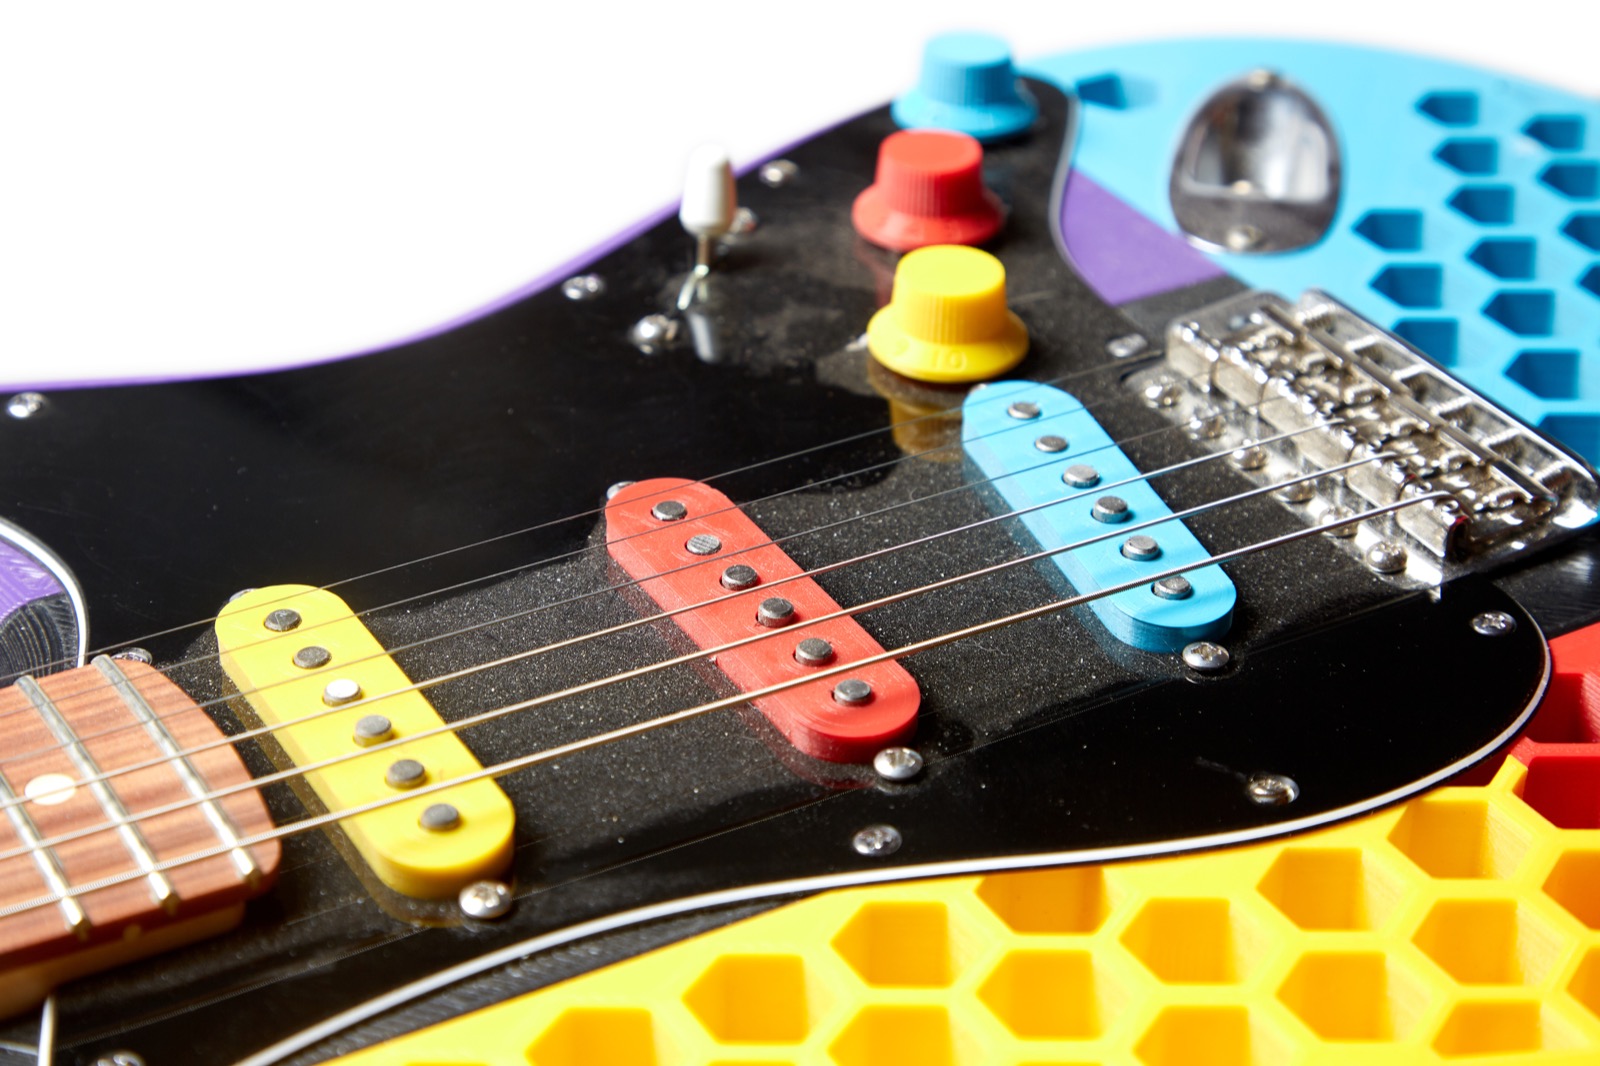
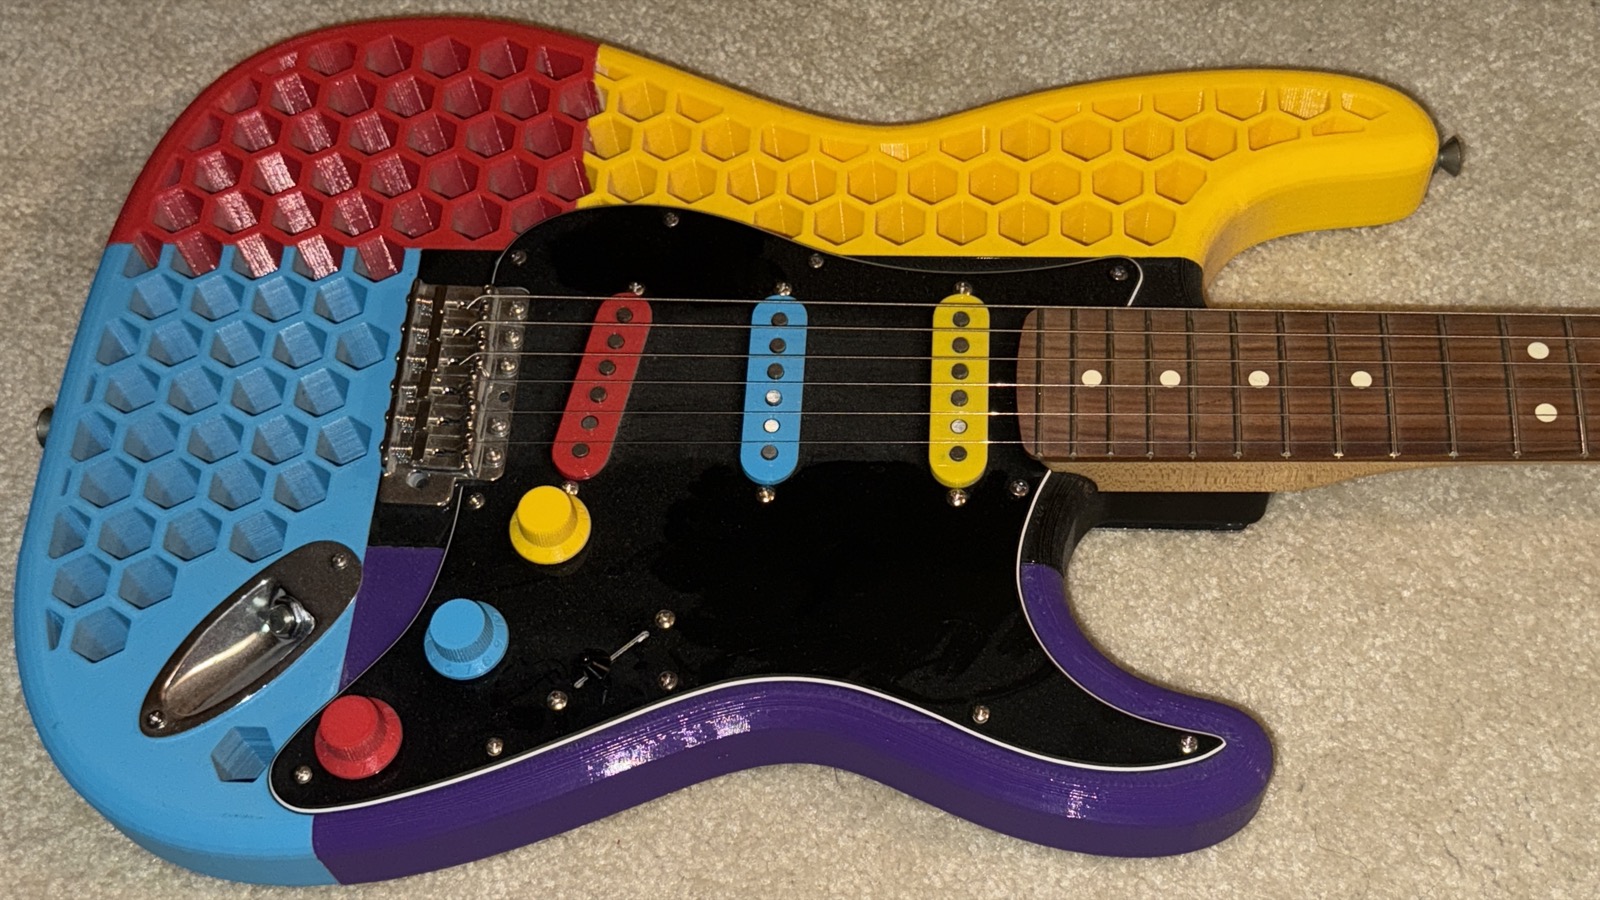
 In order to see how this would all play out, I printed all the split parts at 50% on every axis. This made for some tiny non-functional guitars that were a lot of fun to play around with, but they taught me some things that would be handy later on. It was actually during this step when I first learned that the pick guard didn’t line up properly since the scaled pickup covers would not fit into the scaled holes. I printed two small guitars, and the colorful one was where I first came up with the idea of having the knobs and pickup covers match the colors on the body. Those models were sourced from TinkerCAD.
 In order to get the mini guitars to look right I needed necks, and finding a real neck at that scale seemed unlikely, so I found another 3D model, scaled it to 50% on all 3 axis and printed it using white filament. I then spray painted it into the color you see in the pics of the mini multi-colored guitar, the colors of which were chosen by my daughter, Colleen.
 Some things I discovered about the model that I had to fix included:
- The pick guard screw holes were way too wide, and not deep enough. Also, maybe three of them were in the right spots.
- The neck screws holes didn’t go all the way through so I had to extend them.
- The bottom of the body under the neck pocket was beveled so much that the neck plate stuck out about 2-3mm on all sides.
- There were no screw holes for the tremolo claw
- There were no screw holes for the strap pegs
- The control cavity didn’t fit the controls
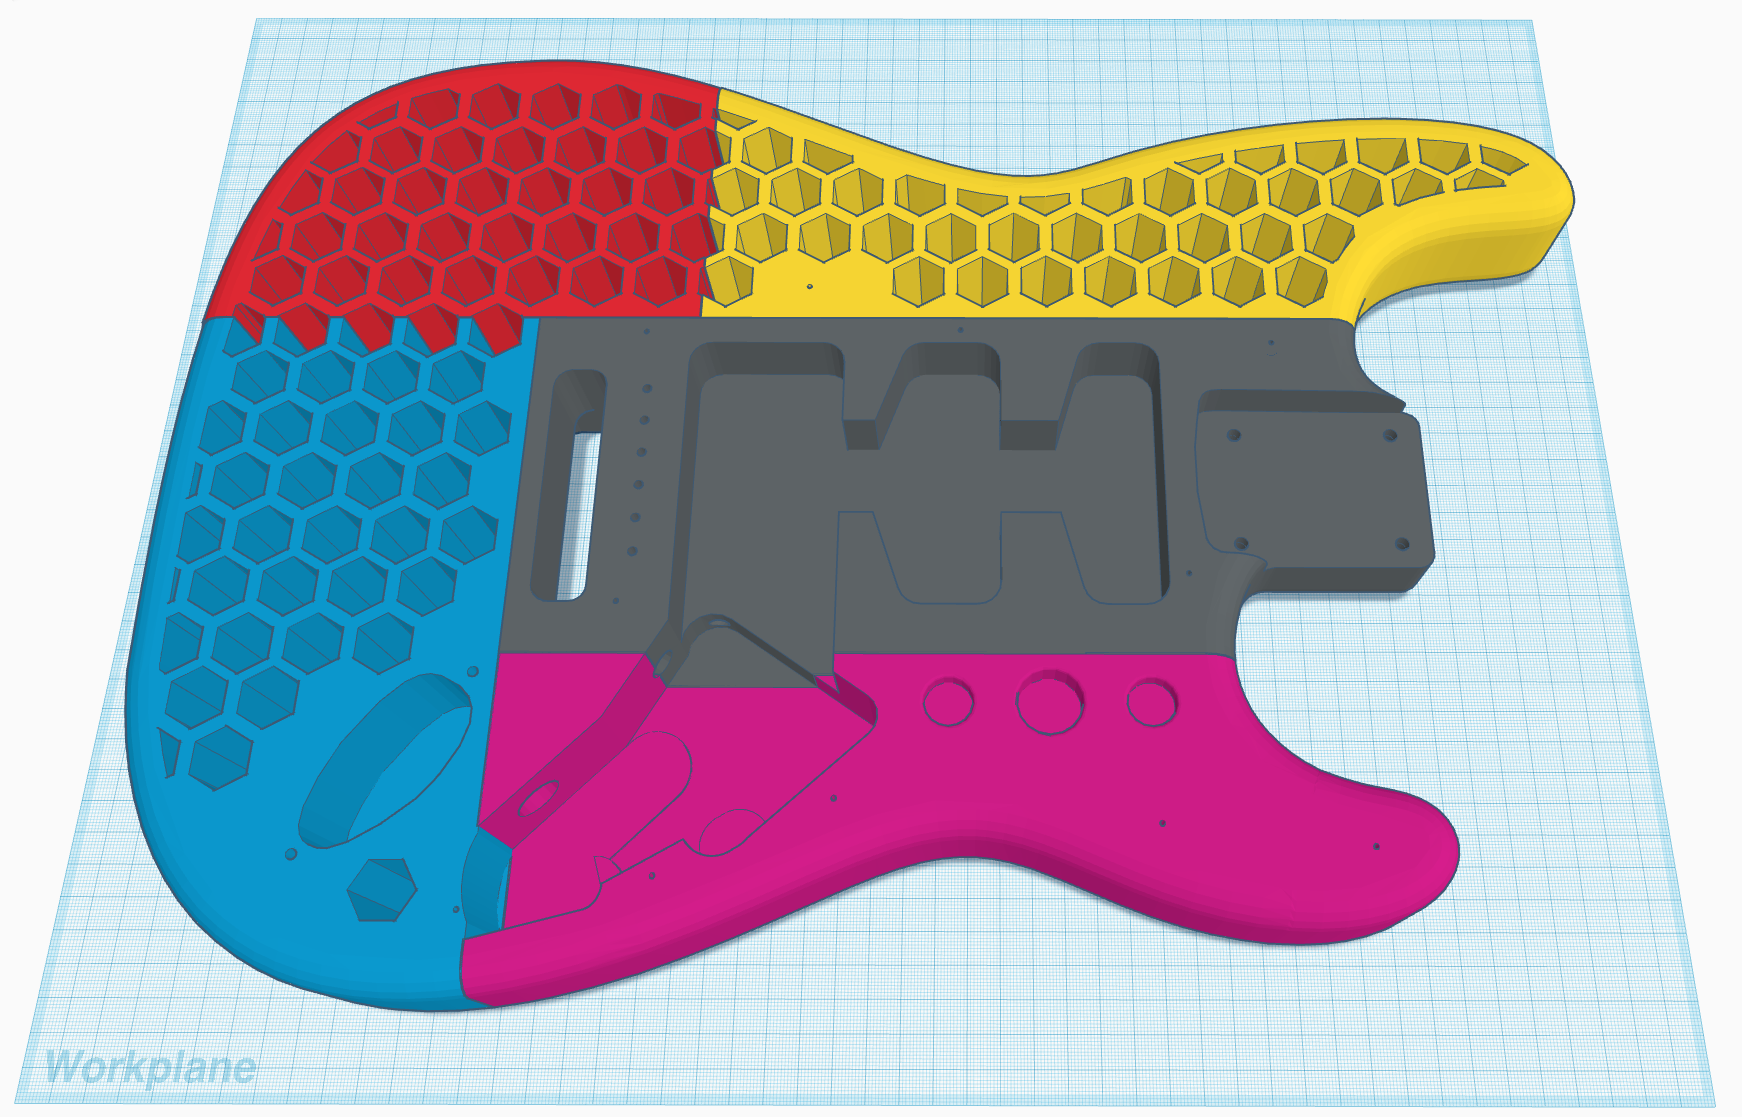 As time went on I split the guitar up into a total of five parts. Originally, this was because the large piece couldn’t print with dual extrusion due to there being no room for the priming tower on the print bed. I eventually stopped using dual-extrusion support because it takes a lot longer and I quickly learned that printing support with the same filament as the piece being printed worked just fine.
The majority of the changes I made to the model were in the control cavity, so having smaller pieces meant burning less filament every time I printed a new test of the bottom horn piece. That bottom horn piece proved to be a huge pain in my ass.
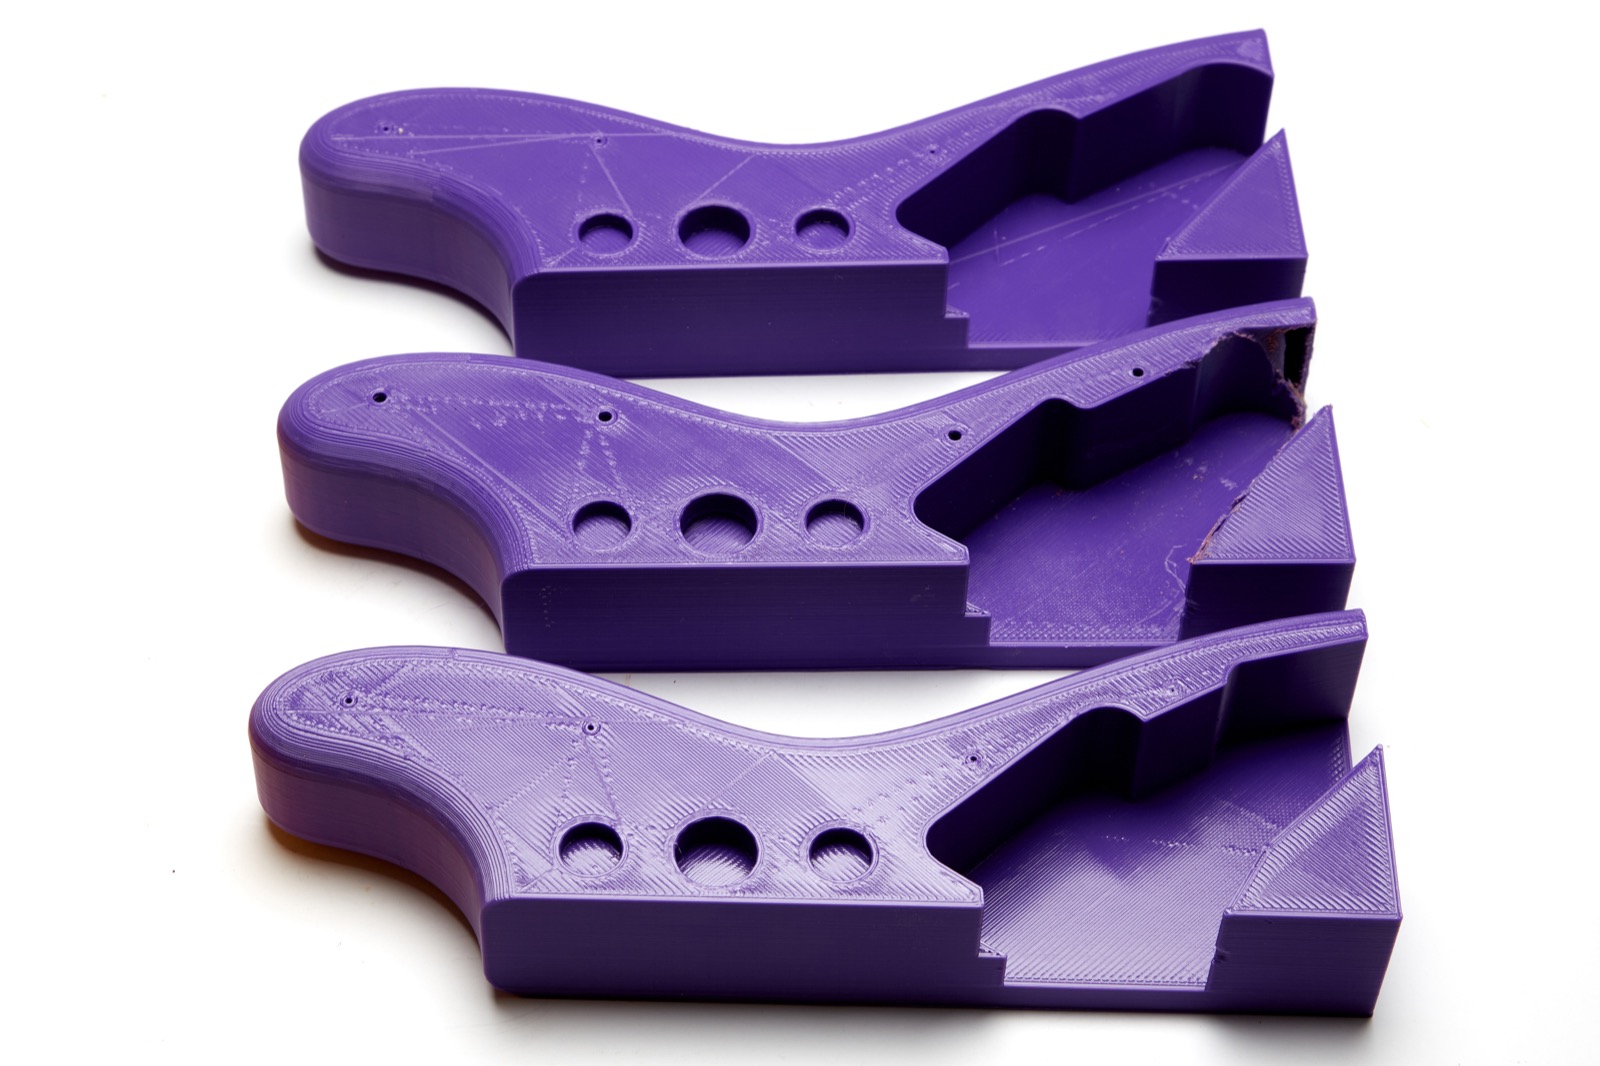 Earlier I noted that the control cavity didn’t fit the controls. That was a tough problem for me to solve because after you fit the pick guard, you can’t see what’s hitting up against what part of the cavity. Through much trial and error I discovered that the two primary culprits were the bottom-most tone pot and the 5-way switch. After my third failed print I finally got fed up and started to treat the last piece like it was wood and took some power tools to it, but that did not end well because PLA has a pretty low melting point and any friction from a saw just melted the plastic. That meant using a good old fashioned bastard file which finally did the trick. Believe it or not, that hand-filed last piece is what made all the difference.
In the end almost everything worked great except for the bridge screws and the pick guard screw holes. The bridge itself worked OK, but the screws seemed to be cheap pot-metal crap, which I guess I should have expected when paying $20 for a Ping Strat bridge, but one of the screws broke on me and many of the rest stripped, so I pulled them all and ordered hardened Callaham screws from Specialty Guitars, all of which worked great. You’ll see how that broken screw affected me later on.
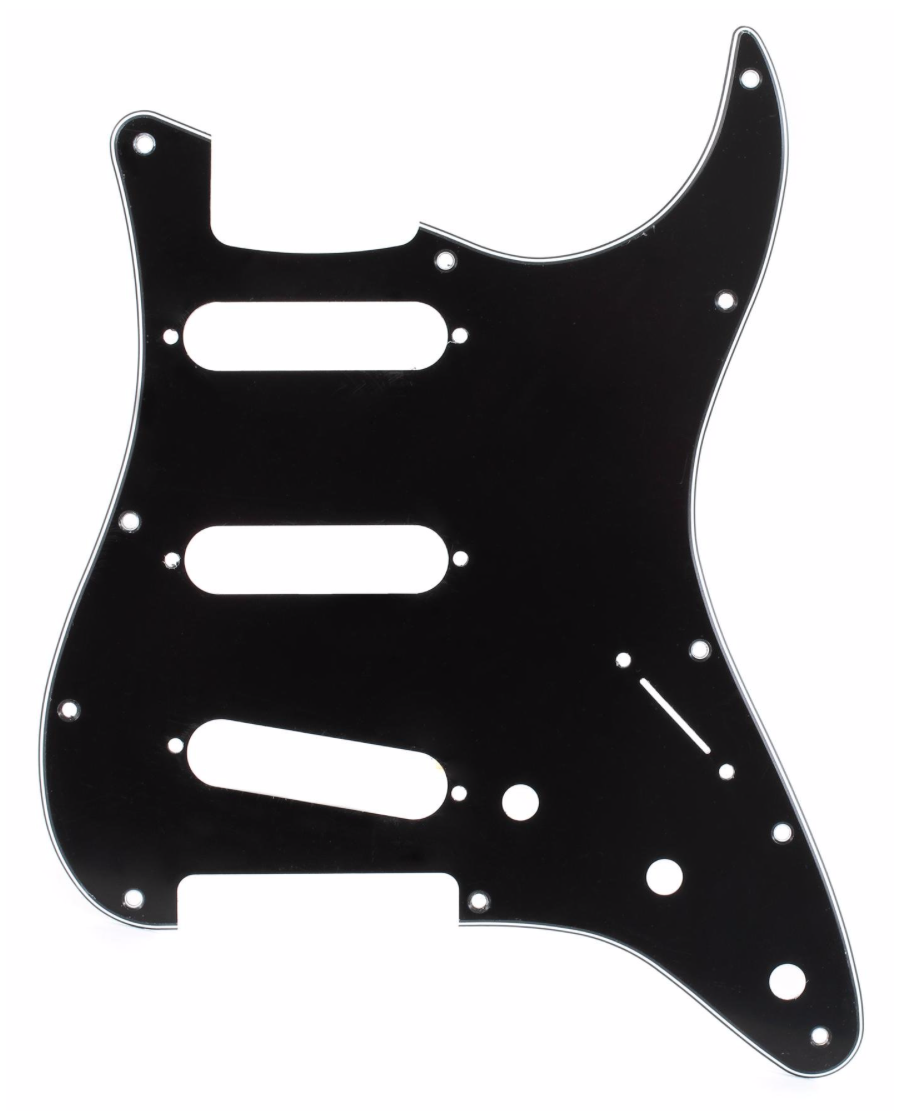 Every single one of the 3D models for an 11-hole Strat pick guard that I could find was wrong and after dorking around with them for far too long, I just went to Guitar Center and bought one. I really wanted to 3D print it, but I was just getting too aggravated. I even went so far as to convert a picture of one to an STL file and even that didn’t work right. This picture is the one I used which seams to be dead-on accurate so I don’t know what went wrong. After trying unsuccesfuly for days, the purchased pick guard lined right up. Oh well, I’m over it. Mostly.
My goal at the beginning was to use whatever leftover parts I had, but the simple truth is that I’m not really a Strat guy so I don’t have many Strat parts laying around. Somehow I did have pick guard screws, a neck plate, and an output jack plate, likely a result of me gutting the only Stat I’ve ever owned, a 2008 American Deluxe that came with some absolutely awful Samarium Cobalt Noiseless pickups and the S1 switching system along with an ugly green/white pick guard that I just hated.
Phase II – The Final Prints
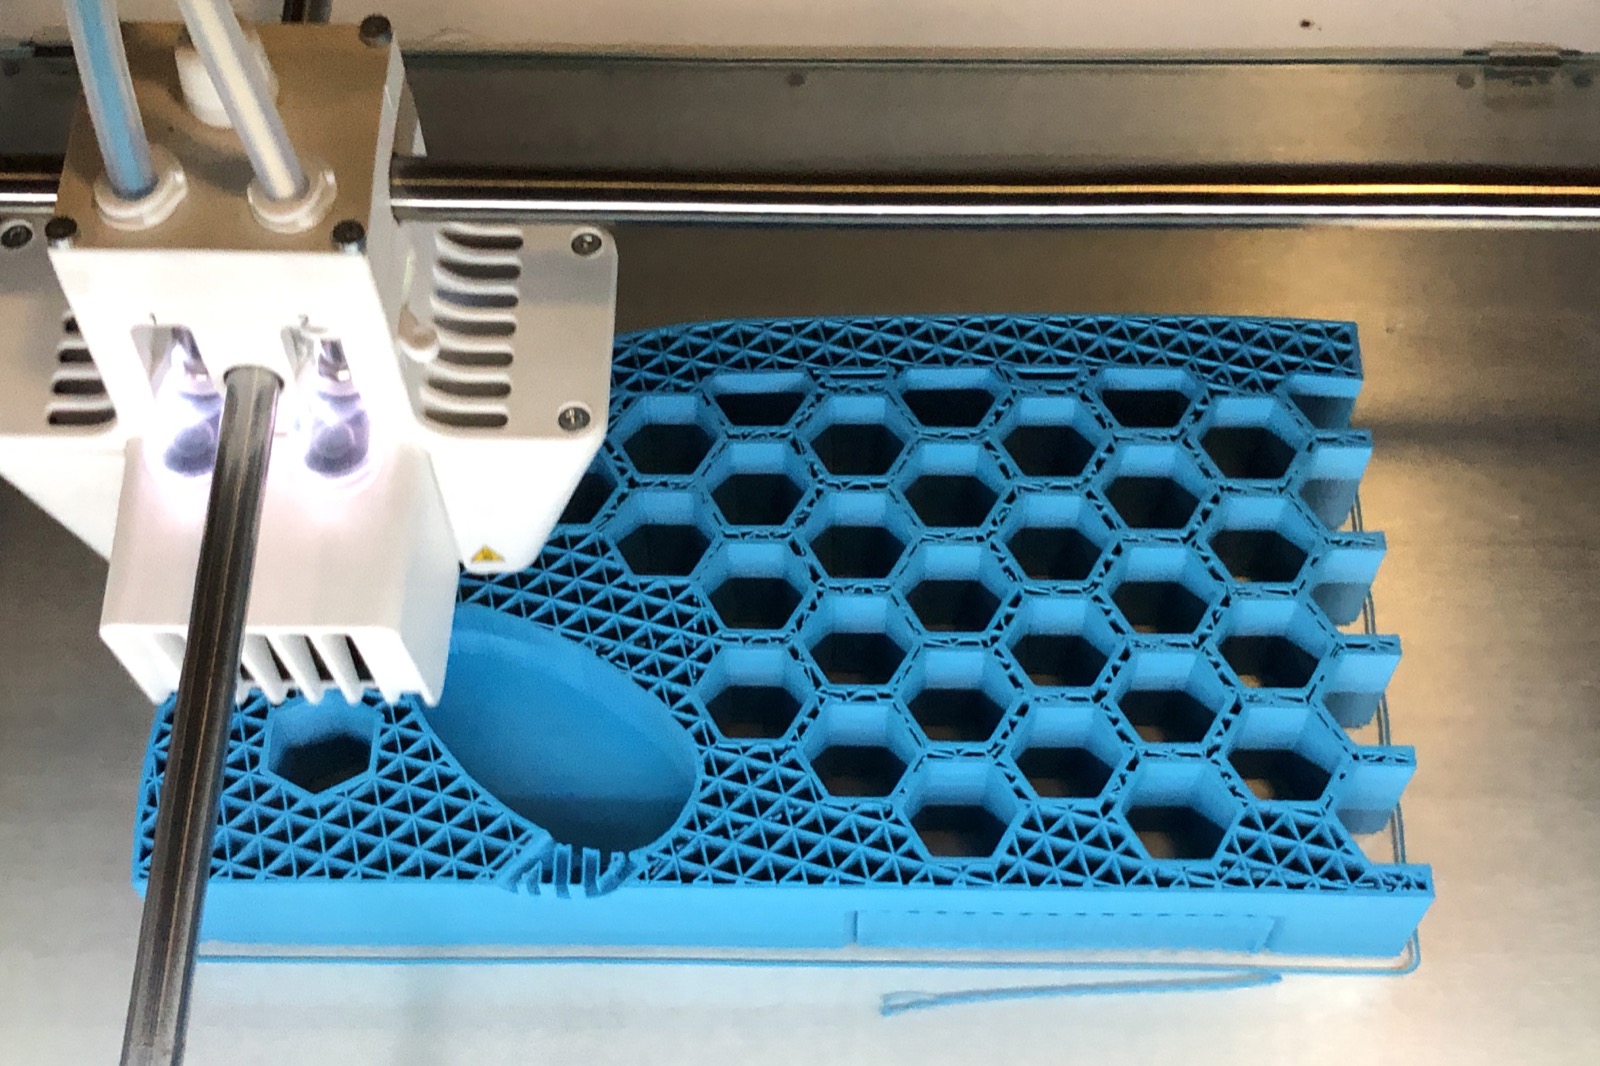
 3D Printing is not a quick process. For example the blue part took almost 19 hours to print using some pretty default settings (more on that later), and there were five similarly sized pieces to print. That, coupled with the fact that I had to reprint a couple of the parts due to them not fitting correctly at first due to the stupid model being wrong added not hours, but days to the project. Luckily, I don’t need to baby-sit the printer while it does it’s thing for hours on end so I’d let it print overnight or while I was working. Thanks to that fume-hood contraption on top the printer doesn’t foul the air like it did when I first got it. Don’t believe the marketing: 3D printers produce microplastics that can be very bad for you (source).
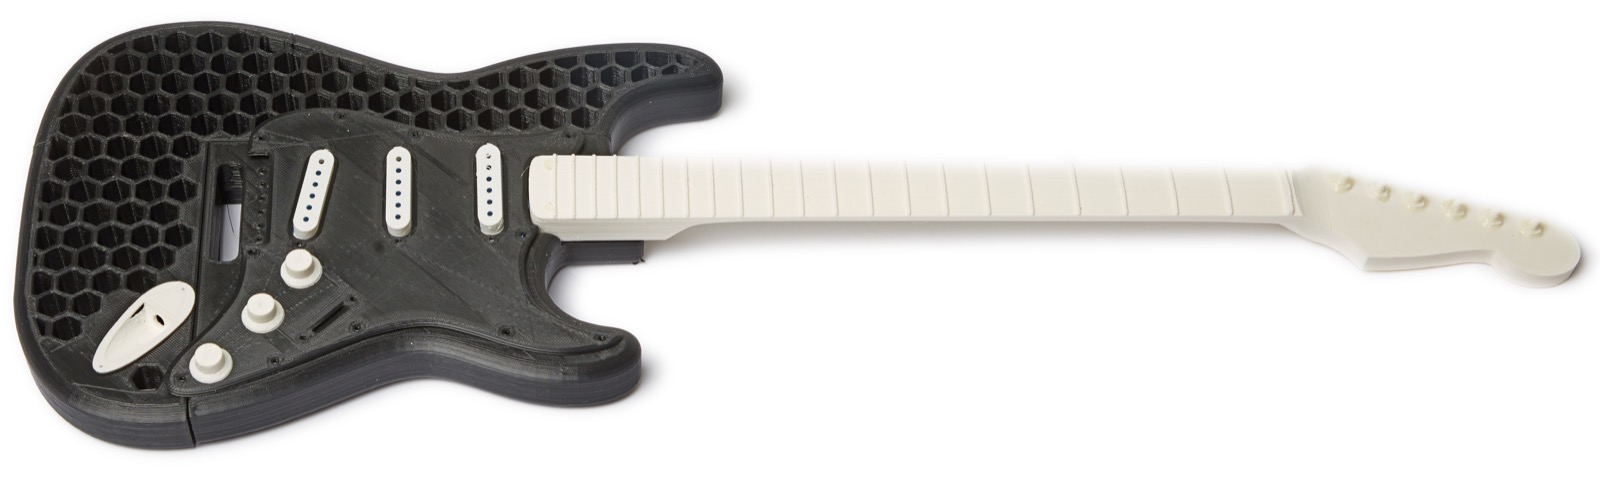
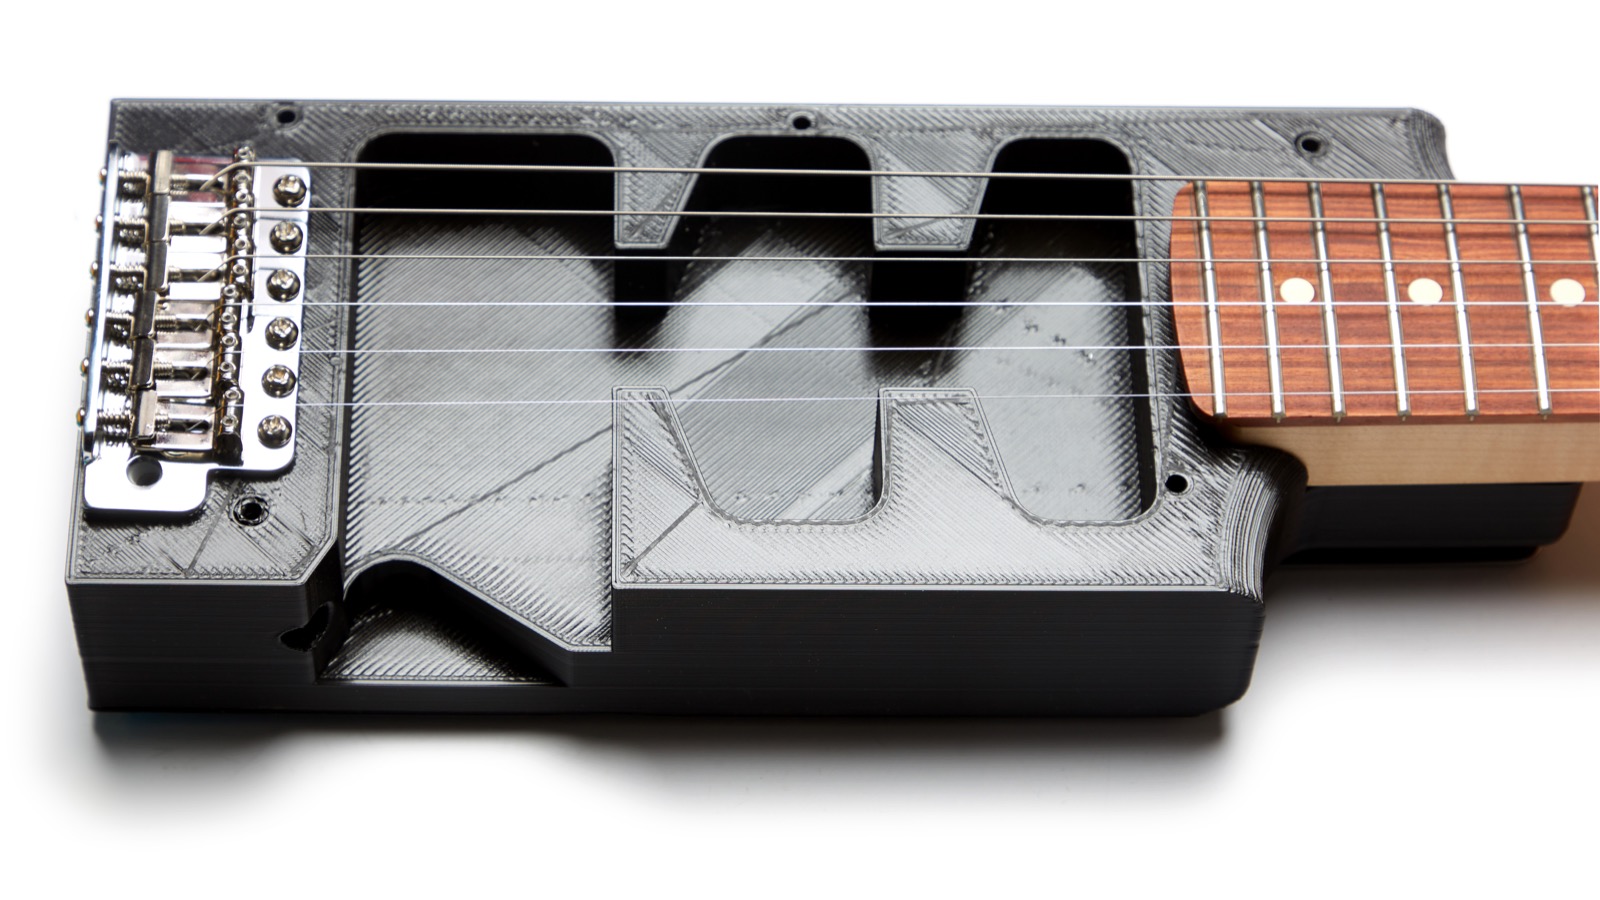 The first step was to print the core and bolt the bridge and neck onto it to see if this project was even feasible. To my delight the little black chunk of plastic not only worked, it actually sounded pretty great! Much to the consternation of my wife and kids, I walked around playing that little chunk of plastic for hours as I dreamed about designing and printing my own Steinberger-esq guitar. That is a project for another time, though to be honest I’m not sure I’m up to that task.
Some of the pick guard screw holes still don’t line up, so I just gave up and drilled them where they belonged because that actually does work provided the screw isn’t supporting any real weight or stress.
 Actually, drilling doesn’t work very well in 3D printed parts, so don’t just assume you can drill holes anywhere you want them, but for the pick guard it worked out OK.
The problem with drilling into PLA is that after a certain speed the friction of the drill bit in the plastic just causes the plastic to melt and not behave the way wood or even metal would because the melted plastic isn’t ejected from the channels in the bit properly. It works if you take it slow and you may need to manually pull plastic bits out of the hole. The right solution is to fix the hole positions, but that was an exercise in frustration due to my limited skills as a 3D designer.
 The neck just wouldn’t sit right on the Tough PLA print and I’m not sure why, though that part was also where I experimented using a .8mm nozzle and a .4mm layer height, so the larger layer height may have thrown something out of spec. I had to shim the neck a bit to get it to work right, which is a problem that I didn’t have with the normal PLA print. In fact, I was pretty impressed with the tone and sustain using PLA, so if I were to do it again I’d forget about the tough PLA, though time will tell if the prints hold together under the long-term stress of the strings.
Gluing the Parts
 Gluing the parts was the most nerve-wracking part of the entire project because if I screwed it up, days of work would be lost. As a result, I set about finding a way to improve my odds of success. I found that the simplest means of doing so was to line up the parts on two pieces of plywood that had perfectly straight cuts. Then I quickly discovered that this setup would only work for gluing the first two parts together. In fact, I also quickly determined that the parts would need to be glued in a certain order if I wanted them to line up neatly.
 Before gluing I had to sand all of the mating surfaces so that there would be sufficient surface area for the glue to do its thing. As you’ll see later on, there’s more room for error in that step since it’s easy to sand off too much plastic.
The glue I used was regular old Krazy Glue that I got from the hardware store, and I can tell you that I used two full tubes of it for the guitar body. Additionally, gluing the black part to the yellow/red assembly was a tricky operation because the glue makes the parts slippery at first and it’s very easy to let the glue set with them misaligned. If I were to do this again I would alter the individual pieces so that they interlocked somehow. I have some ideas on that if there’s a next time.
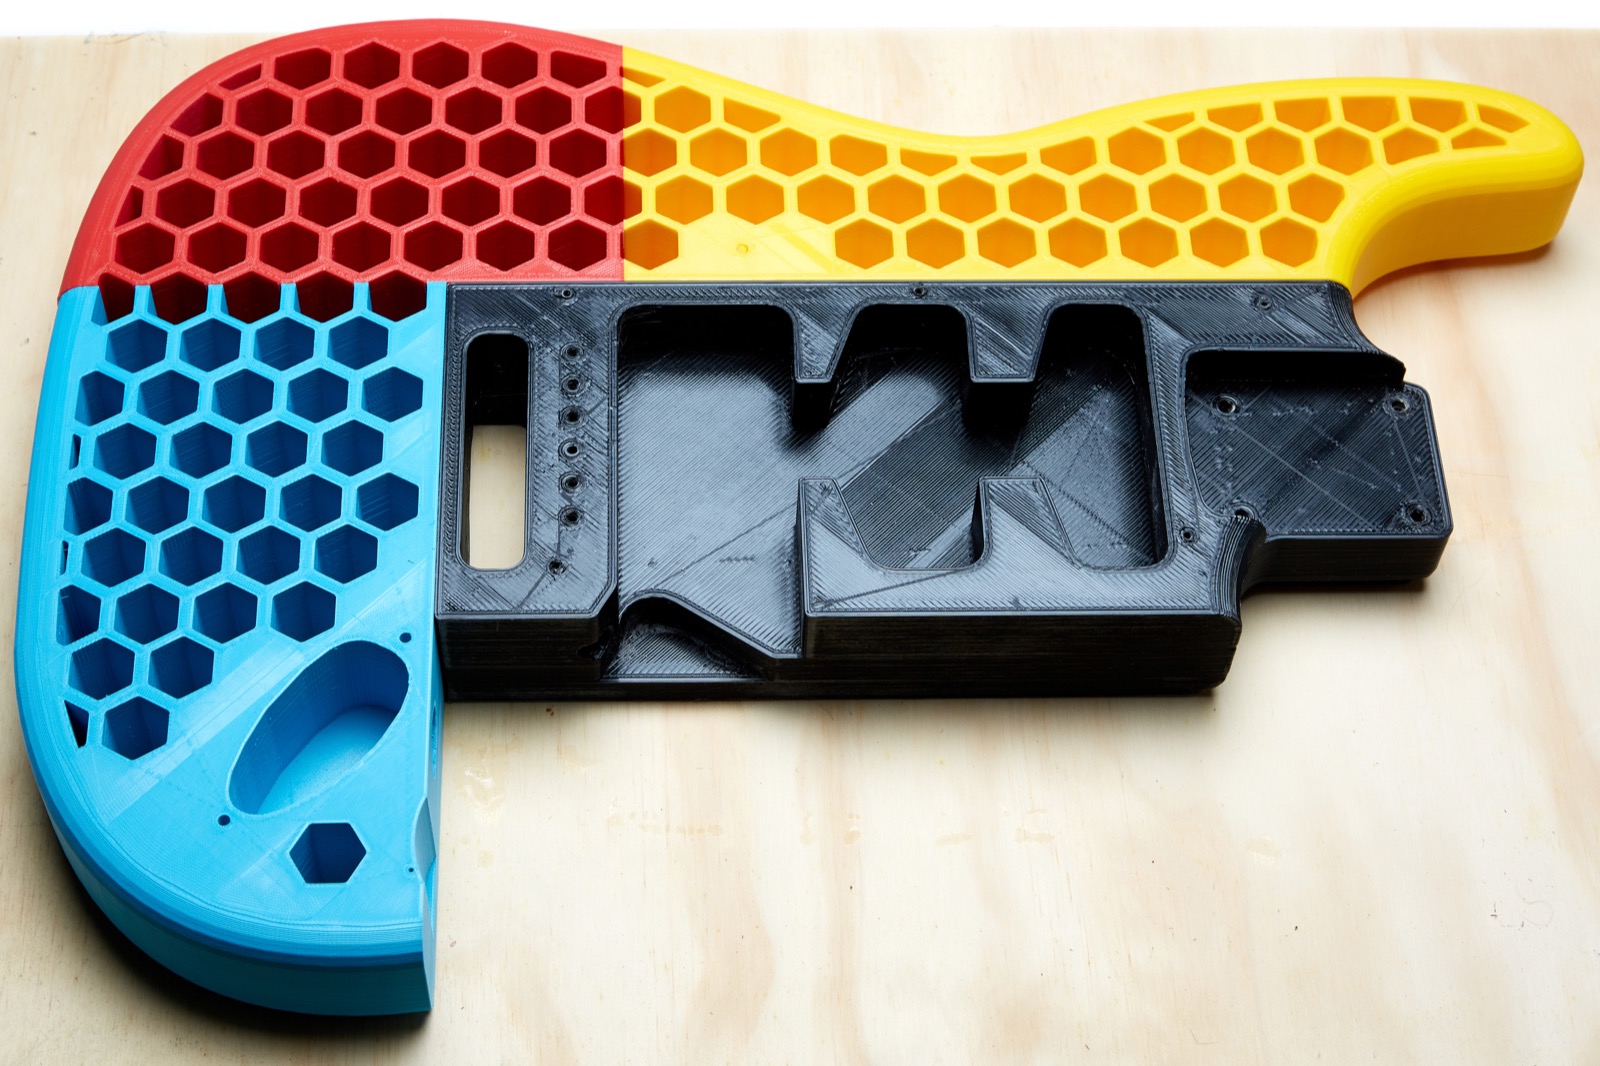 The blue piece was challenging because, though the glue sets pretty quickly, you still need to apply pressure for about a minute, and with the blue piece sitting in a corner of the red/yellow/black assembly, it was difficult to maintain pressure on two axis without using clamps. Note to self: next time use clamps.
Using simple finger strength worked for me, but then I have pretty long fingers and years of guitar playing has given me a strong grip in my left hand, so it it worked out fine. Your mileage may vary.
 The last piece (purple) was also a corner piece and therefore had the same multi-axis issues as the blue, but that also made it one of the easiest to line up. Since there are plenty of places to get a good grip in the black center piece, this was actually pretty easy to do.
Total time stressing over and planning for the glue steps? About a day. Total time spent gluing? About 15 minutes. Measure 20 times; cut once, and all that. And yes, I had super glue all over my fingers when I was done but managed not to glue myself together and I didn’t imprint my fingerprints anywhere on the guitar.
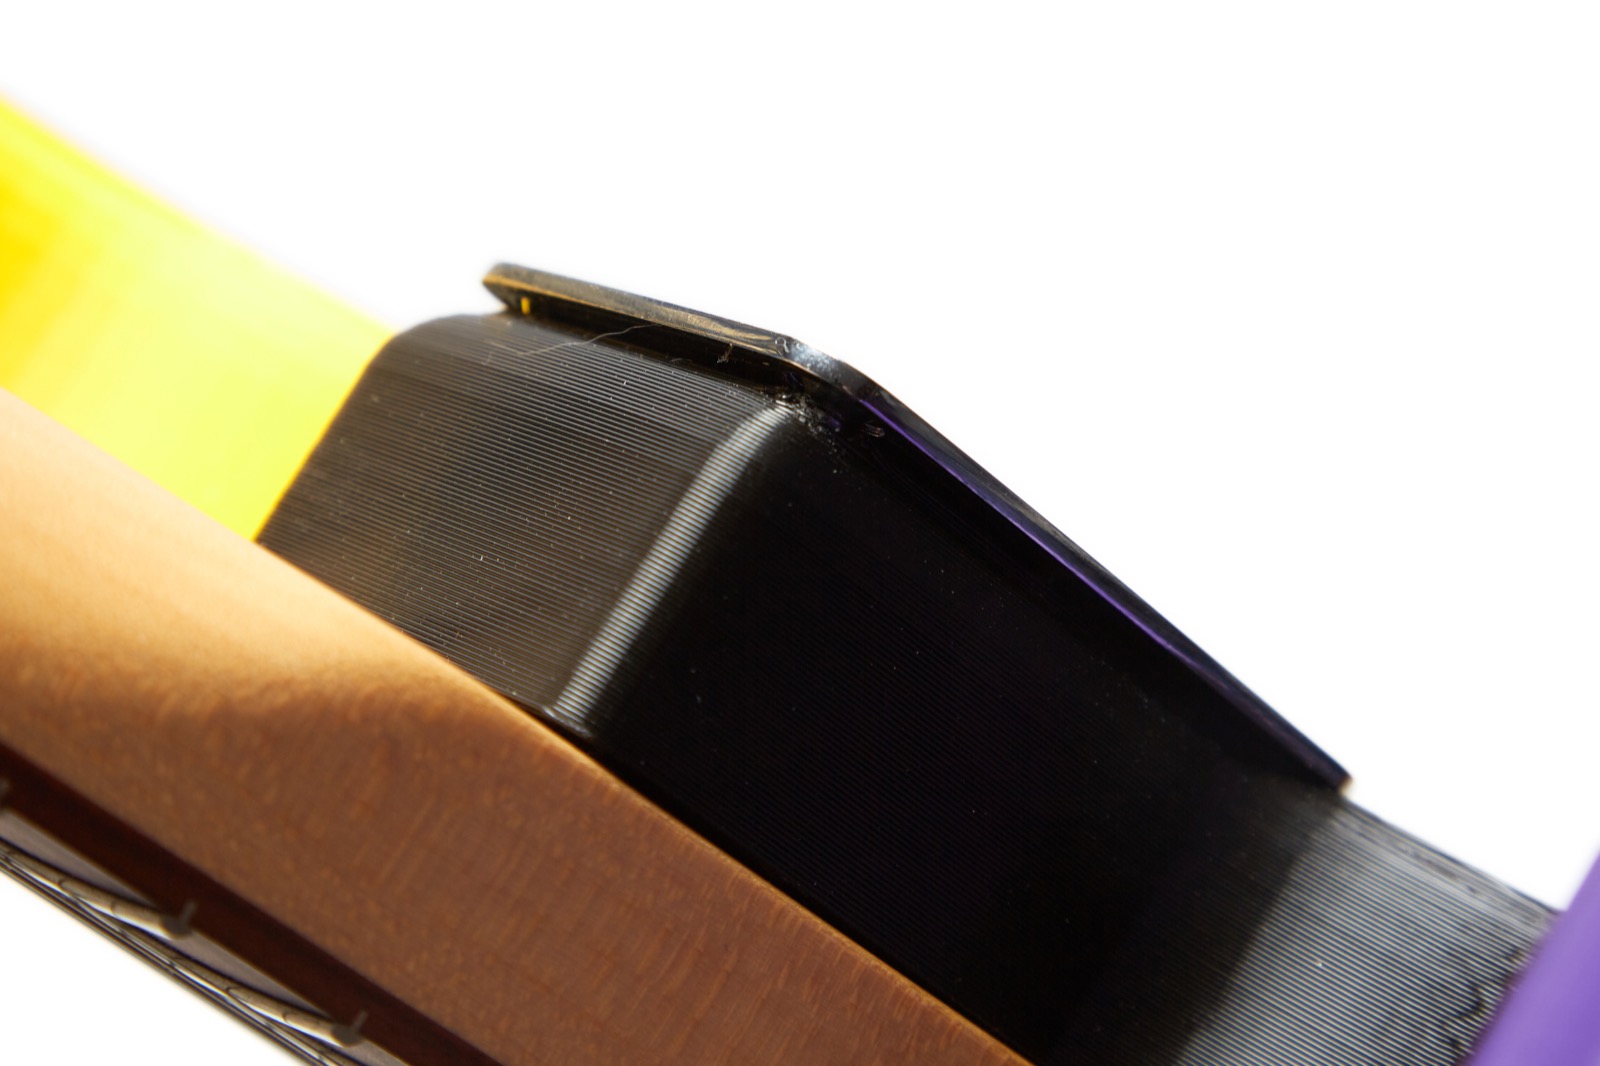
 I will admit that I used way too much glue on one of the joints, the results of which you can plainly see on the back of the guitar. The glue dripped down unto the plywood where it pooled and then proceeded to melt into the black and purple parts while I let it set. It looks terrible but doesn’t affect the playability or sound in any way. When I later made a second guitar, I used less glue and this wasn’t a problem, but making horrible mistakes is pretty much how I learn.
Cost of the Project
 Can you save boatloads of money 3D printing your own guitar? Let’s find out. I’ll split this into two parts: the cost of the filament, and the cost of the hardware.
Cost of Filament
Ignoring the cost of the printer (which was significant according to my wife), the cost of the filament is calculated to the penny by Cura, the slicing software I used to send the 3D models to the printer. Here’s how that worked out:
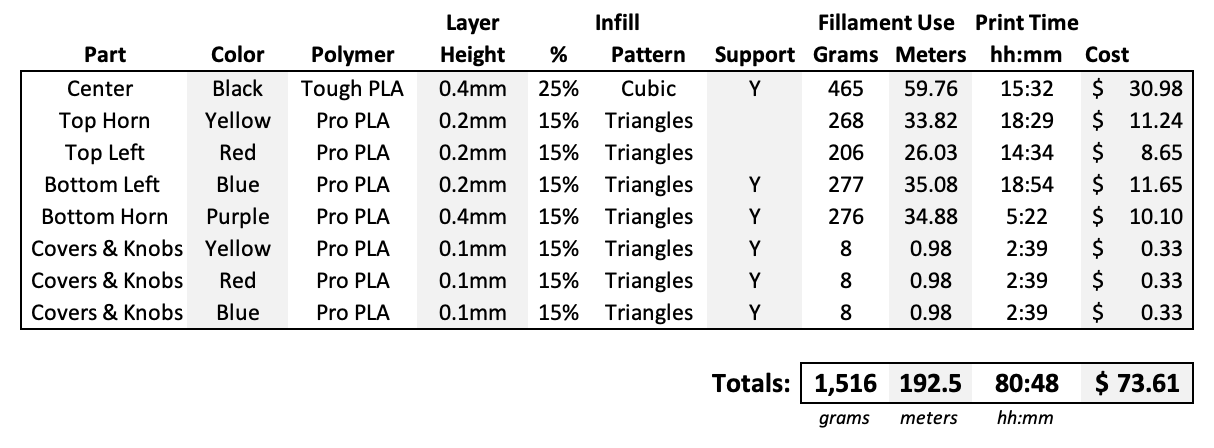 Prices are calculated based on the following:
- MatterHackers Pro PLA 1kg roll (MatterHackers): $42.00
- Ultimaker Tough PLA .75kg roll (MatterHackers): $49.95
Note that these prices do not included the two failed parts due to a power failure and a tangled spool of filament, nor do they include the three purple parts I printed when trying to figure out why the loaded pick guard wouldn’t fit on the body. In other words, this price reflects a working model with no mistakes having ever been made. You know, just like my marriage.
Cost of Hardware
The total cost for the hardware that I used is shown here: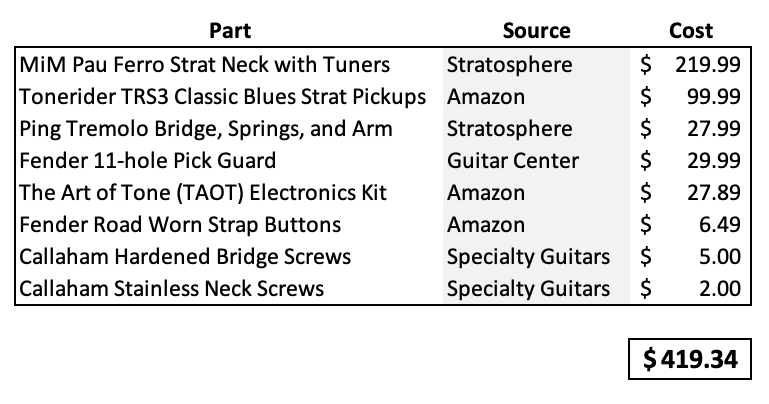 Here are the links for the listed hardware as purchased. Note that the prices shown above were accurate at the time of publishing (April, 2020).
- MIM Pau Ferro Strat Neck with Tuners (Stratosphere)
- Tonerider TRS3 Classic Blues Strat Pickups (Amazon)
- Ping Tremolo Bridge, Springs and Arm (Stratosphere)
- Fender 11-hole Pick Guard (Guitar Center)
- The Art of Tone Electronics kit (Amazon)
- Fender Road Worn Strap Buttons (Amazon)
- Callaham Hardened Bridge Screws (Specialty Guitars)
- Callaham stainless Neck Screws (Specialty Guitars)
Total Cost for the Guitar
Let’s recap and get a grand total:
- Total cost of hardware: $419.34
- Total cost of filament: $73.61
Total cost for the guitar: $492.95
Sweet Cats! I could have bought a nice used Japanese or Mexican Strat for that price!
Remember, though, that over ¾ of the hardware cost is contained in just the neck and pickups, and both could have been much cheaper had I gone with 100% generic or low-cost solutions. There are plenty of $100 generic or even Fender Squire necks on Reverb and I could have easily sourced a set of no-name import pickups for $20. Hell, I could have made the guitar a single or even dual humbucker setup and done the electronics for essentially nothing since I have so many of those laying around. Had I been able to build this entirely with leftover parts, I could have called it “free” except for the $88.76 filament cost.
Things I learned While Printing
 Here is a short list of things that I learned along the way. As is usually the case, when I learn something it is as a result of pain.
Nozzle Size Matters
If you’re printing big things like this and you’re OK loosing a bit of detail, get yourself an 0.8mm nozzle. Holy crap did that save a lot of time! For example, the lower purple horn takes 11h 25m to print with a 0.4mm nozzle and 5h 33m to print with an 0.8mm nozzle. When printing five huge parts that take 11+ hours to print, the total print time difference is measured in days.
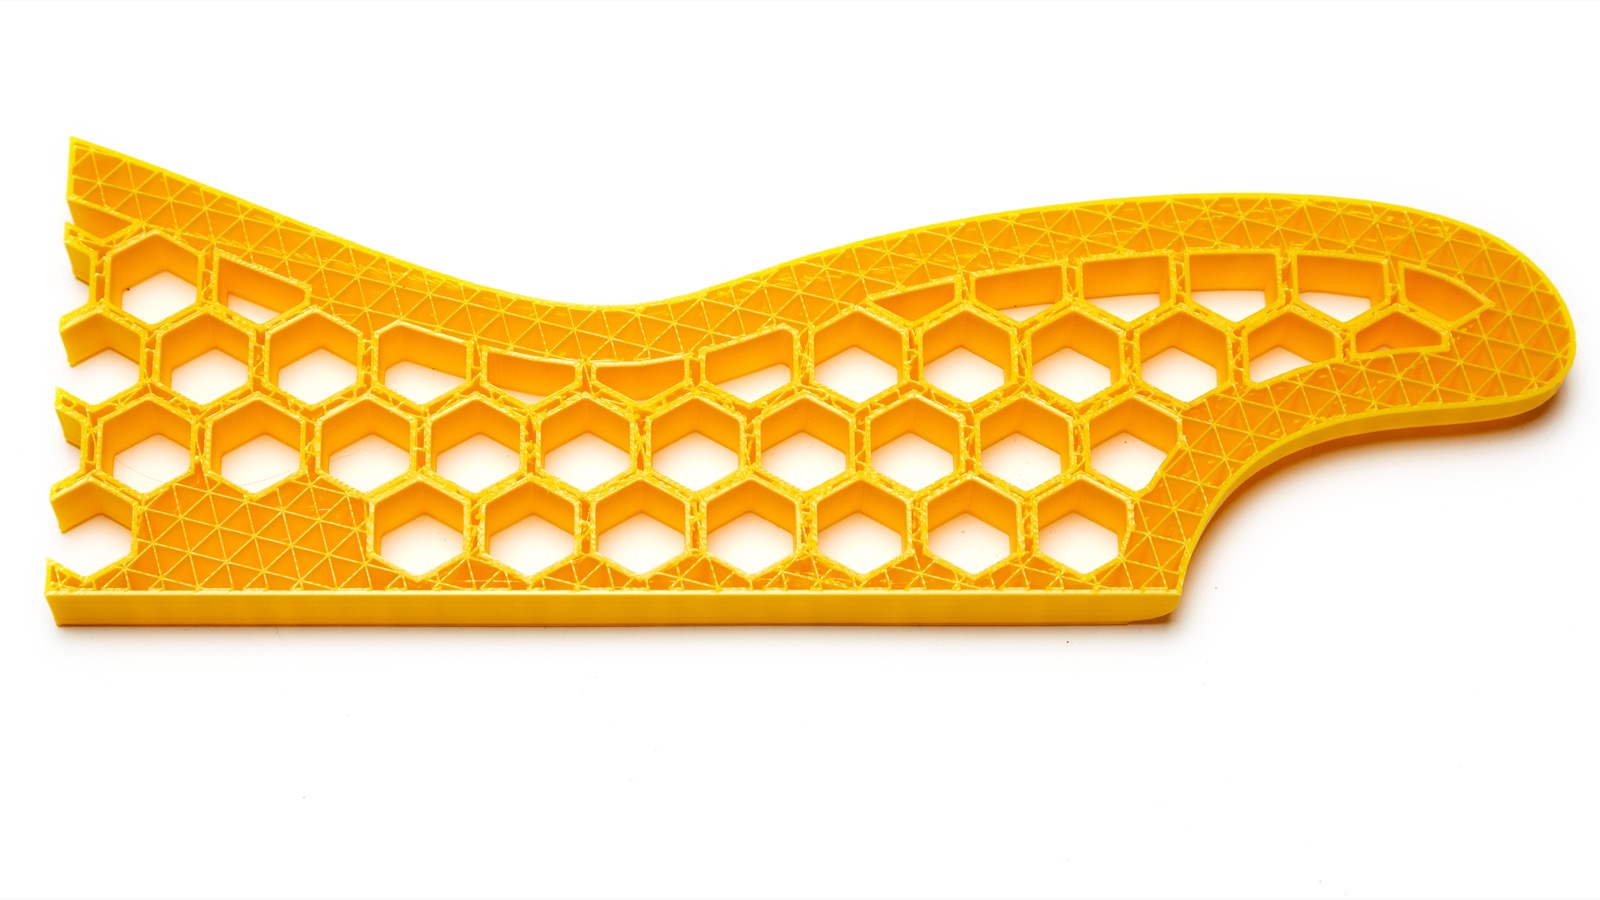
The downside to printing with the 0.8mm nozzle at 0.4mm (you generally only print at a layer height 1/2 the size of the nozzle) is that trying to print small round holes such as those for the pick guard is difficult at best. Another problem with the larger layer height is that it’s harder to glue the pieces together because they tend to slide into each other’s grooves and since the grooves are larger, there’s more sanding that needs to be done. The biggest issue, though, is that the parts just don’t look as good. That’s why the red, blue, and yellow parts were all printed with a 0.2mm layer height while the black and purple (which are mostly behind the pick guard) were printed at 0.4mm.
 Power Failures Suck
When I went to print first the full-sized piece (a 19 hour affair, remember) we had a power failure seven hours in which led to the first of two failed pieces, which you can see here in this pic. The cool thing about failed pieces is that they’re good for showing people the infill patterns that comprise the areas would be solid if created with subtractive manufacturing such as cutting, sanding, or CNC milling wood.
Drilling into PLA Doesn’t work Well
After trying in vain to get all of the pick guard holes to line up with my model, I finally gave up on about five of them and decided to just drill them out. This has two problems: first, if you don’t design a hole in the right place you may well drill into empty air due to the “solid” parts of the model actually being an infill pattern, and second, a spinning drill bit actually melts PLA plastic instead of drilling into it due to the relatively low melting point of PLA. Drilling slowly helps, and thankfully the holes I drilled were for the pick guard so they don’t really need to support any stress.
Source Material Matters
 Don’t take online 3D models for granted! I had to do a lot of work on that Strat model to get it to work properly, and only after printing it at full size did I realize that it doesn’t have a belly cut or a forearm bevel. Thankfully when piecing together the smaller test prints I realized that the neck screw holes didn’t go all the way through, there were no trem cavity screw holes, and so-on. Many of the 3D models I found online seemed to be designed for making 3D objects that look good in virtual space and not for fabricating fully functional instruments. This can be seen in this picture where it’s clear that the beveling around the neck plate is simply not correct – and that’s after an attempt at me fixing it in TinkerCAD.
Tangled Spools Suck
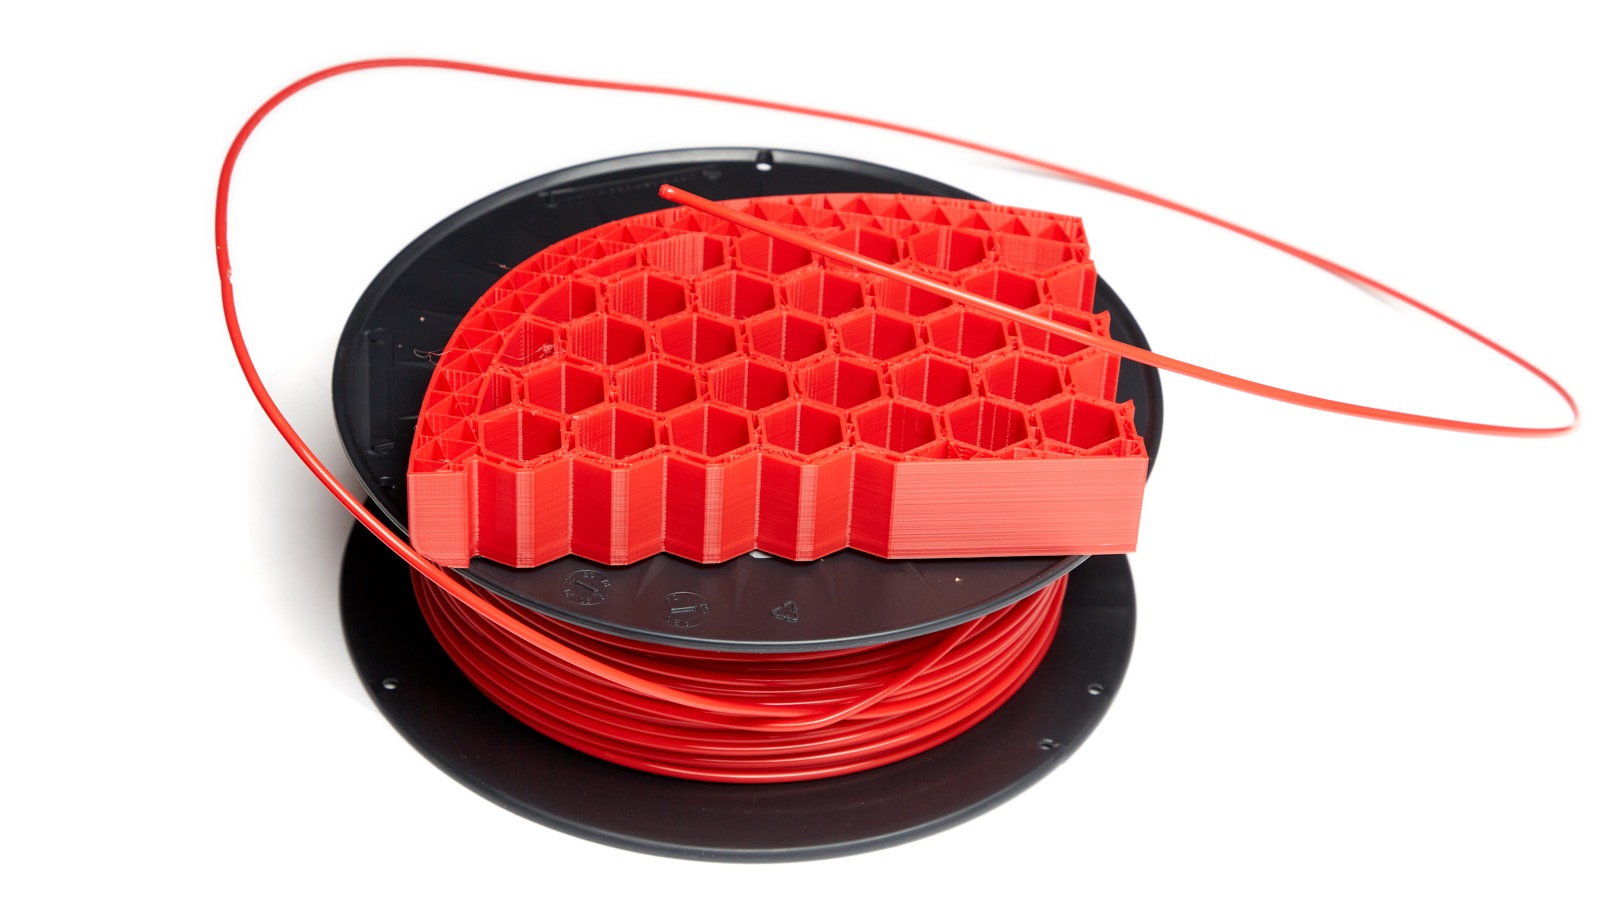 When printing another copy of the red piece, the spool got tangled and it failed 12 hours in. I’d read about things like this happening, but somehow this spool got tangled, likely months ago before I knew to keep a careful eye on the spools when removing them from the printer, and that tangle caused the printer to print for hours overnight without any filament being fed into the hot end, which meant that the red piece you see in the picture was ruined. And yes, that’s the actual knot that caused the
 pain lesson to be learned.
Keyed Parts Would be Better
Just gluing the parts together leaves a lot of room for error in the final stage, so if I ever print another I’ll be altering the parts so that they interlock in some fashion. I didn’t do this at first due to a lack of experience both in design and assembly of large 3D printed projects.
Be Careful Sanding the Parts
 This may not be obvious if you never done it, but you probably can’t just glue those 3D-printed parts together, and that’s because of the layer lines on the side which prevent the parts from sitting flush with each other. To fix that, the sides need to be sanded.
On the second guitar I built, I over-sanded one of the pieces so it doesn’t fit together quite right, the result of which can be seen in this picture of that second guitar where the blue and red parts don’t quite connect. That sucks because that blue part took 19 hours to print and I almost ruined it in a matter of minutes. If this had been a job for a client the entire thing would have been ruined because I didn’t notice the problem until gluing the third piece.
Sometimes Cheap is OK
 Honestly, I don’t notice much of a difference in tone when comparing the guitar with the $100 pickups and the $30 TAOT electronics to the guitar with the $30 pre-wired import pickups and electronics.
The difference in price alone between those two part sub sets is $157.87 (Pickups: $99.99, Electronics: $27.89, Guard: $29.99) vs $39.99 (link) which comes out to $117.88 less, not to mention the time saved not having to wire up the guard. Not only that, but the smaller import pots fit into one of the old test pieces that didn’t work in the first guitar, so if I’d used a cheap import solution I could have saved days of design and reprinting.
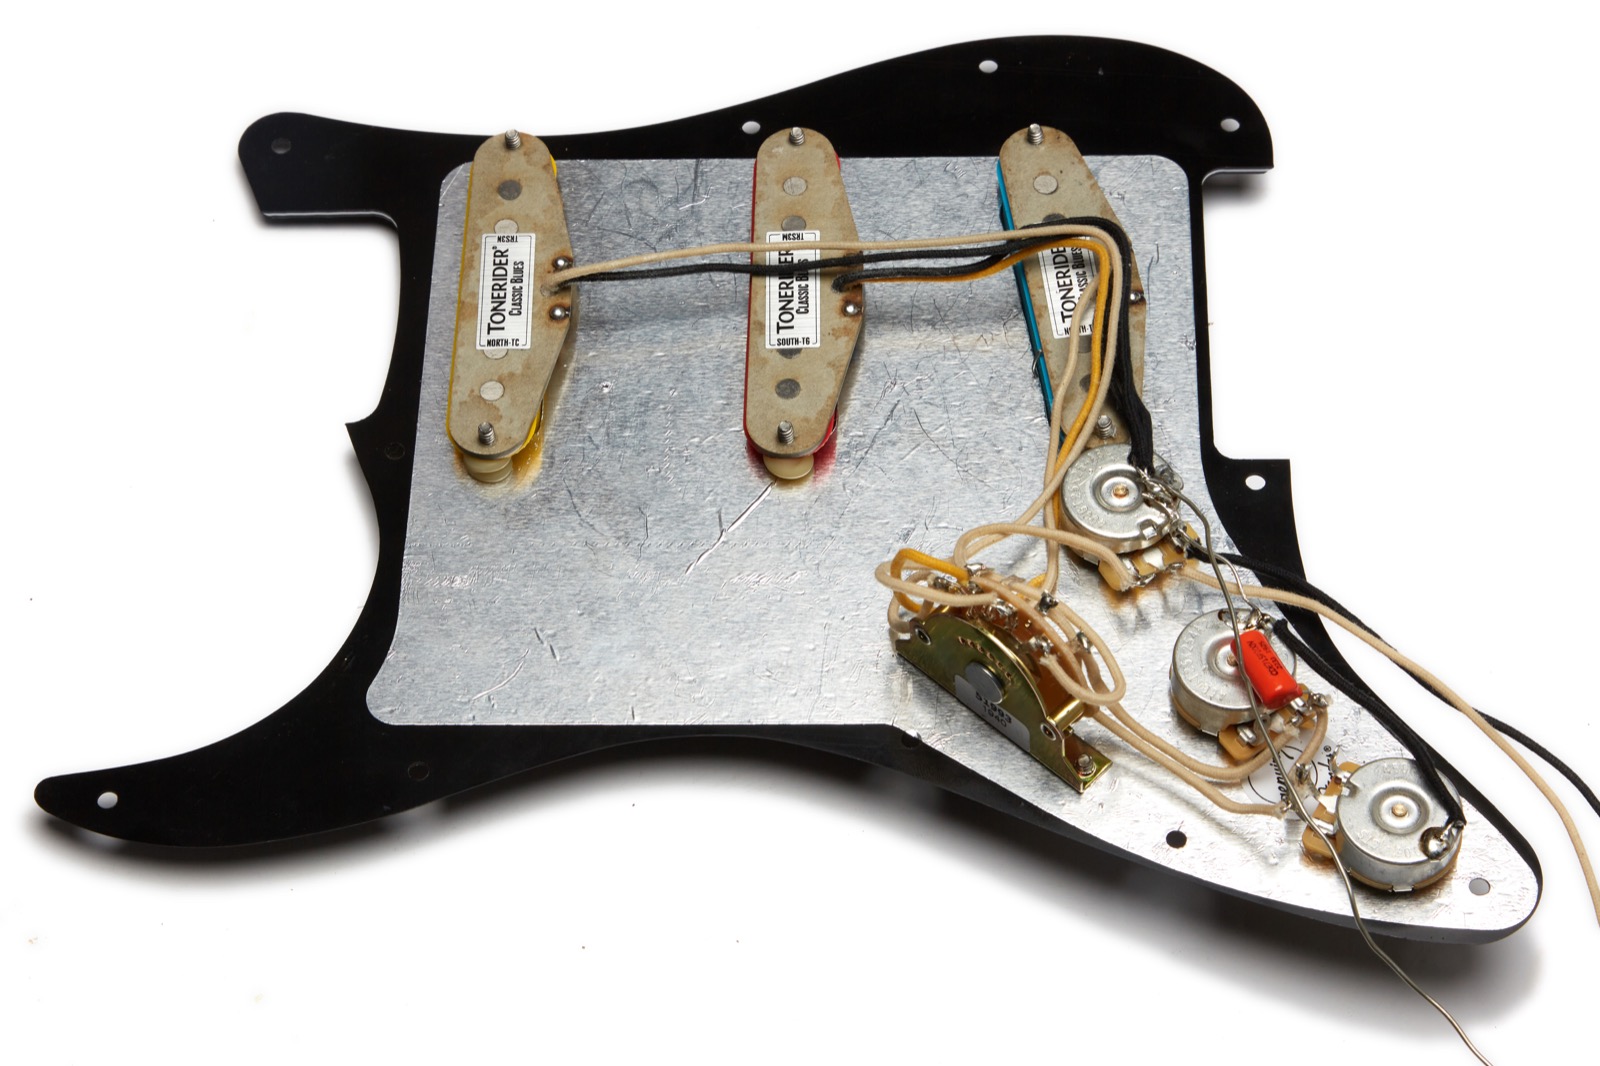
The first picture is of the Fender guard with the $100 Tonerider pickups and TAOT electronics all hand-soldered by me.
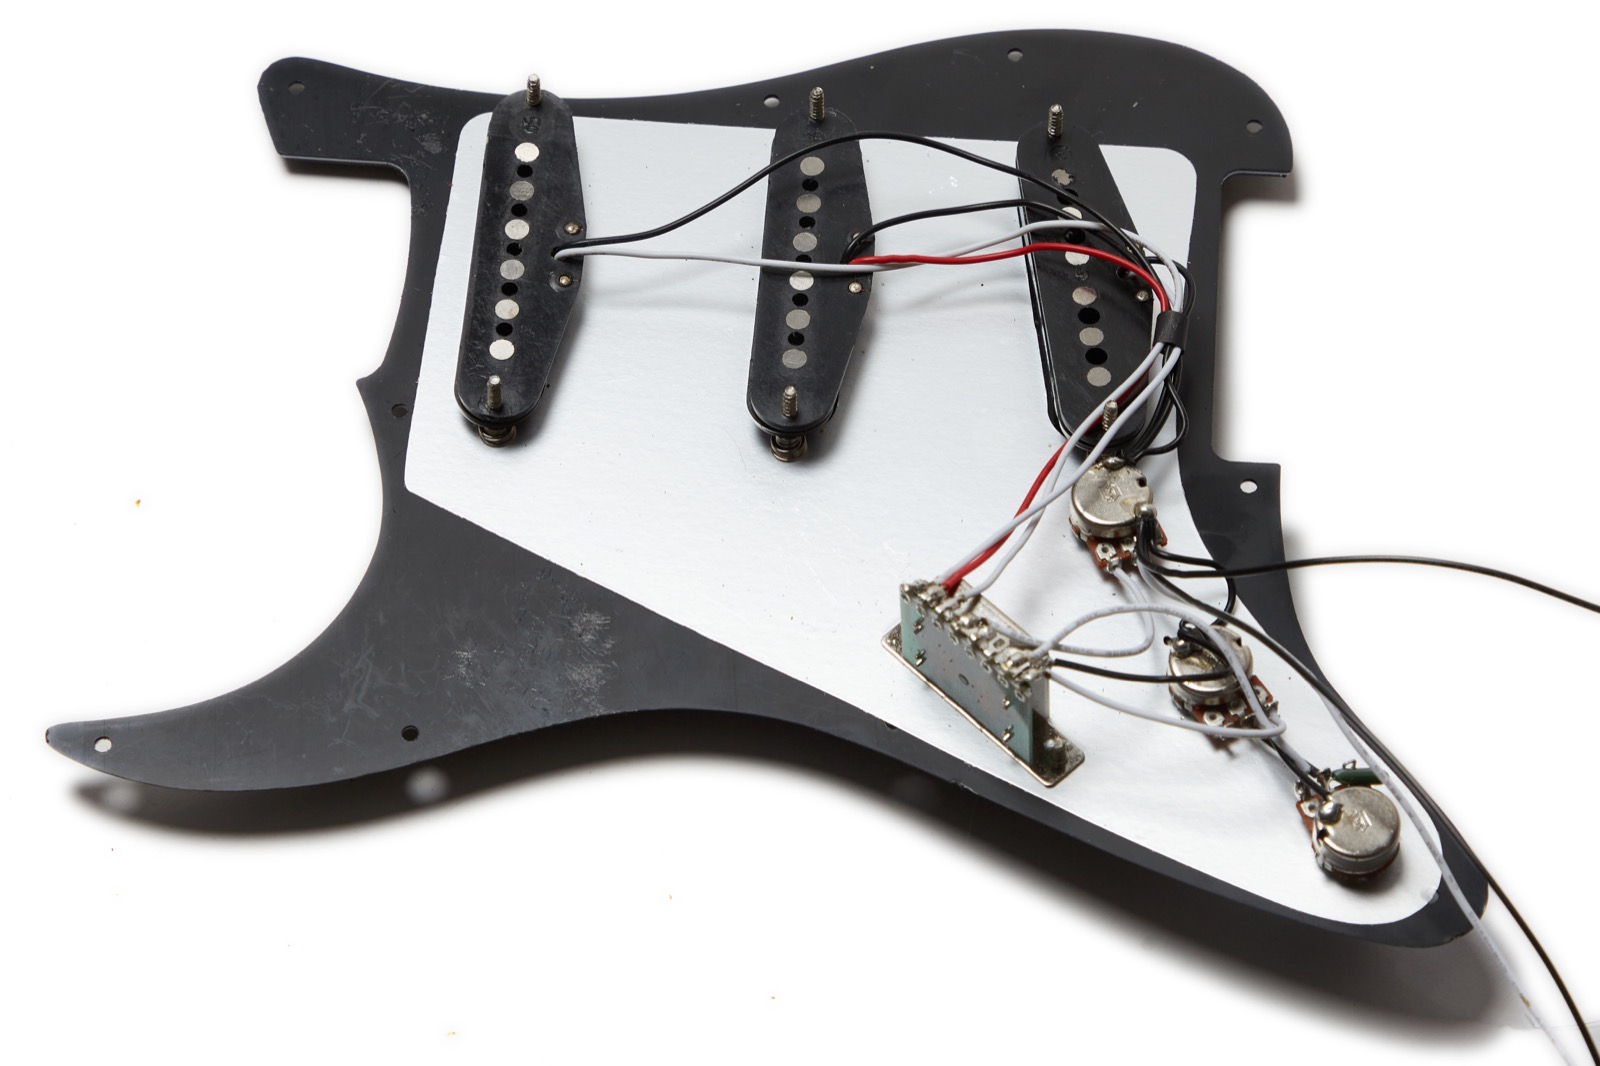 The second picture is of the cheap import pre-soldered pick guard that cost $40. Are the parts better on the first one? Absolutely. Does it really matter on a 3D printed guitar? Eh – probably not, and let me tell you: the cork-sniffer in me is none too happy about that.
I did have an issue when I printed all of the pickup covers. I discovered that on the import pre-wired guard that the bridge pickup had 52mm pole-piece spacing while the neck and middle were both 50mm, so I had to re-print those (the ToneRiders in my hand-wired setup were all 52mm).
The one place where I would not skimp is the neck, though I’d have to imagine that a nice Warmoth neck would do the job just fine.
But is it Useful as a Guitar?
 Surprisingly, yes!
The final guitar is well balanced, plays pretty much like a Strat, has a surprising amount of sustain, and actually sounds pretty great! It even suffers from Stratitis due to the vintage-spec pole piece heights on the pickups I used and when I listen to recordings I think the pickups need to be lowered, but I’m honestly kind of blown away by how well it works, which is honestly probably more to do with the genius of Leo Fender than anything I did.
The pictured sunburst guitar (technically Sienna Burst) is my 2008 Fender American Deluxe Ash Strat. I’ve modified the electronics and plastic which make the guitar a fabulous instrument and remains the only Strat that I’ve ever purchased. It sounds, looks, and plays amazingly well, so I used this guitar as the basis for comparison against the 3D-printed guitars. 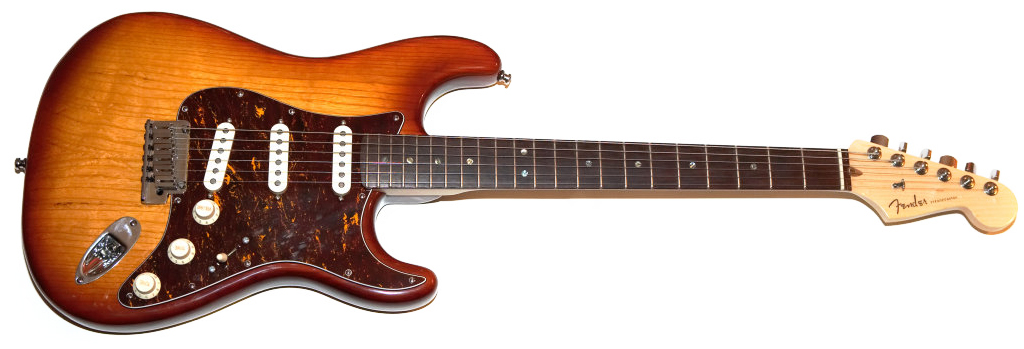
You may notice that in my pics the tremolo arm is not attached, and that’s even true on my Fender Strat. Why? Because I’m a child of the ’80s when the Floyd Rose ruled the earth and I can’t stand the trem on a Strat. As a result, I tend to either deck the trem or just not use the bar.
I can tell you that the tremolo absolutely does work on the 3D printed guitar, but after testing it I immediately took the bar off and bolted the trem flat to the top. This is partly due to my dislike for the regular Strat trem and partly due to me thinking that six screws threaded into plastic probably don’t need the additional stress of me banging on the whammy bar.
No matter how impressive the material, I don’t think any plastic will compare with a nice piece of swamp ash, so my expectations were pretty low when I started playing the plastic guitar for the first time.
Quick Aside #2
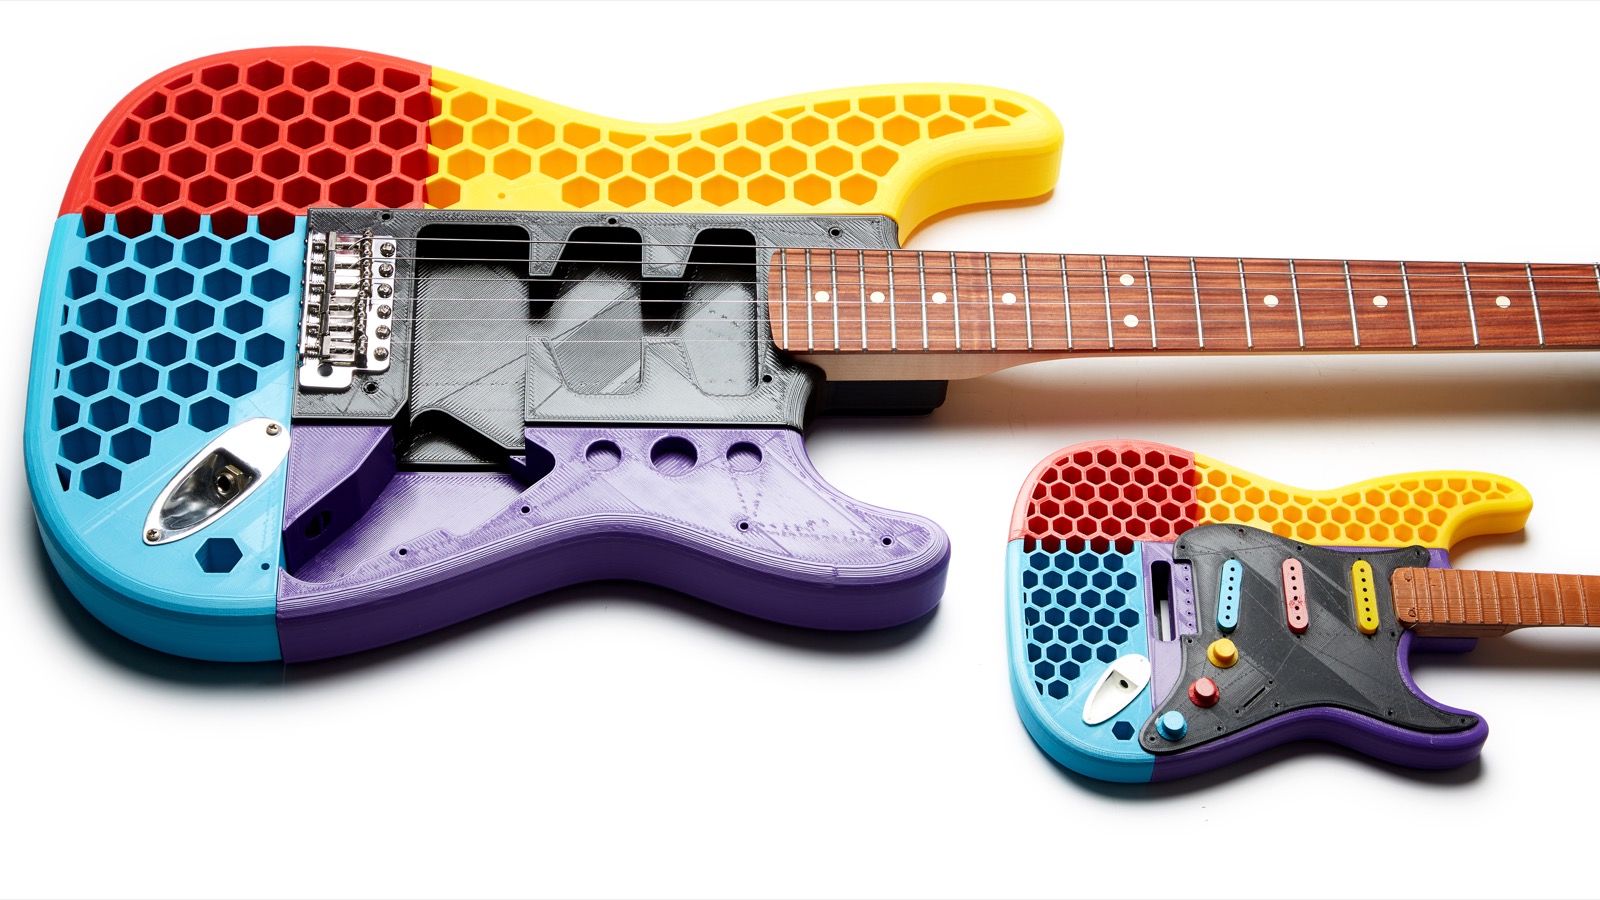
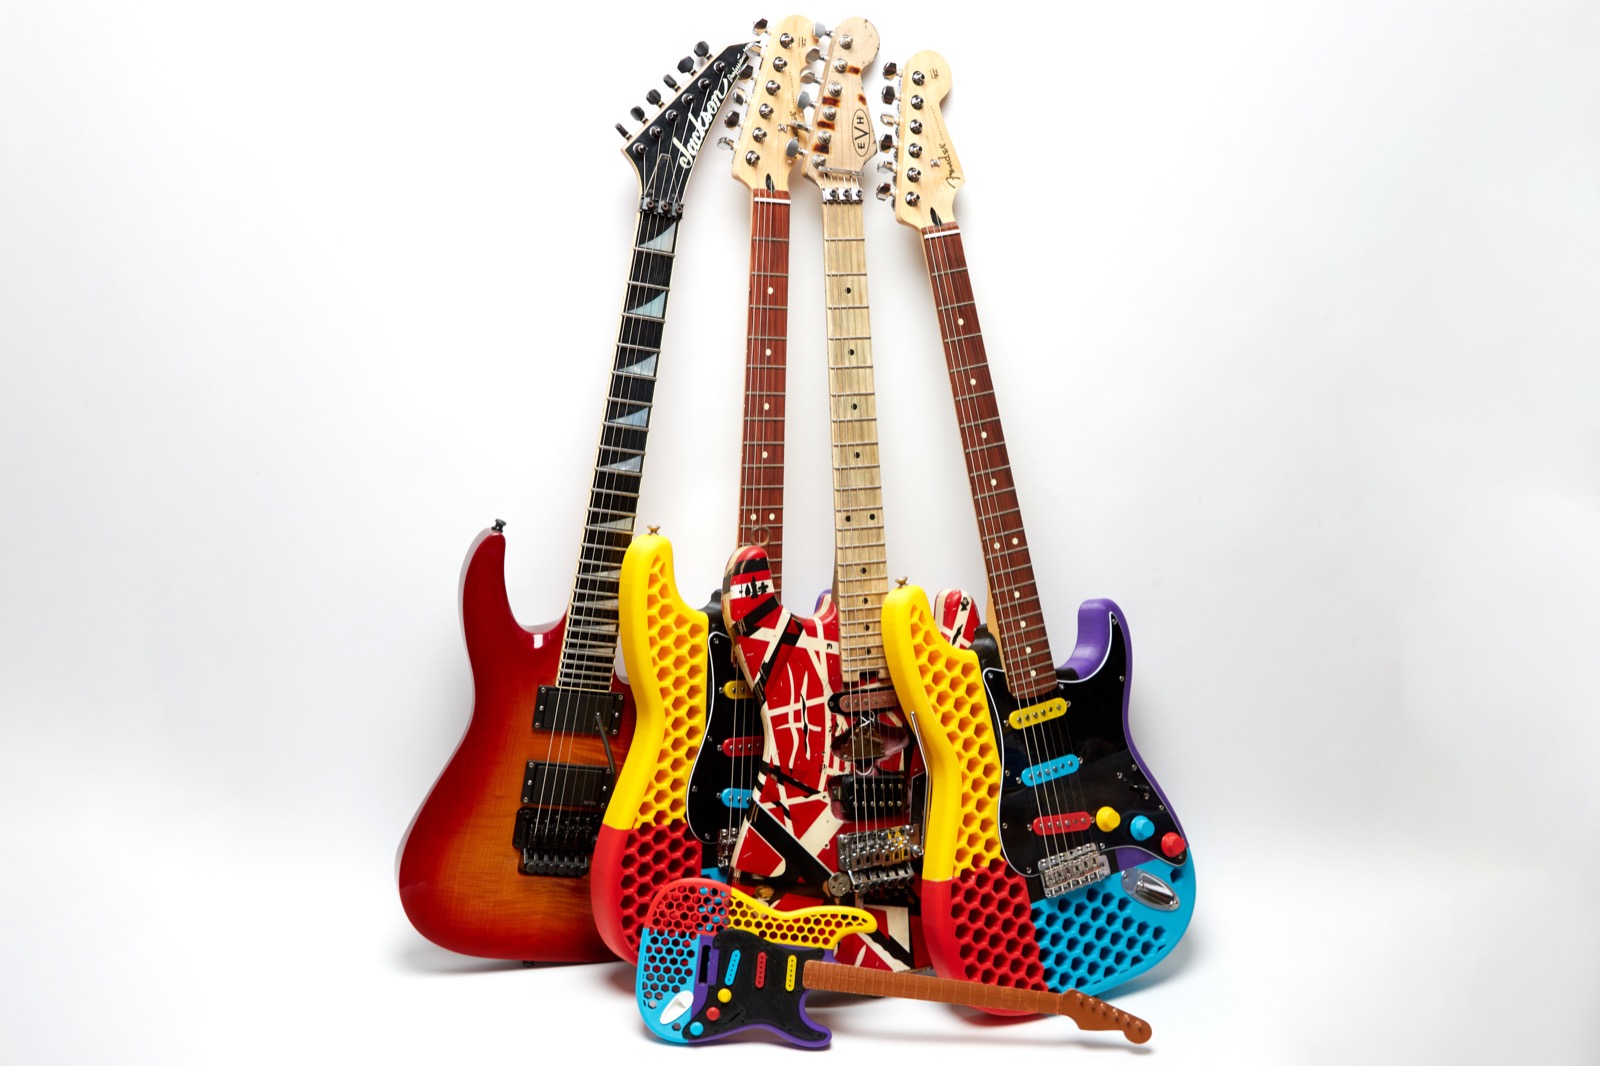 It struck me while editing the photos for this article that I might be inclined to doubt the veracity of the project since there’s nothing in most of the picture to prove that this is, in fact, a full-sized functional guitar. In an effort to combat this possibility, I got together a couple of my super-Strats, threw them all into a pile and snapped some pics. The guitars in this pic are, from left to right: 1992 Jackson Professional Soloist ATT Pro, the guitar from this article, my Judah EVH Frankenstrat conversion, and the second guitar I printed and gave to my daughter. Finally, the little test guitar is on the bottom for scale. I purposefully left enough shadow to show the background so that the picture didn’t look fake. If you zoom in you can even see where the screw prevented me from putting in all six bridge screws in the last guitar. You can also see that I got the pickup cover colors wrong on the guitar to the right, a fact noticed by none other than Kurt over at the Guilds of Grot after I showed the pic on the LetsTalkGuild forum.
Sure, I could have just put the guitar next to an amp that everyone recognized or took a picture of me holding it but all my amps are in storage except for my Axe-FX, and thanks to the salons all being closed due to the state-wide lockdowns I’m no longer pretty enough to be photographed.
Playability
 How’s it Play? I’ll try not to say “Like a Strat”… but I can’t because it plays like a freaking Strat. Does it feel as good in my hands as the American Deluxe? No, and that’s where I see the most difference.
This guitar does not have a refined feel like a nice wooden Strat, though it doesn’t have the candy-coated shell feeling of thick poly like the Fender does, either. And it certainly doesn’t have the luxurious feel of a lacquer-coated vintage instrument. My main gripe is probably the missing forearm bevel, but aside from that I feel like I’m playing a damn Strat.
 I’d probably attribute that to the MiM Fender neck since the neck has such a significant impact to a guitar’s sound and feel, which makes me wonder how the guitar would handle with an even better neck, but I think I’m done tinkering with this one for now.
The finished guitar weighs in at 6 lbs 10 oz (3.0 kilos) so it’s pretty lightweight for a Strat, at least when compared to the ash models that I prefer. Hell, my Judah EVH Frankenstrat weighs 8lbs 5oz (3.77 kilos) so it’s almost 25% lighter than that. The guitar is also surprisingly well balanced while sitting and standing, and I gotta say that surprised me, too.
 My main complaints are that, due to a quirk resulting from printing the pickup covers face-down on a glass bed, the tops of those covers have about a ½mm lip around them that I catch my fingers on while playing. That could be solved by either sanding it down or printing them face-up, but I didn’t think about that before assembling the guitar and I’m not pulling it all apart now that it’s together. While printing them face-up would likely solve this problem, it does require significantly more support material and thus causes longer print times.
2021 Edit: I’ve since resolved this problem which is commonly referred to as “Elephant Foot” in 3D printing circles. If your 3D printer is well setup, you shouldn’t have this problem.
The guitar is fairly resonant, but certainly doesn’t ring out like my ash Strat does, and the g-string seems a bit dead which I at first attributed to the high vintage pole pieces, but that didn’t seem to go away when I lowered the pickups down to the guard.
The guitar intonates well and the notes mostly play clear with the exception of some slight buzzing on the low frets which I attribute to neck relief. Honestly I haven’t really fine-tuned the setup because the guitar plays pretty well out of the box. I imagine it could probably be tightened up a bit here and there, but in reality this guitar will probably hang on the wall until someone asks to see or play it, so I’m not overly concerned about the details.
As a final note, it seems that every day I pick it up I need to tune it, but it doesn’t go out of tune while I’m playing it so that doesn’t seem like a major issue to me unless it’s a sign of the guitar slowly warping under the stress of the strings. Time will tell.
But How’s it Sound?
 I had pretty low expectations for this guitar that were probably what led me to be blown away, but this guitar sounds… well, it sounds like a Strat!
Even unplugged the guitar sounds like a Strat. Hell, even when I was walking around with nothing but the little black center piece bolted to the neck it sounded like a Strat! I honestly expected the finished guitar to sound like cheap plinky garbage but it does not. Plugged in it sounds like a Strat.
Now, I’m perfectly willing to blame my claim on a lack of a critical ear when it comes to Strats, being a humbucker guy at heart, but I generally pick up my Strat when I’m playing Dire Straits or even John Mayer, and to me this guitar does the job pretty damn well. Surprisingly well, in fact. Don’t believe me? Listen for yourself.
’59 Bassman
Open Chords #1
Open Chords #2
7th Chords
A Barre Chords
D-Shape Chords
Gary Killed a Little Lamb
For most of the recordings I play my usual test chords through all five of the pickup settings in the following order:
- Neck (position 5)
- Neck & Middle (position 4)
- Middle (position 3)
- Middle & Bridge (position 2)
- Bridge (position 1)
Why did I do them in reverse order of the numbered positions? Because I always record my guitars in the same order: neck to bridge.
For the last recording, I murdered Stevie Ray Vaughn’s Mary had a Little Lamb and put my own terrible spin on it in order to show off the fact that aside from building the guitar(s) in this article, I haven’t picked up a guitar in months. In fact, listening to those awful recordings I only hear a terrible guitar player and not a plastic home-made guitar. That’s gotta count for something, right?
Conclusion
I 3D printed a guitar! And it works! How cool is that?
Purists may argue that since I didn’t print the neck that I didn’t print the entire guitar, and to them I would say that a purely 3D printed guitar would probably look and sound like crap and I just couldn’t see the point of spending all this time and energy on something I wouldn’t actually play. Clearly I couldn’t see the point of practicing during the Coronavirus lockdown time, either, if the previous recordings are any indication.
Would I recommend a project of this size to the average person who’s new to 3D printing? Maybe not, but if you’ve had your printer for a while and you’re prepared for failed prints and other mishaps, then have at it! Especially if you already have most or all of the hardware you need to make it happen.
Would I gig with this guitar? Maybe for a song to show it off, but I’d have to do a lot of testing before I trusted it for an entire gig and I have my doubts that it would stand up to as much abuse and a wooden guitar.
Would I do it again? Hell, I already have! I printed a second almost identical guitar for my daughter because I had basically 3/4 of one already done due to test prints and such. That one even has locking tuners and doesn’t have Krazy Glue marks all over the back, even if I did over-sand one of the pieces.
My only concern is that PLA is known to warp under prolonged stress, so I’m not sure how long the bodies will last but so far it’s been a month with no discernible issues. If there are any failures in the future I’ll be sure to update this article. Of course the best part is that if it fails I can just print a new one!
April 5, 2021 Update: One Year Later
 I wanted to post an update after exactly one year from the date of publishing this article, so I did some science, and by “science” I mean I left the guitar leaning in a corner for a year. It was not in a case, it was not detuned, and it was not cared for in any way. The strings are a year old, the guitar has been through the ravages of the humidity changes here in rural NJ (last week it was 18%), and the guitar was just largely ignored.
The last time I picked it up was probably six months ago when I moved it for reasons that escape me as I write this, but the guitar has only been picked up, tunes, and strummed a couple of times to show it to people. Sadly, since we’re over a year into Covid lockdowns, those were via zoom. The picture shows proof of one year’s worth of dust under the strings. Ew.
Here’s how the guitar has fared structurally:
- Glue seams – No change
- Plastic (PLA) warping – No change
- Plastic (PLA) cracking – No change
- Bridge angle and stability – No change
- Neck angle – No change
Here’s how the guitar fared from a setup standpoint:
- Neck relief – Slightly bowed: needed 1/2 turn truss rod adjustment
- Fretboard – A bit dry and could use some bore oil
- Frets – Could use a polishing
- Electronics – No problems
I find it pretty funny that though I fully expected the string tension to pull the PLA apart, there has been zero sign of that happening. Meanwhile the old-school wooden neck was the source of all of the issues with the guitar, but to be fair any guitar left in the corner for a year would probably need a similar setup.
I must say that I’m impressed. This glued-together 3D printed guitar still kicks ass a year after I made it, and you know what? It still sounds like a Strat!
June 2, 2025 Update: Five Years!
 Not only has this guitar been sitting unused in the corner of my office with the same basic conditions as the last review – for an additional four years – but we live in a new house so it’s been moved, moved again, and then finally moved into the corner where it’s been resting for probably three of those four years. The only time I play it is to show guests that it actually works, and that’s usually through my JCM-800, because I have a JCM-800 (that I built). It has the same strings on it, which weirdly have not rusted (probably due to limited finger oil contamination), and I have done literally zero maintenance on the guitar.
 These pics were taken with my iPhone on the carpet because I was too lazy to set up the studio. The dust was left on it again to show that these aren’t old pics. Let’s run down the same list as last time:
- Glue seams – No change
- Plastic (PLA) warping – No change
- Plastic (PLA) cracking – No change
- Bridge angle and stability – No change
- Neck angle – No change
Here’s how the guitar fared from a setup standpoint:
- Neck relief – Still straight! And this guitar is not in the humidified room with the nice acoustics.
- Fretboard – A bit dry and could use some bore oil (I hate dry fretboards)
- Frets – Could still use a polishing
- Electronics – It’s buzzing (ground hum), and it’s pretty bad. My guess without taking the guard off is that there’s a broken ground lead somewhere and while I’d be inclined to blame the cheap import parts, it could also just as easily be a bad solder joint from the maniac who built it.
The craziest thing of all? It was almost in tune. If the Tough-PLA had warped I would expect the guitar to be violently out of tune but it required only less than a semitone on a few strings, and what’s more it was perfectly playable. To be fair I don’t recall the last time I tuned it, but it’s been at least a year. Hooray for locking tuners, I suppose.
I’m honestly shocked. I expected this thing to self destruct within six months but it still plays well and aside from the probably grounding issue, it still sounds like a Strat. If I remember I’ll post another update at the 10-year mark, but short of leaving this in a hot car where it might melt, I’d imagine that the guitar has pretty well stabilized.
Donate: PayPal Crypto:
ETH: 0x0AC57f8e0A49dc06Ed4f7926d169342ec4FCd461
Doge: DFWpLqMr6QF67t4wRzvTtNd8UDwjGTQBGs
Very cool and I love the colors. Thanks for including enough geeky stuff to satisfy my nerdy side while still keeping it interesting. Look forward to seeing the next one.
A fantastic project and very nice documentation. Superb work, Gary!
Out of tune issue could be due to a higher coefficient of thermal expansion for plastics as compared to hardwoods. Even my ash-bodied Telecaster changes tuning (ever so slightly) after I’ve played it for 20-30 minutes as my body warms it up. It’s subtle, but measurable.
Like Dave C., I love the colors too! Great choices.
Continued …
To test this, tune the instrument and keep it temperature stable as long as feasible. Recheck tuning. If no change, good. If there is a change, it may be that the body is slowly deforming under pressure. This may reach a limit over time, though, and eventually stabilize.
Keep it in tune and keep us posted!
Interesting. If you mean “leave it in the corner and see how it does”, then I’m all over it. 🙂
Hi Gary,
I saw your Guitar on FB and was curious on how you 3-D printed it. You have a very informative style of writing. Excellent article. Nice job.
Take care ~ Dennis
Ps. ~ also liked your face masks. Can you modify them so there is a pouch to put “breathable medicine” in. If this virus comes out on droplets then why can’t we reverse that and send our cures in through our air ways directly into our lungs?
Just a thought.
Wonderful Guitar. Please make a video on youtube.
You ROCK!!! Agreed that a YouTube video would be awesome 🤘🤘
fat
Hi Gary.
It would be great to be able to mod this design. Any chance of posting in the TinkerCAD gallery?
https://blog.tinkercad.com/share-your-designs-with-the-world
I really enjoyed reading this and it makes me want to learn how to play guitar.
Ok, I am new to the guitar world, but not to 3d printing. My friend’s birthday is coming up in a couple of months and I was just hoping I could throw some dumb questions out there.
I understand the printing process and I will manage through that but for the assembly of the rest of the guitar do you have any good tips or videos on how to assemble the electric part of the guitar. Is this electric or what? Sorry this may seem like really dumb questions to you guys but I don’t know much of anything about guitars. Thanks so much in advance
You could maybe used heat sets fro attaching the pick guard on future design mods. They can be bought in various sizes and are pressed into the PLA with a hot soldering iron. They are a good strong solution.
Cool idea – thanks!
Very impressive, Nice job !!!
First part done. I’m printing this with a 0.2mm nozzle so I’m looking at around 360 hours in total. The quality is pretty amazing on my Ender 5 though.
I’m nowhere near proficient enough on any kind of guitar to justify spending out on genuine electronics so I’ll be going with generics. If you have any tips on where to get a neck and what to look for I’d be grateful.
360 hours! I’d love to see it when you’re done!
I got my neck at Stratosphere (see the Cost of Hardware section) where they have a whole bunch of options. Warmoth is always a good option, too.
I built two of these, one with nicer pickups and one with a generic populated pickguard from Amazon (see “Sometimes Cheap is OK” near the bottom) for for $40 and it’s surprisingly pretty great.
Hello, nice guitar, could you please send me the original (not sliced model). I’d like to split this model differently and make tonguing and grooving connections.
Sure! But only if you promise to share. 🙂
Very nice looking! I just printed one myself using – https://www.thingiverse.com/thing:4577188 – dues to me having an Ender 5 and the bed is just so small for things like this! I found this article when researching the best glue for putting it together (I am going to try JB Weld ClearWeld *crosses fingers*). I really hope mine looks even 1/10 as nice as yours! I do plan on painting it before adding everything just so it will fill in some small layer lines and imperfections (used .28mm layer height). Will have a make up on thingiverse when i get it done (if it doesn’t shatter into a thousand pieces anyway). Really appreciate the in-depth article for your process!
Keying parts is simple. Make matching 2mm x5 holes in both parts, cut any filament to 10mm lenght, insert and there it is.
I’m printing my own design guitar right now. First has cheap chinese wood neck, embedded Mooer PE100 multi effect (I hate cables and I can’t rip Marshall100 in multi apartment building aniway 🙂 . Its’s ok, sounds nice, plays easy, but it is not what I wanted. Second one, now in the making, will have printed PACF neck, PLA fretboard (with metal frets) and active humbuckers. I like to push myself…..
Thanks! I’ve since learned this trick (and it’s a great one!), but just wanted to add that since I use 3mm filament that the holes need to be ~3.5mm or 3mm and drilled out to better match the actual size.
I’d love to see your finished product! A printed neck is a tough one to pull of and would love to see it.
Hi
For now it is here:
https://www.pinterest.co.uk/stenc55/my-3d-printed-guitars/
I’ll have to redo the neck. Right side tuners are to close together, neck mounting holes will have to be strengthened, and most important, instead of 2x fi6mm rods I will put in 2x 10x5mm rods. It likes to bend too much.
Whoa – that’s cool!
I find bore oil a bit too oily. Dunlop lemon oil is my go to.
Hello,
you did an amazing job designing this guitar and thank you for sharing this inspiring project.
I would love to be able to design my own guitar but I never assembled one (I have basic knowledge of Fusion 360).
I would like to know how you got the dimensions to ensure that the neck, microphones and other parts fit well?
Do you have a file that I could use and modify with my own design?
Yours is pretty cool and I would be happy to use it but I would be much more proud of myself if I could create my own design.
Thanks a lot.
Xavier
Thanks!
Sorry, I don’t have what you’re looking for, but the body is a Fender Stratocaster shape, so there should be a lot of information out there about them. A quick search found this which would probably be a good starting point: https://theelectricluthier.com/your-guide-to-build-and-shape-a-stratocaster-body/
Have you had any issues with PLA melting? I printed one for my significant other and he is concerned about it melting!
Nope! The melting temp of PLA is ~170C which is 338F, so for it to spontaneously melt it would need to be in an oven. Even the dashboard of a car in Arizona in the hottest summer days only gets to ~195F.
If it does melt, though, just print a new one! 🙂
Hi,
Whats the size for the guitar. I see 459 for x 320 for y and 44 for z.
Its very small for a strat no ?
Hey Gary,
What an awesome way to use 3d printing! I came across your Thingiverse file the other day and was just blown away by how nice and easy the printing appeared. After doing some more research and seeing your well done writeup I’m convinced to take the plunge into this project. I’ve been reworking your model to hollow the top honeycombing out to allow for a resin pour and even possibly do the main body in resin as well if possible. Assembling them with some joints and keeping the components sections and rim 3dprinted.
Thanks again!
Very cool! I’d love to see the finished product.
Man I just stumble upon this article and blew my mind! Very cool I wanna make one myself!
Did you ever make the YouTube video?
I did not, but that guitar is still going strong!
What was the scale length of the neck you used?
Details from the link where I outlined the parts: Official Fender Player Stratocaster Neck & Tuners- Tinted Maple w/ Pau Ferro Fingerboard- Modern “C” Shape- 9.5″ Radius (241 mm)- 22 Medium Jumbo Frets- 25.5″ (648 mm) Scale Length– 1.650″ (42 mm) Width at Nut. Satin Urethane Finish on Back, Gloss Urethane Finish on Front.
Hope that helps!
Hİ, it looks great, I’m about to place the order for the neck and other parts. I have only one question: what is the tremolo measurement? (52.5mm 54mm)
I see that Stratosphereparts.com is no more so my links don’t work. Such is the way of the web. They seem to still be selling on Ebay, though.
I don’t have that measurement in my notes, but the bridge I used is a Ping STR-TRST11-C which is for American Vintage Stratocasters.
Thank you for your response, I need the distance between the first screw and the last screw, it’s not written their either :S The holes didn’t line up for me, I have 52.5, I think I need 54.
That’s the bridge I used. I can’t measure accurately without de-stringing but it looks more like 55-56mm which makes sense since according to Fender the American Vintage bridge is 2-7/32″ or 2.22″ which is 56.388mm.
Fender link: https://www.fender.com/en-US/parts/bridges/american-vintage-series-stratocaster-tremolo-assemblies/0992049000.html
I can’t access the site you shared, that’s why I can’t see it :S
It doesn’t surprise me that the guitar sounds like a Strat! 🙂
Recommend checking out this video if you haven’t already seen it. The main conclusion is that the only thing that really matters on a guitar is the pickups and electronics (as well as strings, and scale length).
https://youtu.be/n02tImce3AE?si=v37Z0h132yfbKvdD
Just wondering how you attached the Strap Buttons to the guitar. Very cool….making one as we speak 🙂
I drilled a hole and screwed it in.
Hey, I was wondering how that “Strong PLA” is holding up without metal supports like the EXO Guitar? I’ve been thinking about making my own but I’m concerned about it becoming deformed after a while.
Thanks for asking! I’ve posted a five-year update at the end of the article.
I loved the updates, that’s exactly what I wanted to know about a 3d printed guitar