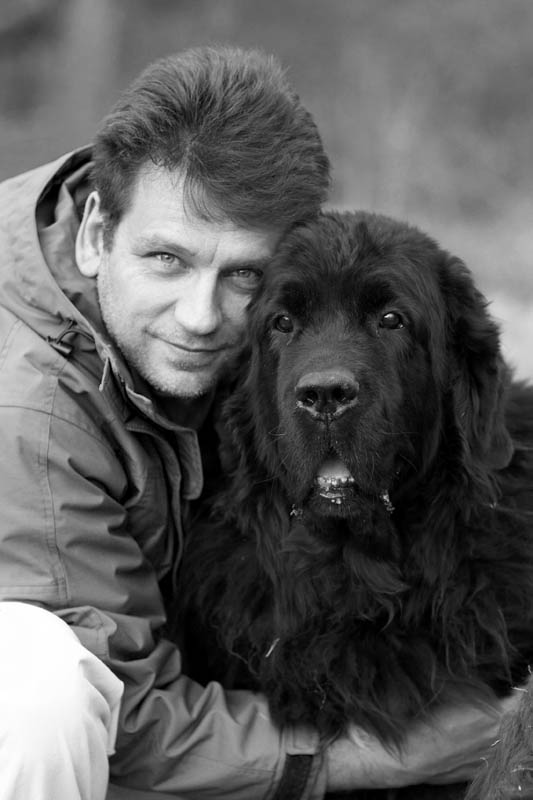
 I get asked over and over again, “How do you take those pictures of your dogs? Anytime I take a picture of my Newfie (Or other black dog), all I get is a big black smudge!” Here are some tricks I recommend to people to help take better pictures of their pets. Some you’ll find easy to replicate, while others might take some practice and/or equipment. Either way I bet that if you follow my advice, you’ll take better pictures of any pet, but most especially of big black dogs
Gear
First lets talk about gear. Do you know what the first question anyone asks me when they like one of my photos is? ” Almost every time I get asked, “What kind of camera did you use?”
Now can you guess what the first question asked of me is when the picture sucks? It’s usually, “Who took that picture?”
My point here is that the equipment is secondary to the person taking the picture. I’ve seen great pictures taken with disposable cameras and now phones. I have taken literally thousands of truly terrible photos using stellar gear. Don’t buy a $4,000 Nikon expecting it to take great pictures for you. If you buy a great paint brush, do you think that you’ll be able to paint like Monet or Van Gogh?
Gear vs. Technique
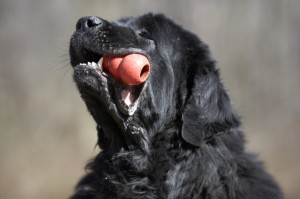 I am fortunate enough to be able to afford very nice camera gear. Some of the photos I take reflect that, but really only if you know enough about photography to recognize the details. For example, look at the photo of Cozy with her Kong to the right. Notice how the background is a smooth silky blur, almost like a watercolor painting? That effect is derived from shallow depth of field while using a quality telephoto lens with a large aperture. In layman’s terms, I used an expensive lens. The nice background blur makes the photo “pop” because your eyes are drawn to the center and there is nothing in the background to distract you. Very nice right? But look at the photo again and think about why it works: that’s a dog who loves her Kong and she’s rearing her head up because she’s about to throw it at me. Even if the background were not so smooth it would be a slightly blurred backdrop of winter trees. The expensive lens made the background, but the photographer captured the image. The photographer knew how to use the nice gear to his advantage, but the dog and the moment in time combined with the composition makes this a great photograph. The creamy background blur is just icing on the cake. In this case, I could probably have recreated that background in Photoshop.
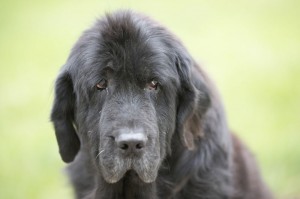 Look at the picture of Daisy to the right of this paragraph. Very nice background blur again, but look at that face! Yes the beautifully blurred background helps you to focus on her face, but even if the grass was more defined, her face is so filled with emotion that the picture would be good even without the expensive lens. Try not to get too wrapped up in equipment and concentrate on composition and technique first.
Here is a trick that anyone can use, and it will improve your photographs of big black dogs like Newfoundlands and Black Labs significantly (assuming you’re not already doing it). You ready? Here we go:
That’s right — it’s that simple. All of the pictures above taken outside during the day, yet I still used the flash. That may seem counter-intuitive, but look at Guinness’s fur to the right. Notice how shiny it is? That is because I used a flash. You see, black fur doesn’t look like black fur without bright highlights on the fur and those highlights are usually lost without the flash. Without the highlights, he would just be a black smudge.
Now to be critical of my own shot here, notice how the background is blurry, but not a smooth continuous color like the above images? Forgetting the technical reasons for that, the bigger problem is the composition. Notice the fence in the background? I do, and it drives me nuts. That has nothing to do with expensive gear, and everything to do with composition. Once again the “who took that picture?” aspect is more important than the “what kind of camera was used?” part of the equation. The lesson? Be careful of what’s behind your subject as it can be just as important as the subject itself.
Composition
Speaking of composition, let’s talk about how to compose your photos. We live in a world where pretty high quality point and shoot cameras can be had for $100, and in the decade since I initially wrote this cell phone cameras have become the norm. The problem with the term point and shoot is that people just point and shoot! Try this for a day: Instead of taking pictures, try composing photographs. What’s the difference? A snapshot is what you get when you point and shoot. A photograph is what you get when you compose an image and wait for the right moment to press the shutter. Semantics to be sure, but let me ask you this: do you think that any of the photographs on this page were lucky point and shoot shots? They were all planned in one manner or another. The benefit of experience is that I can plan them very quickly, and with some practice you can too. Composition of the photo matters more than anything else. With possible one exception: focus.
Focus
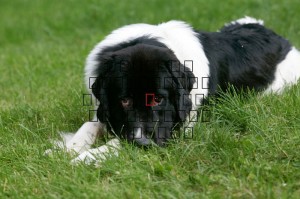 I can fix a lot of problems with Photoshop. There is one thing that I cannot rectify though, and that is an image that is out of focus. Your camera will likely expose your images well enough that extreme lighting problems should be rare, but out of focus images are lost. I see a lot of amateurs take out of focus shots because they don’t realize how to pre-focus their cameras. Every modern camera I’ve handled will allow you to push the shutter button half way. When you do this two things happen: the camera exposes the image, and it focuses the lens. Usually some indication of the spot being focused is shown in the viewfinder or on the screen and the camera may beep signifying focus lock. Zoom into the picture of Annie and you’ll see the focus point active over her eye. Why do this? Speed.
One of the slowest things a camera does is focus. When you just mash the shutter release, the camera focuses, exposes, then takes the picture. If your subject has moved, you missed the shot, or the picture is now out of focus. Many times when I hear people complain that their camera has “lag” or is “slow”, this is the problem. What they should do is push the shutter button half-way and let the camera focus lock, then when the perfect photograph presents itself, push the button the rest of the way. With the camera already focused, the response will be almost instantaneous (assuming a modern camera without other issues of course). Remember that if your subject moves, you may have to re-focus-lock!
On the majority of cell phone cameras you can touch part of the screen and it will not only focus on that spot but expose properly for that area as well!
If you are unsure about where the camera should be focusing, remember this simple rule: Where there are creatures in the photos, the eye closest to the camera should be in focus. This is not a big deal on most small point and shoot cameras, but if you’re shooting with a digital SLR and a nice lens, this becomes very important. In any of the pics above, if the eyes were out of focus, the photo would be trashed.
 Get closer, use a long lens, or crop.
In most of these photos, there is only one, or maybe two subjects in the photo. Where possible, fill the frame with your subject, but be careful not to cut off important parts. When in doubt, include too much. You can always crop it out later, but if you cut it off with the camera, you can’t go back and add it in later.
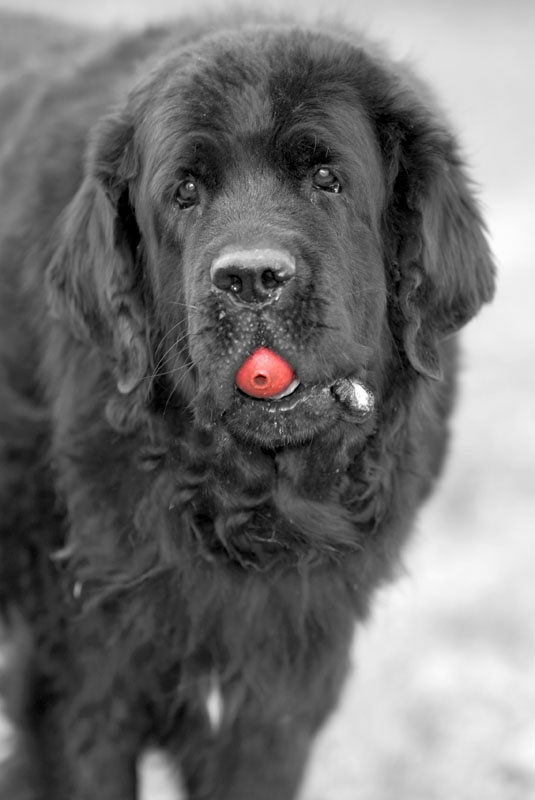
Let’s look at one of my favorite pictures of Cozy. Yes this is another expensive lens image, and yes I’ve gone and done the hackneyed bit of color in a black and white image thing, but forget about all that for now and look at the entire photo. How much of the frame does not contain Cozy? Ten percent? fifteen percent? The frame is filed with Cozy, and there is no doubt that this is a picture of her. Her Kong adds a focal point which is further accentuated by the narrow depth of field and color treatment, but my point is that the image is filled with the subject. By the way, this works especially well with children too. If you can’t get close, get yourself a telephoto lens, and then you can fill the frame from a distance (just be careful about exposure as long lenses are generally slow (they need more light). If you’ve got a camera with a high megapixel count, don’t be afraid to crop out distractions to make your images look like they were composed by a master.
Dirty little secret #1: Every image on this page was cropped by me in post production. Every single one.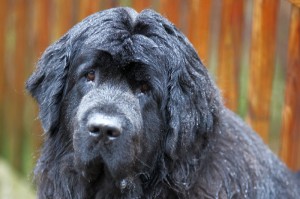 The closer you are, the more of the picture your beastie will take up. The more of the frame is black, the more the camera understands that your beastie is the subject of choice. Once the dumb old camera says “hey, this big black thing is what you want to take a picture of”, you stand a better chance of getting a good shot. Now, this doesn’t mean 95% Newfie and 5% grass all the time, it means a good centered subject with 50% or more of the shot being the beastie. Try it and see. Look at Guinness in the rain. Is there any doubt what this picture is trying to convey? Extraneous information in the shot confuses the viewer.
The Rule of Thirds
The next rule of composition will amaze you when you start to see it, and believe me, you will see it everywhere once you learn it. This little gem of a rule is called the rule of thirds. Look at the nice picture below of Annie being good. Sure it’s priceless because it’s rare that she’s being still, and quiet, and good (I bet she was thinking evil thoughts), but the composition is interesting. What is she looking at? What would make such a mischievous dog sit so still and stare off camera like that?
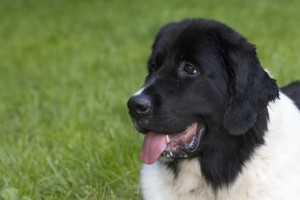 Dirty little secret #2: My daughter is standing where Annie is looking. She is also holding a cookie, which has Annie’s attention. Don’t be afraid to stage the photo you want when pets or children are concerned. Just be quick with dogs or the drool will start to flow.
Notice that this rule contradicts my previous rule about filling the frame? Get used to that because none of these “rules” have to be followed at all times. So why is this photograph interesting when most of it is filled with empty grass? Because of the rule of thirds.
The rule of thirds says that if you take any image, divide it into thirds, then put the subject into one of those thirds, the image will stand a better chance of being interesting. Why? I don’t know. All I know is that it works. Master this and your photos will come alive. Now you may argue that Annie is really filling up half of the image, and you would be right, but take a look at the image with some guidelines added.
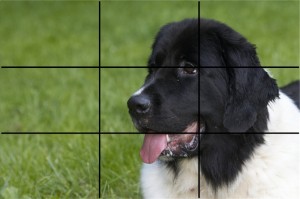 Look where the top and right lines intersect – right over her eye – the same eye that is closest to the camera and is therefore in focus. Also notice the shiny black fur? I bet you’ve been paying attention and correctly guessed that I used the flash.
Eyes are extremely important in photography. If you take a picture of a child, dog, cat, bird, adult, alien, doll, or probably even a friggen’ potato, the eyes are what you will look at because we humans are hard-coded to look at the eyes if they exist. With Annie’s eye at the perfect nexus of thirds, the photo works. The fact that she’s sitting still, was recently brushed and had her ears trimmed doesn’t hurt, but really it’s the rule of thirds I’d like to focus on here.
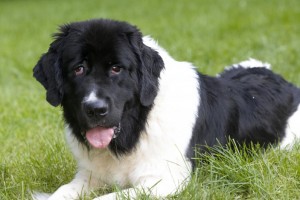 Now let’s combine rules and use the rule of thirds while also filling the frame. I’ll pick on Annie again because she’s being good. I love this photo because she looks nuts! She looks nuts because she has one eye without pigment in her third eyelid and it makes her look sort of lopsided. I swear she’s got a goofy smile and she’s just sort of happy/crazy and isn’t causing any trouble. This picture really captures her personality for me. Every time I walk by her I mutter “goofy dog”, and this picture just makes me want to say it all over again.
My reaction to the photo is one thing, and we’ll talk about that more in a minute, but let’s analyze the image using our newfound rule of thirds knowledge. Get it? Newfound knowledge in our NewfoundLAND dog picture? Seriously, I crack me up.
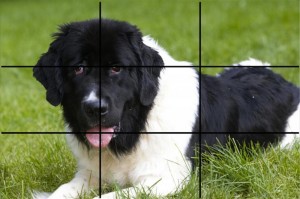 If we add the lines to the image, the thirds intersect right between her eyes. How about one more just to drive the point home. Believe me, if you can master this, you will be impressed with how much more you will like your own photos.
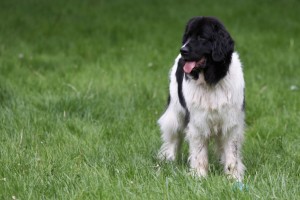
The picture at the star of the next section is an example of Annie and the rule of thirds, but now we don’t need any black lines to figure it out. Notice how she’s looking into the open space? If she were looking in the other direction, the photo wouldn’t work as well. The open space would be wasted because the view will naturally follow her gaze to see what she’s looking at. The fact that she needs a bath in this picture is not germane to the discussion, so let’s not talk about that. Is this picture a stunning photograph? No. But it works because of the rule of thirds. If Annie were standing in the middle of the frame, it would then just be a snapshot. It wouldn’t be interesting, even though it’s the same subject in the same pose with the same background.
Enough talk of my goofy dog and how to split her into thirds. Here are a couple of ideas that might surprise you.
Be Patient
 Watch your dog through the viewfinder (or screen on your phone) for a while. Get a feel for what makes a good picture. When you see it happening, take the picture. Don’t just point and shoot because these pictures invariably end up looking like, well, point and shoot pictures. Think of a picture that you liked in the past and try to reproduce it. Heck, take any of the pics on this page and try to reproduce them. Even if it doesn’t come out well, use that as a learning tool to help figure out how to make the next one better.
Take A lot of Photos
I know that seems to contradict the “be patient” rule, but that’s not what I mean. When I post a photo you see only one of them. That’s one good photo from a set of probably 100 or more. When you go to a gallery to view art, you see the best works the artist has to offer. The crap stays home or gets hung in her mother’s basement, so use the law of averages to your benefit. If you take 1,000 pictures. there’s got to be one gem in there right? Absolutely, but only if with every picture, you try to accomplish something and learn from your mistakes. If you just blindly take 1,000 pictures, one might be great. If you take your time and try to learn new techniques, 10 might be great. After a few weeks of practice, 20 might be great. Get the idea? As with anything, practice makes perfect.
 Digital photography is the best thing to happen to the hobby in a long time, if for no other reason that it made the ability to take a lot of pictures so inexpensive. Back when I shot film, if I fired off 100 pics of my dog in the back yard, I would have had to change the film three times, then brought them in for processing, waited a day or more, and then looked to see if I liked any of them. Today, even on my pocket point and shoot camera, I can take 480 pictures without reloading. On my phone I can take 1000s. The battery is now the limiting factor more than the media. Take advantage of all this technology and go practice. It’s practically free!
Don’t be Afraid to Think Outside of the Box
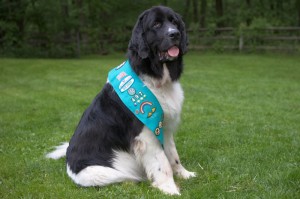
Look at the picture of Annie as a Girl Scout. I had the idea for a Blog story I had written, so I grabbed my daughter’s Girl Scout sash, cleaned Annie up, brought her outside, positioned her, slapped the sash on her, took probably 30 pics, and chose that one. Total time invested: maybe 30 minutes. Sure the idea is cute, but there’s nothing special about that picture. She’s a pretty dog (who’s crazy), sitting in my yard — but she’s a Girl Scout! It’s stupid, it’s funny, and it fits with the story I wrote about her. The picture is another one that’s not a great example of all the rules I’ve thrown at you, but it works because it’s humorous, which makes it another example where the subject matter is far more important than any of the gear I used. Oh, and that goofy picture of Annie the Girl Scout has been viewed, copied, and stolen more than any other photo on my site.
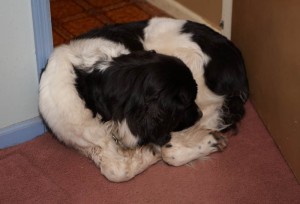 Sleeping Beasts Make Great Subjects
You might be surprised at how much you will cherish the pictures of your sleeping pets when they’re gone. I’m not sure why, but it’s certainly true for me. Take a few nice ones and you’ll be surprised at how much you like them.
Another great tip that applies to pets and children is to get down on their level. Take another look at Annie the Girl Scout and you might notice that I’m kneeling so that the camera is at her face level which makes the picture much more professional looking. If I had stood, it would have looked like a snapshot taken by someone walking by a photo shoot. Many of the face shots of my dogs are taken at their level. This technique, coupled with a filled frame, makes for very expressive and emotional photographs.
As with all of the rules, this one doesn’t always apply, and you have to be the judge of when to use it. Look at the picture of Annie sleeping in the doorway. This photograph actually spawned a Blog entry about Annie pushing limits. From a compositional point of view, it works because from a standing height I can include her entire body and convey that she’s inside the office while still obeying the rules by having 1/10th of her body outside. Goofy dog…
Quick Lighting Tips
When shooting outdoors, try to keep the sun to your back or to the side of your subject. Better yet, take pictures when it’s overcast since bright sunlight is very harsh. Cloud cover filters the sunlight and makes the ambient light much softer which results in better contrast and more vibrant colors. Try it and see, but don’t forget to use your flash, even in bright sunlight.
Try to Capture or Evoke Emotion
 What is the purpose of your photo? Take the photos on this page. What is their purpose? You could argue that they’re here to serve as examples for the subject at hand. That’s true, and very clinical, but it’s not why I took them. Photographs can be used as a means of documentation, and I do that all the time. Photographs of our beloved pets usually mean something more to us though. I propose that the purpose of my photographs is to illicit emotion in the viewer. All of these tips and tricks are great, but they all serve a purpose, and that’s to help make photos that trigger an emotional response. Think of any famous photo. I bet you remember it because of the way it made you feel. Maybe it makes you think of a special time in your life, or a point in history. Maybe it makes you think of a loved one. Maybe it makes you angry. Good photographs illicit an emotional response, especially when they concern people or pets.
So Many Words!
In closing I would like to say that if it’s not fun anymore, why do it? If you find that your killing yourself trying to take good pictures and you just can’t, don’t get all wrapped up in the rules. Taking Newfie pictures should be fun! The more you experiment the better you’ll become, rules or not, and the better you get, the more fun you’ll have, and the more fun you have the more your Newfie likes you. Can you imagine your Newfie liking you more? OK, so that’s a stretch, and in the case of Annie, possibly even frightening.
Here is over 3,500 words distilled into one sentence: Have fun, pre-focus your camera, turn on your flash, and watch for the rule of thirds.
Enjoy!
Donate: PayPal Crypto:
ETH: 0x0AC57f8e0A49dc06Ed4f7926d169342ec4FCd461
Doge: DFWpLqMr6QF67t4wRzvTtNd8UDwjGTQBGs
Gary
Many thanks for this – now I’ve a good idea where I’ve been going wrong and have always blamed the great British weather for the large number of big black smudges I possess.
Do you have any tips on how to get the black beastie photographed at night please?
Judith
Suffice to say the simple best advice I could give is “get closer” or “get a bigger flash”
You don’t say what kind of camera you have, but if it’s a point-and-shoot model, you might be hard pressed to get the results you’re after at night.
The flash on most point and shoot (P&S) camera has an effective range of about 10-15 feet (3-5 meters), and honestly, that’s being generous. Tiny cameras with tiny flashes just don’t have the power to illuminate a black dog at any real distance. Since most P&S cameras don’t allow the attachment of an additional flash, you’re at the mercy of the underpowered built-in flash.
Digital SLRs allow for the attachment of more powerful flashes, but that could be a whole article unto itself.
nice article…good tips…should give something to every shooter :-))
Ah, so those are the secrets! Thanks for the tips, they’ve helped in pictures from water training!
Great article, fantastic advice, and very nice photos! I really should use fill flash more often as you recommended.
A couple of other little tricks I’ve found useful are:
– Use exposure compensation at about -1/3 EV to ensure the black fur appears black and not gray.
– Use the adjustment brush to selectively de-saturate color casts (green on chin from grass, or blue on top of head or back from sky). Kinda cheating, but works well for black and/or white dogs that have distracting color casts.
Thanks!
Brendan
When deciding to really work at getting better pictures of my Astrid, a rottie/mix, I typed ‘how to photograph big dogs’ into my search engine. Your blog was #1 and I see why. Great info…should help me and all who take the time to read your answers to taking better pictures of our black dogs.
Great article, thanks for all the tips. I would never have thought to use my flash outdoors on a black dog. I was just at the beach with my friend’s dogs, and took several head shots of her black dog, and I’m really struggling with the PP – the highlights are overwhelming her black color, and when I adjust saturation or curves, the fur turns blue! I’m going to try some of your tips next time, and hopefully I’ll get more successful shots.
Thanks for this guide! I have big black lab mix dog (well she’s “only” 70 pounds) and have trouble getting good pictures of her. I’m sharing a link to your article in the FAQ on my new website, http://www.reviewofmydog.com. I hope people will read your guide before they send in pictures. It is good advice for photographing any dog, really.